• The move to the new server is done. There are some software and database maintenance updates in process. This has us passing the hat around to help out. We appreciate any donations. Seriously, even a dollar helps. The payment page may be found here - https://www.audiokarma.org/support.html

Wood Receiver Cases/Cabinets-How I Built a Few

Man...great shares all!

Having the right tools is 1/4 the job, the other 3/4 is to be able to use them well.

Veneer can be a b**ch to work with. The thinner, the more probs.

Some day, I'd like to get into dovetailing. That is yet another wood art of the past!


Super results!:thumbsup:


Q
 
You have all the right tools.
But the tools are useless without all the skills you show. Outstanding carpentry.
Me and wood don't get along as well as me and metal...
 
Had to google that one. Cool. Pretty nice that it cuts the miter and the interlock at the same time. In a production shop that would remove a lot of process steps.
https://www.rockler.com/rockler-45-deg-lock-miter-router-bits-1-2-in-shank

View attachment 2446839

But from the short video I watched it looks like there is a lot of trial and error in setting up the router table to make the cuts correctly. Biscuits are more moving parts but pretty fool proof. Maybe I get one of these bits next xmas. . .

Love your avatar. I have an original reel to reel tape of Whip Cream. Its one of my favorite things next to all my other favorite things (original Star Wars laser disc set). blah blah blah.
I use one from time to time. Fussy getting it set up but one set to go you get beautiful and strong miters.
 
Kudos on some great looking work... I don't have the space or the budget to set up a shop like that, but I'd like to think that if I did, I might try similar kinds of projects. I have to wonder though if I would ever get the processs down as well as you have here... Those boxes look really well made! Fortunately for me, my Marantz receiver came with one of those boxes... I really like it and can't imagine the thing without...
 
Very cool, I’ve contemplated doing this, it’s nice to see the process….to decide if I want to tackle it, and what special tools are helpful.

Question: Is the face trim slightly larger than the box to accommodate the thickness of the veneer? Or is it not an issue and it’s the same exact dimension as the outer box dimensions?

cheers,
 
Is the face trim slightly larger than the box

It depends on how you want to do it. On the original Marantz case, the veneer was applied over the face trim. So that is how I did it on mine. On Scott cases there is a bevel on the outside of the face trim. It would not look good to try an bevel veneer as too much of the paper would probably show.. So I butted the veneer to the back of the face trim. The easiest way to do that is to veneer the case first then cut the face trim to match whatever dimensions the case and veneer end up being.

I think I mentioned that some brands have a black band/groove around the case where the case meets the face trim just so they don't have to make a super exact alignment. The only example I can currently identify in my empire of knobs is a Fisher TX300. It looks like this:
upload_2022-1-10_19-15-51.png
But honestly the way the grain flows on the top to the face, it almost looks like the groove is a deliberate design choice.
 
Here are the steps I took to build these wood cases:
View attachment 2446239
After exhaustive searches of the interweb I found only one relatively complete guide on how to build nice wooden cases for vintage (or modern) audio receivers. And now I can't even find that one anymore. So in case there are other fools out there that want to build their own cases I thought I would document my efforts here.

I have piles of vintage audio equipment and most of the pieces will look better with wooden cases. Especially the tube equipment that has been pulled from consoles (NOT BY ME!). So I have gone down the expensive and time consuming path of acquiring the skills and tools, tools, tools needed to do a reasonable job of building these cases. If you only need one or two cases do the right thing and buy them from one of the online vendors. The $300 or so they charge for a case is well worth the price. But if you enjoy building and have all the tools then here are some instructions that may help you.

Enough yacking here we go:
Where can I find an online vendor for wood cases ? Thanks
 
Where can I find an online vendor for wood cases ?

Just doing some google searches led me to this: I have no idea if these are good or bad products.

https://vintagehifiaudio.com/product-category/wood-cases/marantz-wood-cases/

The site I was thinking of "mcintoshcabients.com" seems to have shutdown. Or my Google skills have faded like so many others. Or McIntosh shut them down on a trademark claim. I'm going with the latter because the website looks a lot like the previous one

And I did stumble on the "build log" of someone building a 1030 marantz case:
http://mikepick.com/furniture/marantz_build_log.html
 
I also built a pile of WC-22 cases. I think that is the number. Its a common cases for many many Marantz receivers. And since I have many Marantz receivers it seemed logical to build a few in a mass production line. Here is the one original case I have. It came from a 4270 so it has the huge metal vent plate.
upload_2022-6-7_19-47-41.png
upload_2022-6-7_19-45-57.png
The case has had a hard life.
Some things to note about the construction:
The case is 3/4" particle board with an incredibly thin veneer. I never investigated fully but I think the bevel in the front is veneered particle board also. Very strange.
There are cutouts on the bottom for side vents where the heat sinks are on the receiver.
There is a cutout in the middle for the SQ quad decoder that screws to the bottom of the receiver. (yes I have the decoder and I also have the wired remote volume control in the original box. yea me)
The top vent is pretty much as wide as it can be without cutting the entire top off. That is because the heat sinks are on the sides of the receiver. On other models the heatsinks are along the back or other locations so I did not cut the huge holes on those.
upload_2022-6-7_19-58-32.png
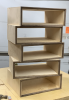
I really got into mass production on this project. I made 5 cases but later realized I needed 7 because I forgot about the pieces I had in my office. That is where I keep some of my favorites. But it is probably good that I have 2 more to make because I made all of these other slightly too large where the face plate goes. Like 1/8" too large but they are all identically wrong. Fail. And the face plate is about the only place where 1/8" gap is really noticeable. Oh well. I think it had to do with some cumulative error from the plywood not being exactly 3/4" thick and my veneer being thicker than the original. And the bearings going out on my table saw. I think that on future case builds I will build the frame for the face FIRST. Then build the wood box to match that face. Especially on cases like these where the frame has to fit exactly.
upload_2022-6-7_20-2-52.png
Google the difference between "precise" and "accurate". . .
Measure once, cut 5 times. blah blah blah.

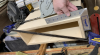
I also noticed that the cases were not gluing up perfectly square. Again probably because the bearings are going out on my table saw. But here is a picture of how to make the frame square once the band clamps are in place:
upload_2022-6-7_20-1-29.png
Put a bar clamp across the long diagonal and squeeze it square. You can also see that I finally figured out that the ONLY smart place to mark the cases is "FRONT BOTTOM". All the other ones get cut out or you can't see them because they are on the top of the case.

I made this template for the cutouts:
upload_2022-6-7_20-5-16.png
I like the idea of having the top and bottom cutouts on the same board. It gives more room to clamp the board down without wasting plywood. For the smaller amplifiers that needed less vent space I just uses less of the cut out. And you can see that I wimped out on cutting the three holes to match the original. I just made one big hole that went side to side. It does not actually have room for the SQ module.
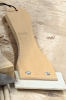
I also got this thing which I like better than the roller for pushing bubbles out of veneer:
upload_2022-6-7_20-8-42.png
I forget what it is called but Amazon kept pushing it to me every time I ordered veneer.

I was not entirely happy with the way the corners on the veneer turned out on these cases. I'll take some detailed pictures to show what I mean. I am going to do a sample or two of putting on the veneer BEFORE making the miter cuts. Just to see if that provides a cleaner finished product. I'll post some finished cases along with those pictures when I get around to it.

 
If you glue the front walnut piece on first, it will save you lots of work. When you cut and miter the top, bottom and sides, the front walnut comes with. I would also put the veneer on before any cutting.

Just suggestions.

BTW, nice cabs.
 
If you glue the front walnut piece on first, it will save you lots of work.
I have tried that on a sample case but the frame splintered when cutting the miters. Maybe some masking tape would have helped the splintering. But I was also trying to standardize the process and some brands of cases have face frames that extend past the plywood which would make sawing some of the miters difficult. But for the WC22 it would probably be a good idea. You can see in some of the pictures there are gaps in the plywood part of my cases. I believe that is because of the bearing going out on my table saw. Since I cut the face frames on a miter saw I can hide those cracks. Solution: Spend a pile of money on a new table saw or a pile of time replacing the bearing. But I have to imagine that people or companies that manufacture these cases are gluing the solid walnut face onto the plywood before they make the miter cuts. It takes out SOOOO many steps. And I will probably switch to putting veneer on before making the miter cuts. I have enough confidence in my miter cuts that I will not have to scrap any boards and mess up my matching grain patterns. In fact it should make matching easier since I don't have to deal with matching grain when contact cement is working against me.

What will do with all the time that I save. . .
 
@FireGuruMN

Great documentation job.

Just a note on a reference you made when using a router template bit to trim veneer or other applications,
they're not intentionally made to leave a little material behind but this is can happen when the glue {contact cement} builds
up on the carbide or bearing due to heat softening or your 90 deg angle is say 91 or 92 deg.
 
Nice work! I used to love my Freud Biscuit Joiner but it's been on the shelf for a long time, have you tried Kreg Pocket Holes? You just need to clamp everthing really good because it always seems to slide 1/16." My huge JET Table Saw is still sitting in it's box, I bought a Makita Track Saw at the same time and found out it's super easy to pull out and use and it doesn't take up a lot of space. I hook it to a Bosch HEPA Vacuum with auto ON/OFF when the tool is engaged and have very little dust. For the track saw I use a Bora Centipede (get the one with a ton of legs) and a sheet of 2" foam board. It saves a ton of space and you can take it anywhere!
 
Here are the steps I took to build these wood cases:
View attachment 2446239
After exhaustive searches of the interweb I found only one relatively complete guide on how to build nice wooden cases for vintage (or modern) audio receivers. And now I can't even find that one anymore. So in case there are other fools out there that want to build their own cases I thought I would document my efforts here.

I have piles of vintage audio equipment and most of the pieces will look better with wooden cases. Especially the tube equipment that has been pulled from consoles (NOT BY ME!). So I have gone down the expensive and time consuming path of acquiring the skills and tools, tools, tools needed to do a reasonable job of building these cases. If you only need one or two cases do the right thing and buy them from one of the online vendors. The $300 or so they charge for a case is well worth the price. But if you enjoy building and have all the tools then here are some instructions that may help you.

Enough yacking here we go:
Putting an amplifier in a wooden box is a Horrible idea. Why don't you just stick in your oven and set it 250-300 degrees. As a retired technician and can say my experience is that amplifier and receivers in wooden cases are twice as likely to have electrical failures/issues due to heat. Even with the minimal venting most have its not a good idea. Of the many 100's of the vintage ones I repaired or rebuilt due to component failure 70-80% of the pieces were in wood cases. The number of major failures on units with no wood case was very very small compared to those that did. Why do you think high end modern manufactures Don't and have never done it. When people say they look better I do not get it.
 
Putting an amplifier in a wooden box is a Horrible idea. Why don't you just stick in your oven and set it 250-300 degrees. As a retired technician and can say my experience is that amplifier and receivers in wooden cases are twice as likely to have electrical failures/issues due to heat. Even with the minimal venting most have its not a good idea. Of the many 100's of the vintage ones I repaired or rebuilt due to component failure 70-80% of the pieces were in wood cases. The number of major failures on units with no wood case was very very small compared to those that did. Why do you think high end modern manufactures Don't and have never done it. When people say they look better I do not get it.
Many of those units you've worked on were probably 50 yrs old and due anyway.
 
Last edited:
Back
Top Bottom