

You are using an out of date browser. It may not display this or other websites correctly.
You should upgrade or use an alternative browser.
You should upgrade or use an alternative browser.
Yamaha M-60 amp restoration planning
- Thread starter Brad1234
- Start date


Looking good. I used the same main filter caps on one of my 60's. The hover space between the new caps and the board bugged me; feared they would slide down over time. So I put some Loc-tite blue on the bracket cinch screws & crossed my fingers.They have to hover in the brackets since there are so many connections on the board under them I guess.
I purchased solder wick/copper braid at our local ACE hardware store, lol. Had a decent electronics section for a chain hardware store.Any suggestions on where to buy the type of hook up wire/braid
Edit: I put heat shrink tubing around the solder wick braid cuz the sight of bare copper flopping around bugged me too. Again, just things I do/did.
Last edited:
I left the main caps alone on my first couple M-60's. Figured I'd milk them 5-10 years. The one I did last winter though got the same CDM's the OP is installing now. I noticed some better bass, better all around. But man, it was a booger installing them. Glad I cut the solder wick in 6 inch strips. Had to have my son help me fish it through while I held the 4 bracketed caps.
Stock was low last winter so I bought the OP's caps and the larger CDM's, wasn't sure which to install at the time. Installed the smaller ones and they rock. Get em while ya can I guess.
I'd rather share my experience with a side of hint than than get too opinionated about main filter caps. I do know the internal electrolyte dries out from time & heat, and still may "test ok". One day those old caps will spill their guts without warning so I'll be slowly swapping them over the next few years in the 60 hoard, lol.
These big suckers will go in one day...
Last edited:
Just curious about the availability of 16V & 24V zeners nowadays. I think I gave up, lol.I am replacing the zeners thru-out.

Brad1234
Active Member
I have an idea for the main caps to help support them, I am going to look for some of those nylon spacers in nuts and bolts aisle at the Home Depot just long enough to be a center support beam under the middle of each cap to help with any sliding. The new caps are a tiny bit smaller than original and slip a little in bracket even fully tightened. Will need to cut a thin strip of rubber shelf paper/neoprene or electrical tape to add around cap to make clamp hold tighter. I plan to use 16 awg solid core copper wire to make the around 1” distance need to reach board. That is my plan so far, will get some pics when parts arrive and get back to the restoration.
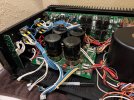
I have done lots of main cap replacing and swapping and they have always had a huge impact on overall sound quality. Speaking of some giant caps, these are in a Parasound HCA-3500 amp I am perpetually working on trying to fix a bias stability issue. They are same 33k uF but 100v, but much larger than my new CDM caps.
I have done lots of main cap replacing and swapping and they have always had a huge impact on overall sound quality. Speaking of some giant caps, these are in a Parasound HCA-3500 amp I am perpetually working on trying to fix a bias stability issue. They are same 33k uF but 100v, but much larger than my new CDM caps.
Attachments
Brad1234
Active Member
Mouser had the 16 and 24V zeners in 1/2 watt.Just curious about the availability of 16V & 24V zeners nowadays. I think I gave up, lol.
I'm considering this on the next one if there's too much play between clamps and new main caps...
2 sided sticky rubber tape jones

2 sided sticky rubber tape jones


Just a small chunk as needed not the whole mud spray roll, lol.
Any thoughts on some permatex black around the clamps?
Any thoughts on some permatex black around the clamps?
These jumpers look rotted...

Brad1234
Active Member
Those are actually new jumpers, the originals were pretty corroded by the glue. The board is scarred a little from the glue but I scrubbed and scraped it as clean as I could get it with isopropyl.These jumpers look rotted...
View attachment 3841342
Attachments

Brad1234
Active Member
A couple dots of some good black adhesive at the seam behind each cap would probably be enough to prevent any slippage down. I found a 1/8th inch thick neoprene rubber sheet on amazon for $20 to cut some strips to add to the clamps for extra grip for the smaller new caps. Here is a pic. It is handy to have for other uses of padding and insulating stuff in other electrical projects too.Just a small chunk as needed not the whole mud spray roll, lol.
Any thoughts on some permatex black around the clamps?
Attachments

That sounds like fun...I plan to use 16 awg solid core copper wire to make the around 1” distance need to reach board.

I wonder if the Japanese engineers back in the day ever imagined we'd be holding these pieces together today with roofing material?A couple dots of some good black adhesive at the seam behind each cap would probably be enough to prevent any slippage down. I found a 1/8th inch thick neoprene rubber sheet on amazon for $20 to cut some strips to add to the clamps for extra grip for the smaller new caps. Here is a pic. It is handy to have for other uses of padding and insulating stuff in other electrical projects too.

My 60's work fine with it so far & no chipmonks get in yet


Asmodeus2112
Super Member
I have a working M70 that needs to be restored too. Post up when you do please. X Power intimidates me some on this one. I'm just getting back into this after moving interstate and setting up my bench again. Still in the middle of rescuing a B-6 that was physically damaged and someone tried to repair and pulled the triac and other stuff.I have an M70 that I fixed but did not restore it yet, still working on my B-1 , that amp intimidates me
Asmodeus2112
Super Member
I plan to use 16 awg solid core copper wire to make the around 1” distance need to reach board.
That is what I did. I used 8ga. tho. Working good so far for me. I used the same caps, the retention bracket was quite tight on my M-65.
Brad1234
Active Member
Update on progress, I have all of the electrolytics replaced and been struggling with main cap replacement. I decided on 16 gage solid wire to connect 2 tiny negative and positive solder points on the 383LX 33k uF Cornell Dublier main caps. So annoying how ridiculously the small the solder attachement point they provide.
Attachments


Brad1234
Active Member
My solution was to use 16 gage solid wire to bridge the 2 tiny solder points on caps and use a 3” piece of 14 gage stranded wire with tips tinned with some solder to allow for easy feading into Yamaha board.
Attachments


I knew that would be a bitch post #53 brotha.Update on progress, I have all of the electrolytics replaced and been struggling with main cap replacement. I decided on 16 gage solid wire to connect 2 tiny negative and positive solder points on the 383LX 33k uF Cornell Dublier main caps. So annoying how ridiculously the small the solder attachement point they provide.
Solder wick braid Jones