

You are using an out of date browser. It may not display this or other websites correctly.
You should upgrade or use an alternative browser.
You should upgrade or use an alternative browser.
2285B recap & binder post conversion
- Thread starter 1978_DREAMER
- Start date


1978_DREAMER
Active Member
That looks great! Did you replace the vellum paper when you did the LED bulbs? Some day after I practice lots, I will recap my dad's old 1030.
Yes, I did the vellum behind the meters. I had one sheet left over from my drafting days that was in great shape so I used it. I didn't have any behind the station panel. Jerry

1978_DREAMER
Active Member
I thought i was done!
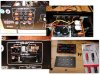
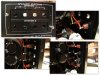
Well I thought that I was done with this until Catrafter put another idea into my mind!! :sigh: I really liked that repair he did where he changed out some poorly fitting binder posts. I just had to upgrade my 2285B!!! Lucky for me I still have access to milling machines and programming help from my friends in the tool room at work. I purchased a bundle of Radio Shack binding posts (#274-662) off of eBay and got busy.:scratch2: I carefully measured up the old spacing, windows and hole positions then drew them up in cad. The binding post holes with flats are really great for not allowing them to rotate and come loose. I thought that I could do some pre-assembly of the posts and slip the plate and all in at once, WRONG!!!!!! This turned into a progressive assemble and solder project. I think it turned out quit nice! Now I just need to find a bundle of good gold plated banana jacks. Thanks Tom, no more spring loaded three handed connect ups!:thmbsp: The assembly and solder work was done with the unit on it's side. Here's how the project progressed:


Well I thought that I was done with this until Catrafter put another idea into my mind!! :sigh: I really liked that repair he did where he changed out some poorly fitting binder posts. I just had to upgrade my 2285B!!! Lucky for me I still have access to milling machines and programming help from my friends in the tool room at work. I purchased a bundle of Radio Shack binding posts (#274-662) off of eBay and got busy.:scratch2: I carefully measured up the old spacing, windows and hole positions then drew them up in cad. The binding post holes with flats are really great for not allowing them to rotate and come loose. I thought that I could do some pre-assembly of the posts and slip the plate and all in at once, WRONG!!!!!! This turned into a progressive assemble and solder project. I think it turned out quit nice! Now I just need to find a bundle of good gold plated banana jacks. Thanks Tom, no more spring loaded three handed connect ups!:thmbsp: The assembly and solder work was done with the unit on it's side. Here's how the project progressed:
Attachments


1978_DREAMER
Active Member
Nice work, looks factory.
Now's your chance to make more plates.
I contemplated that. I just don't know what units this design would work on. It sure made a nice conversion.
1978_DREAMER
Active Member
I just got thinking, I don't think that I cross referenced my speaker built to this thread. If any one is interested here are the speakers that I'm driving with my 2285b;
http://www.audiokarma.org/forums/showthread.php?t=385983
These really sound great since I put all this effort into improving this receiver!
http://www.audiokarma.org/forums/showthread.php?t=385983
These really sound great since I put all this effort into improving this receiver!
JuanPabloCue
New Member
OK, I set the bias and offset DC voltages tonight
Service Manual says to have 00.0mVdc offset, i agree.
but also says... 30mV Bias....
here 30mV sounds less detailed and less dynamic.
have new transistors?
try different settings with no music playing, then play music/listen to find the sweet spot, pause again to change settings, it's an small diference but very interesting.
will see if you get the same number i have.:thmbsp:
Last edited:
1978_DREAMER
Active Member
Sorry, JuanPabloCue, this unit is back in use which makes it labor intensive to take apart. If I pull it to test another unit this fall I may take you up on testing another bias setting. I would like to know from the techs if there is a working tolerance for bias and how much range is safe? I really don't want to put this receiver into any risk. Jerry

Go too low and it can break into output blowing oscillation at the worst and at the least too much distortion noticable at low power, go too high and it can run extra warm to too warm. I stick to the recommended unless there's new transistors installed then see where crossover distortion on a 10-20kHz sinewave disappears as viewed on a scope. Then the bias is measured and pushed a bit higher to be safe at all temperatures.
1978_DREAMER
Active Member
Go too low and it can break into output blowing oscillation at the worst and at the least too much distortion noticable at low power, go too high and it can run extra warm to too warm. I stick to the recommended unless there's new transistors installed then see where crossover distortion on a 10-20kHz sinewave disappears as viewed on a scope. Then the bias is measured and pushed a bit higher to be safe at all temperatures.
Thanks for the data! That's exactly what I needed to know before doing something not smart. I appreciate it. Jerry
Hey 78 Dreamer,
I've been reading your 2285B recapping thread for the last few months because I've been planning to recap mine this summer. Well, the time is now, however, I have a couple of questions for you (or perhaps someone else) before I get started. Oh yeah, thanks very much for all of your great info up to now. It has inspired me to take on this task myself.
1) Did you replace every capacitor inside your 2285B, or just all of the capacitors on select boards, or was it select capacitors on select boards? Please explain.
2) Did you replace any trim pots, or just clean them all? My volume knob crackles like crazy and I've been thinking that I might replace that pot, rather than just clean it, if cleaning alone won't fix the problem, or might only fix the problem temporarily. I have also thought about replacing all the trim pots connected to the front face knobs. Thoughts?
I bought this receiver new in the late 70's, with some JBL L166/Horizon speakers. The JBLs have been reconed, and now the receiver need some love and care. The 2285B has always sounded great with the JBLs, and my Thorens turntable. Originally, my main reason for recapping and tuning up the receiver was because of the crackle in the volume knob, but about a month ago, the right side receiver volume dropped way down in comparison to the left side, making the whole system unlistenable. All of this has finally prompted me into action to fix up the receiver. Anyway, thanks again for any help you (or anyone else) can give me as I go along. I think I'll follow your example and put binding posts on the output of the receiver, since I recently bought some binding posts to replace the horrible, original, twist connectors on my JBL L166 speakers.
I'll post some pictures as I go as well.
Cheers, Bluesman
I've been reading your 2285B recapping thread for the last few months because I've been planning to recap mine this summer. Well, the time is now, however, I have a couple of questions for you (or perhaps someone else) before I get started. Oh yeah, thanks very much for all of your great info up to now. It has inspired me to take on this task myself.
1) Did you replace every capacitor inside your 2285B, or just all of the capacitors on select boards, or was it select capacitors on select boards? Please explain.
2) Did you replace any trim pots, or just clean them all? My volume knob crackles like crazy and I've been thinking that I might replace that pot, rather than just clean it, if cleaning alone won't fix the problem, or might only fix the problem temporarily. I have also thought about replacing all the trim pots connected to the front face knobs. Thoughts?
I bought this receiver new in the late 70's, with some JBL L166/Horizon speakers. The JBLs have been reconed, and now the receiver need some love and care. The 2285B has always sounded great with the JBLs, and my Thorens turntable. Originally, my main reason for recapping and tuning up the receiver was because of the crackle in the volume knob, but about a month ago, the right side receiver volume dropped way down in comparison to the left side, making the whole system unlistenable. All of this has finally prompted me into action to fix up the receiver. Anyway, thanks again for any help you (or anyone else) can give me as I go along. I think I'll follow your example and put binding posts on the output of the receiver, since I recently bought some binding posts to replace the horrible, original, twist connectors on my JBL L166 speakers.
I'll post some pictures as I go as well.
Cheers, Bluesman
Last edited:

1978_DREAMER
Active Member
Hey 78 Dreamer,
I've been reading your 2285B recapping thread for the last few months because I've been planning to recap mine this summer. Well, the time is now, however, I have a couple of questions for you (or perhaps someone else) before I get started. Oh yeah, thanks very much for all of your great info up to now. It has inspired me to take on this task myself.
1) Did you replace every capacitor inside your 2285B, or just all of the capacitors on select boards, or was it select capacitors on select boards? Please explain.
2) Did you replace any trim pots, or just clean them all? My volume knob crackles like crazy and I've been thinking that I might replace that pot, rather than just clean it, if cleaning alone won't fix the problem, or might only fix the problem temporarily. I have also thought about replacing all the trim pots connected to the front face knobs. Thoughts?
I bought this receiver new in the late 70's, with some JBL L166/Horizon speakers. The JBLs have been reconed, and now the receiver need some love and care. The 2285B has always sounded great with the JBLs, and my Thorens turntable. Originally, my main reason for recapping and tuning up the receiver was because of the crackle in the volume knob, but about a month ago, the right side receiver volume dropped way down in comparison to the left side, making the whole system unlistenable. All of this has finally prompted me into action to fix up the receiver. Anyway, thanks again for any help you (or anyone else) can give me as I go along. I think I'll follow your example and put binding posts on the output of the receiver, since I recently bought some binding posts to replace the horrible, original, twist connectors on my JBL L166 speakers.
I'll post some pictures as I go as well.
Cheers, Bluesman
Hey, JBLman, we just got back from college orientation for daughter #3. My re-cap consisted of replacing every electrolytic cap on every board. Catrafter posted a list in the AudioKarma database:
http://www.audiokarma.org/forums/showthread.php?t=266269
This will get you started. My unit had some different boards so ultimately I had to go by what was in the unit. If you've read through the thread then you saw how I tracked the caps by taping them to sheet card, noting their locations. As far as switches, I cleaned all of mine using DeOxit. I worked through each of them at least twice. I also posted an attachment to the sticky on how to disassemble the push switches:
http://www.audiokarma.org/forums/showthread.php?t=266269
This is also a very useful read. I had never soldered components to a circuit board prior to taking on this project but I have been in technical trades all my life and have done much soldering, brazing and welding. Take even more pictures than I did, especially capture the polarity of the caps in their locations. Good luck and take your time. One more thing, build a dim bulb tester if you don't have one, Jerry
Thanks rBuckner, Thanks 1978Dreamer,
1978Dreamer, I have another question for you. It's likely covered in another thread somewhere, but since you just did a 2285B recap, I thought perhaps you could answer it for me.
Once I take all the electrolytic caps off the boards, I'll be ordering my new caps through DigiKey. Jailtime mentioned in this thread that he could see (from your pictures I assume) that you were using some Panasonic FC and Silmic II caps. How did you decide which brand to go with for each of the caps you were replacing? For example, is it Panasonic for power Silmic for sound (audio)? Thought I would make a rhyme.
Could you perchance post a copy of your caps parts list as received from DigiKey?
Thanks again for all your help (and inspiration).
Cheers, JBLMan
1978Dreamer, I have another question for you. It's likely covered in another thread somewhere, but since you just did a 2285B recap, I thought perhaps you could answer it for me.
Once I take all the electrolytic caps off the boards, I'll be ordering my new caps through DigiKey. Jailtime mentioned in this thread that he could see (from your pictures I assume) that you were using some Panasonic FC and Silmic II caps. How did you decide which brand to go with for each of the caps you were replacing? For example, is it Panasonic for power Silmic for sound (audio)? Thought I would make a rhyme.
Could you perchance post a copy of your caps parts list as received from DigiKey?
Thanks again for all your help (and inspiration).
Cheers, JBLMan
I just re-read some of the cap threads here in AK, and I've decided to buy Silmic II caps where I can, and Panasonic FC caps where the Silmic II caps are unavailable.
I'll be starting tonight on the removal of the caps, so if I can, I'll pop up a few pics in the next couple of days.
I'm also thinking I'll recap the crossovers in my JBL 166's since I'm going in to replace the binding posts anyway.
Cheers, JBLMan
I'll be starting tonight on the removal of the caps, so if I can, I'll pop up a few pics in the next couple of days.
I'm also thinking I'll recap the crossovers in my JBL 166's since I'm going in to replace the binding posts anyway.
Cheers, JBLMan

1978_DREAMER
Active Member
JBLman, unfortunately I am not a tech, I probably should have researched where the 2 capacitor brands should have gone. I ended up doing just as you mentioned, Silmic II's where available and balance with Panasonics. Don't forget to search out the list on the AK database to see where to substitute films for tantalums. One area that is an upgrade is to add bypass films to the main caps.
jack0, the drum claps improved immensely with the re-cap and some run time!!! Just cleaning the switches and controls didn't begin to correct that but it did fix nagging issues with channel cut out and volume jumps. Jerry
jack0, the drum claps improved immensely with the re-cap and some run time!!! Just cleaning the switches and controls didn't begin to correct that but it did fix nagging issues with channel cut out and volume jumps. Jerry