• The move to the new server is done. There are some software and database maintenance updates in process. This has us passing the hat around to help out. We appreciate any donations. Seriously, even a dollar helps. The payment page may be found here - https://www.audiokarma.org/support.html

Another A-700 repair thread

guac

New Member
So, I recently bought a Yamaha A-700 amp, without any prior experience in the field. It worked fine until a few days ago.
Without knowing any better I put my record player on top of the amp, with the intention of putting risers below it some time later, well its too late now I guess. Hindsight is 2020.

A few days ago the amplifier started to pop after just a few minutes of playing music and turns off. After waiting sometime I can start it again, but with the same behavior. My guess is, it got too warm, due to the reduced airflow and something in there overheated.

I found some very interesting and informing threads on here which I'm currently working through.
https://audiokarma.org/forums/index.php?threads/a-700-restore.813092/
https://audiokarma.org/forums/index.php?threads/a-700-purchase-and-restoration-advice.712908/

But I'm wondering what are the essential steps to get it back working again? I don't mind soldering and replacing some parts, but currently don't have the time to replace all the parts and essentially rebuilding the amplifier.

My first instinct is to replace the caps, but should I replace all caps or just the bigger ones?


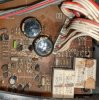
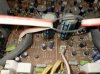
I opened it yesterday to see if I can find anything obvious, as far as I (with my amateur opinion) can tell its just dirty, but there are some "wet" spots, my guess someone spilled some liquid.
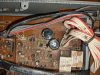
PXL_20210510_161548484.jpg
PXL_20210510_165317152.jpg

The first task I will tackle is to clean up the board a bit with some alcohol and see what surfaces after that.


I would appreciate any tips and tricks regarding the popping issue I experience. I read about the corrosive glue used to hold the caps in place. Any idea which caps and resistors are affected by it?

Thank you all very much
 
Last edited:
Register to hide this ad
The 'wet' spots are most likely glue (DSBG- Dreaded Sony Bond Glue) used to hold bigger components for assembly and shipping. It turns corrosive over the decades. Use acetone or alcohol to soften and remove. Can also be removed by scraping if it's still a little pliable.

The behavior you describe is unlikely to be a cap. Some suspects are transistor, diode, or poor solder connection. Corroded parts could also be the culprit.

The general consensus 'round these parts is to fix the problem before doing a shotgun replacement of parts. So, here are some first steps you can take.

Yes, by all means clean the dust, grime and DSBG and replace any parts that were corroded. Maybe even under the caps.

Get a service manual from HFE or AK Database.

Do you have a meter? If not, get one and heat shrink or tape the probe tips so only a little metal is showing, like 1/8".

Kindly answer some questions:

- Are you in Auto Class A when the failure occurs? Does it happen in both modes?

- is the popping coming from the speakers or inside the amp?

- Does the protection relay click normally?

- Does the turn-off affect both channels and all inputs?
 
@Semanon thank you for your answer. I do have a multimeter, but I'm a bit overwhelmed with the schematics. Where should i start and on which components should i focus.

so i will first clean everything up and then reconnect it. after that i may be able to give clearer descriptions of the issues.


- Are you in Auto Class A when the failure occurs? Does it happen in both modes?

- is the popping coming from the speakers or inside the amp?

- Does the protection relay click normally?

- Does the turn-off affect both channels and all inputs?

1. it happens in both modes, so far I didn't really use the Class A mode
2. the pop comes from the speakers, there is a similar pop when turning the amplifier on
3. I'm not sure what normal is, there is a click a few seconds after turning it on
4. yes, it affects everything. as if the amplifier is turned off. but the lights stay on (iirc, its currently on my table and not connected)
 
Smarter heads will help shortly, but I can get you a little headstart.

When you hook it up, don't plug in speakers. Instead, plug the test leads from your meter into the speaker A jacks...input to something other than phono...volume at 0....unit warmed up for 10 mins. This will measure the DC offset. Read about it in the 1st sticky thread under the 'Solid State' forum.

The click after 4 to 8 seconds after start-up is the protection relay. It protects the speakers at start-up and, more importantly, protects your speakers against damage

If you are getting a pop before the relay kicks in, that's a hint that it could be a power supply issue, but we will need to wait and see.
 
I am not a pro, but a hobbyist. I have worked on enough amps to know some of the basic steps. I agree with what Semanon has told you already, and that there are smarter heads around that I'm sure will chime in. I would add that you should:

1. Get the service manual and check the adjustable settings like bias (Idle), dc offset, dc power. Mini grabber leads for your multimeter are good here. Too many slips with big test leads create more damage by shorting components together. Taking a simple issue into a much more serious fault.
2. Read about a DBT (Dim Bulb Tester) If you are going to desolder components to clean glue, or do a repair it's a good device to have. Although I have heard that DBT's and x power supplies don't play well together, which I believe your A-700 has, so we should verify. Reading one of those A-700 threads they use a DBT with the A-700, so should be fine...
 
Last edited:
Smarter heads will help shortly, but I can get you a little headstart.

When you hook it up, don't plug in speakers. Instead, plug the test leads from your meter into the speaker A jacks...input to something other than phono...volume at 0....unit warmed up for 10 mins. This will measure the DC offset. Read about it in the 1st sticky thread under the 'Solid State' forum.

The click after 4 to 8 seconds after start-up is the protection relay. It protects the speakers at start-up and, more importantly, protects your speakers against damage

If you are getting a pop before the relay kicks in, that's a hint that it could be a power supply issue, but we will need to wait and see.

So I did some crude cleanup, without removing the capacitors and tested it according to the post you mentioned.
The relay clicks after 9 seconds, and the voltage fluctuates between 30mV and 80mV. The service manual talks about 15mV, quite far away

There is no pop but I also don't have the speakers connected, nor do i have any signal going in.
Since I left the cover off I did some hand-thermometer measurements and noticed that some of the resistors (R359, R360, R361, R362, R246, R247, R253, R254, R388, R389) run kinda hot, or hot enough to burn my finger. Is that normal?


@Asmodeus2112 I will look into the DBT and see if I can get the stuff required, I saw it mentioned in the other A-700 threads, so I think it should work fine with this amplifier
 
So I did some crude cleanup, without removing the capacitors and tested it according to the post you mentioned.
The relay clicks after 9 seconds, and the voltage fluctuates between 30mV and 80mV. The service manual talks about 15mV, quite far away

There is no pop but I also don't have the speakers connected, nor do i have any signal going in.
Since I left the cover off I did some hand-thermometer measurements and noticed that some of the resistors (R359, R360, R361, R362, R246, R247, R253, R254, R388, R389) run kinda hot, or hot enough to burn my finger. Is that normal?


@Asmodeus2112 I will look into the DBT and see if I can get the stuff required, I saw it mentioned in the other A-700 threads, so I think it should work fine with this amplifier
I would work on adjusting the bias asap. It will fluctuate for a few minutes until the amp warms up and stabilizes.
 
The relay clicks after 9 seconds, and the voltage fluctuates between 30mV and 80mV.
Yeah, a little high and needs to be fixed, but not dangerous to your speakers.

Bias check is probably a good idea. Burning fingers is not a good thing.
 
I measured again this morning after some longer warm up time. The measurement is now around 100mV but with alot of fluctuation. Will an adjustment of the bias help in this case? Or is the issue somewhere else?
 
I measured again this morning after some longer warm up time. The measurement is now around 100mV but with alot of fluctuation. Will an adjustment of the bias help in this case? Or is the issue somewhere else?
Auto Class A is off? If Auto Class A is off, that is quite high is the SM says 15.5mV. Some moving around is typical. Maybe plus/minus 5mV. Adjusting the Auto A voltage is more involved and looks like it involves three volt meters (well, probably can do it with one, two being better), two 8Ohm dummy loads and a frequency generator. There may/may not be other issues with your amp, but this is a good place to start.

The damage from the glue can be significant, but sometimes harmless. Inspect those areas closely for corroded leads on components, jumper wires etc. Look for dark rings on any resistors. bulging or leaking capacitors. Desolder the capacitors and clean the glue. Inspect the caps and test them. Take a lot of pictures of the area you are working on first so you can refer to them later if you forget about where components go or which way they are oriented. I try to work on one component at a time, or at least the same types so that the possibility of installing them incorrectly is reduced.
 
Last edited:
Checking if it’s a power supply issue could be a next step. Since it pops through the speaker on start-up, and the + side of the speaker is protected by the relay, it may be getting an impulse through the low side. To test, turn off the amp. Then Tuen the speakers off. Finally, turn on the amp. If there is a pop, it’s due to voltage on he ground, perhaps from the PS caps.

You can try the same thing with phones.
 
I agree with @Asmodeus2112 stay away from auto Class A until the simpler Class AB is perfect.

Adjusting idling current will reduce the heat you are getting. This is not the fix for improper offset. That may require parts matching and replacement.
 
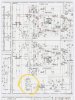
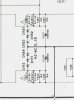
Much smarter minds than mine are going to need to chime in here. I think this is the area that needs more investigation. It...maybe....sets the differential pairs' current....maybe? Circled area in wide shot is detailed in second image. Could account for the high offset. Are the differential pair transistors getting hot? (TR103 to 110)
96F58147-06E3-451A-A4D3-F2477AE368EA.jpeg
88119AC0-B67A-4FF1-8333-9E8620DFBD63.jpeg

So....I’d clean that area it good and remove any glue to inspect for damage. It’s pretty dirty. And the dark area looks like spill or maybe electrolyte. Most likely a spill since it’s also on top of the resistors and connectors.
1CCA8575-2134-4324-82BD-07953E7F2AB0.jpeg
 
Last edited:
Checking if it’s a power supply issue could be a next step. Since it pops through the speaker on start-up, and the + side of the speaker is protected by the relay, it may be getting an impulse through the low side. To test, turn off the amp. Then Tuen the speakers off. Finally, turn on the amp. If there is a pop, it’s due to voltage on he ground, perhaps from the PS caps.

You can try the same thing with phones.
I'm not sure I understand you correctly. What do you mean by turning the speakers off? Disconnect them? Or just turn the channel off?
 
Much smarter minds than mine are going to need to chime in here. I think this is the area that needs more investigation. It...maybe....sets the differential pairs current....maybe? Circled area in wide shot is detailed in second image. Could account for the high offset. Are the differential pair transistors getting hot? (TR103 to 110)
View attachment 2224249
View attachment 2224250

So....I’d clean that area it good and remove any glue to inspect for damage. It’s pretty dirty. And the dark area looks like spill or maybe electrolyte. Most likely a spill since it’s also on top of the resistors and connectors.
View attachment 2224258
I guess I'm not getting around not desoldering those caps to get to all the glue. Any tips to unload them before touching the legs? just hold a resistor to ground? I only have those small 1/4W resistors available currently
 
I guess I'm not getting around not desoldering those caps to get to all the glue. Any tips to unload them before touching the legs? just hold a resistor to ground? I only have those small 1/4W resistors available currently
If the amp has been off for a while they should be drained. Use a volt meter to see by checking for voltage between the caps + and - terminal. Of most concern are the big caps. If you need to drain, then short the cap with a resistor. You will need more than a 1/4W resistor if you have to drain the big caps. Also calculate an appropriate resistance. Too little resistance is almost like just shorting it with a wire and will create an arc which is what you are trying to avoid. Maybe I should, but I hardly think about checking little caps.

FYI, always check the big caps if you have plugged the unit it since you last checked. Since they are connected to the circuit you could get a shock even if you are working on another area of the amp.
 
I guess I'm not getting around not desoldering those caps to get to all the glue. Any tips to unload them before touching the legs? just hold a resistor to ground? I only have those small 1/4W resistors available currently
For small ones, just short the terminals together with an insulated lead. After it's unplugged for a bit, of course. I leave mine on the bench overnight and don't discharge.

Try just cleaning them without removing the caps. Looking again, I'm not sure it's glue. Use tooth brush, Qtips and 99% (or 91%) isopropyl alcohol. If its glue. It will require scraping.
 
Last edited:
I'm not sure I understand you correctly. What do you mean by turning the speakers off? Disconnect them? Or just turn the channel off?
Leave the speakers connected, but make sure both speaker select switches are off. Then see if it pops.

Between the output of the amp section and the speaker terminals are 1) the protection relay and 2) the speaker select switches. If the relay AND switches are off, the only way for a signal to reach the speakers is through the ground path. That's what we are checking.
 
And by the way, if you don't already have it, the schematic at sportsbil.com/yamaha is better. Its cut up onto different pages, but it's in color and a better scan than HFE.
 
I checked now if the speakers pop when turning the amp off. But I didn't get anything. I have the volume turned down all the way and no input selected, both channels off, only the red light for power is on.
Another "discovery" is, that the relay clicks a second time (my guess its turning off) after like a minute, no popping from the speakers or anything. Just a click. But it's strange, sometimes when I try to recreate it, it doesn't happen.

There is also a light hum coming directly from the amplifier, my best guess is from somewhere by C211/C212. Could be normal, I have no clue
 
Back
Top Bottom