
• The move to the new server is done. There are some software and database maintenance updates in process. This has us passing the hat around to help out. We appreciate any donations. Seriously, even a dollar helps. The payment page may be found here - https://www.audiokarma.org/support.html

Butcher block question

motorstereo

AK Subscriber
Subscriber
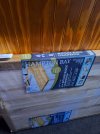
I'm wondering if anyone has any experience using this 1 1/2'' unfinished butcher block? I plan on using it for flexi rack shelves and I'm wondering if the end grains are open and need filling? I also plan on routing edges either a rounding over bit or a cove and I'm wondering if it routs ok? Also plan on doing a radius on the corners. Would a compass and a bandsaw be the proper tools for that? I'm thinking the blade in a jigsaw would lay over and end up looking like hell. Any ideas on working with this stuff would be appreciated.20240106_173426shelfves.jpg
 
Register to hide this ad
Presuming that all those blocks glued together are "normal" wood, proceed as with any thick board; woodworking power tools should work fine. If you were going to plane it down then the hardened glue can wear grooves in the planer blades but as I understand it you're going to leave the thickness as is at 1.5 inches.
  • Router should work same as on other boards. Carbide bits preferable but you shouldn't have that much wear for just a few shelves.
  • Rounding the corners: First thing occurs to me is use a band saw. Since these shelves are good-sized a larger band saw and a skilled operator are desirable, to cut close to the line as you turn the thick shelf, then finish off the radius corner with a sander. The thing here since the shelf is so thick is to keep the corner straight up and down, and blend it perfectly where it transitions to the straight sides. You could do this with hand tools or saber saw etc. but getting a perfect corner would be more challenging. Another method instead of a band saw--use a big bench/floor standing belt sander with vertical sanding disk and just sand down the corners; these machines typically have a large horizontal sanding belt and a large round vertical sanding disk. Actually if you're skilled you could grind down the corners with a handheld belt sander but again keeping the corner straight up and down is more challenging "freehand".
  • I really don't know if open end grain would pose a problem such as with swelling or cracking ("checking") but I doubt it since it'll be indoors. But a poly coat would look nice and be a tougher surface.
 
Last edited:
Thanks for the advice. At over $200 a section I'm nervous about messing anything up. I'm not in a hurry so I'm thinking I will make a stand big enough to rest the shelves on to do the radius on the bandsaw. I've never had luck with a jigsaw radius even with lots of sanding.
Also wondering what would be the best way to cut the shelves? Use the table saw or would a circular saw be alright with minimum splintering?
Right now the plans are to use a dark walnut stain followed by a few coats of sprayed on satin poly. The hardware is 5/8 threaded rod from an old Michael Green audio rack.
 
^^^^ Thanks for the advice and I will do that with the plywood blade. I don't own and I've never used a Forstner drill bit and I wonder if that might be a good idea to keep the holes from splintering? I'm thinking they have to be better than either a spade or a metal drilling bit.
 
I've used paddle bits and gotten good results, but it usually involves drilling part way through from one side, flipping the piece, then finishing from the other direction. Have to run it deep enough that the pilot comes through the back side so it has any chance of having a straight hole though. For something you really want to be nice its probably worth buying the better tool.
 
For something you really want to be nice its probably worth buying the better tool.
This is what I'm thinking to. The bit can be bought for less than $20 so I'll do that. I also plan on using a drill press because I know; I just know I would end up drilling some of the holes crooked if I use a cordless drill.
 
yeah, drill press is nice. One thing I miss about the old cordless drill I had was the bullseye level on the back end and the bubble level on the top. Forget what that drill even was.
 
  • No need to fill the end grain.
  • A round over bit will work just fine. Get a good one CMT, Whiteside, and Amana are great. Don’t buy sets. Don’t by hardware store router bits.
  • Make or buy a 1/4” MDF template to radius the corners with a 1/2” pattern bit like this one. Remove the bulk of the waste with a jig saw leaving a 1/16” - 1/8” for the router.
  • A brad point bit will cut cleanly and faster without a backer board or a drill press. Drill just until the center spur exits the back side and then flip it.
 
Last edited:
I've used paddle bits and gotten good results, but it usually involves drilling part way through from one side, flipping the piece, then finishing from the other direction. Have to run it deep enough that the pilot comes through the back side so it has any chance of having a straight hole though. For something you really want to be nice its probably worth buying the better tool.

Pre drill with a smaller twist drill then you won't need to go so deep with the paddle bit to have the pilot mark the other side.
 
Make or buy a 1/4” MDF template to radius the corners with a 1/2” pattern bit like this one. Remove the bulk of the waste with a jig saw leaving a 1/16” - 1/8” for the router.
Aha; great advice and this is what I'll be doing; thank you. Makes sense and sounds almost foolproof which is exactly what I need.
 
Aha; great advice and this is what I'll be doing; thank you. Makes sense and sounds almost foolproof which is exactly what I need.
Glad to be of help. If you see yourself using a pattern bit frequently on thick plywood or veneer on substrate then upgrading to a solid carbide down-cut pattern bit is better. For super clean 2-sided veneered work upgrade further still to a compression bit which is both a down-cut and an up-cut solid carbide spiral bit.
 
That should work out perfectly I'm thinking. I'll use an original shelf for the template as I like that radius. I have 20 radius's to rout; do you think the one you linked will hold up for them? This is sooo much better than me trying to cut those radius's on a bandsaw. My vision isn't the best; hands aren't the steadiest and I know there would be issues.
 
That should work out perfectly I'm thinking. I'll use an original shelf for the template as I like that radius. I have 20 radius's to rout; do you think the one you linked will hold up for them? This is sooo much better than me trying to cut those radius's on a bandsaw. My vision isn't the best; hands aren't the steadiest and I know there would be issues.
More like 2000.
 
Nothing can be easy; I noticed the shank on that bit was 1/2'' and of course my router only has a 1/4 collet. A search turned up just one 2" flush cut bit with a 1/4" shank and it was a cheap one. I figured there must be a reason they're not available so I ordered an adapter kit which allows the use of 1/2 shanks. I was hoping to find a used router locally with a 1/2" collet but that didn't happen either. Hopefully the adapter kit works.
 
I thought about that but I can go many years without using the router so I don't want a new one. Here's the adapter I ordered. It was under $20 so no great loss if it doesn't work. Problem is it won't be here till the 20th. Till then I will keep an eye out for a deal on a used 1/2" router.
1704828631538.png
 
Back
Top Bottom