• The move to the new server is done. There are some software and database maintenance updates in process. This has us passing the hat around to help out. We appreciate any donations. Seriously, even a dollar helps. The payment page may be found here - https://www.audiokarma.org/support.html

Butcher block question

The issue with stuff like that, the more length you add between the bearings and the tool, the less stiff it all is. Beyond setting it on fire I'm not much good with woodworking but I know if you do that with metal it usually results in chatter and poor surface finish because the tool flexes away from where its supposed to be. I don't know if that would be a problem with wood but I doubt it helps any.
 
^^^^^
Same thing for wood, especially at that thickness.
Maybe with that set-up, take several passes instead of trying to hog off all of the material at once.

1/2" routers are tough to find on the used market but hope that you find one.
 
^^^^Good idea about several light passes.
Yes there's nothing on fb marketplace locally for 1/2'' routers. We have a pawn shop in town that is always well stocked with old power tools. Hopefully I can swing by there tomorrow.
 
Can't go into the woodworking part of it but I took one of those HD butcher block things & cut it down into a desktop w/o incident or difficulty.
The end grain is fine, no filling, no holes. Sandpaper just to knock down sharp edges & to smooth the top between coats of poly. The poly did raise the grain - the sanding was required. Good luck w yr project.
 
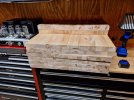
The fun started yesterday. I used a brand new 60 tooth carbide blade on the circular saw which made for some smooth cuts. I clamped a straight edge as a guide for each shelf cut and they all came out great; arrow straight with no splintering. Next step is some 180 grit sanding on the saw marks. Because of the dust I have to do the cutting and sanding outside. It's raining here today so maybe tomorrow I can do some sanding.
I was also hoping to get out of this a little cheaper since it's diy but I can see that isn't going to happen. There's $465 just for the wood in those 6 shelves and another $100 in poly and tools that I didn't have. This project is adding up quickly.20240113_074352wood.jpg
 
Thanks for the advice on the bit @elcoholic. It finally arrived today after being shipped 8 days ago. I had to get creative and add an inch and a half to the router plate due to the extra length of the 3/4'' adapter. The router bit bearing now line up perfectly with the pattern cut out. All I need now is a couple days of decent weather now which is supposed to happen next week.
20240120_121434 router.jpg
 
20240120_205019.jpg20240120_205057.jpg20240120_205113.jpg20240121_084418.jpg20240121_084437.jpg20240121_084501.jpg
I bought this birch butcher block 1-1/2"x25"x48" at Menards, in '18. They were $50 sale priced.

I'm a poor wood finisher. Board ends look like I painted instead of stained.

I used hand drill / forster bit for rod holes. Used board under but still has major breakout. I have a drill press. But nothing to support large work.

I made an AK thread on build. Maybe learn from my mistakes. I'll try to link.

EDIT: After seeing your progress. Don't know if my build thread will be of help to you.
Good luck.

 
Last edited:
^^^^^Thanks for posting the link to your build thread. My plan was to stain mine a dark walnut but after reading your thread that's not going to happen now. Thankfully I have a couple small scraps leftover that I can experiment with. I had also wanted to use an oil stain with the birch but that doesn't seem like a good idea either.
 
Wish I had noticed your thread earlier, as I've installed butcher block counters in kitchens a few times...so if the info is too late, it's too late.
A belt sander and orbital sander are your friends. A belt sander is the best way to radius thick stock safely unless the budget is big..doing it with a router will be a little tough, but since you don't have to pay yourself, just go slow and careful.

From what I've read you are getting good advice about removing most of the cut with a saw and finishing with your router template, but that spacer on the bottom of your router is a bit concerning.. I would make a base that sits on the piece, rather than the tool.
Probably at least 4 times the size of your router base diameter...if the base is 6 inches, make a 12 inch by 12 inch base, like a chunk of 2x12 or maybe one of the other shelves, and clamp it to the work piece securely, maybe under your radius template, with the radius rough cut out of it at the bandsaw, like the shelves before they get routered.

As mentioned, that long router bit that's almost two inches higher than the work piece will probably deflect a bit, just do a couple of light passes until you hear that's it's not cutting wood anymore. Don't go too slow, you'll burn the wood, and then finish with a sander.

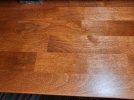
As for finishing, machine sand to about 180 or 220, and then hand sand with something higher, but don't bother going above the early 300's before poly. Only because birch is a bit soft, and can suck in the stain a bit unevenly.
Wipe it all with a damp rag, wait a bit, then polish out the raised grain with the same grit you used to hand sand.
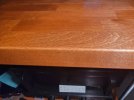
For the edge grain (not the face or side grain) you may want to get some shellac (Zinsser clear) and thin slightly with pure alcohol. The shellac will seal the wood so it won't absorb as much, which is maybe what you want for the edge grain.

I would suggest buying the shortest length of 2x12 you can, use it for your router base, and use the leftover for practice for your routing.

Do at least one full test run of the routing process, preferably two, and use them as test pieces for your stain, since the softwood will be even harder to stain evenly than the butcher block.
If the edge grain is too dark compared to the face and side, add more shellac. If it's too light, either thin the shellac more, or sand some of it back off before staining. Practice on several test pieces, as much as it takes, figure out the right formula, practice on a scrap or two of the actual butcher block, adjust your formula, then stick to that formula with your finish pieces.

 
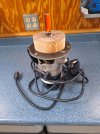
Thanks for the advice on the bit @elcoholic. It finally arrived today after being shipped 8 days ago. I had to get creative and add an inch and a half to the router plate due to the extra length of the 3/4'' adapter. The router bit bearing now line up perfectly with the pattern cut out. All I need now is a couple days of decent weather now which is supposed to happen next week.
View attachment 3094913
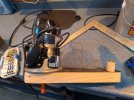
That arrangement will be tippy and tough to control. A tear-drop shaped offset router base would be more stable. They are available online or easy enough to DIY. What make and model number is your router?


1705854975341.jpeg
 
Thank you once again! Now that's a much better idea and it makes perfect sense for a much more stable base. Looks like I'll be scrapping what I made making a teardrop. Not sure what the model the router is. I'm guessing it's from the 60's as some of the paper work says 1966. I saw an ad last week for an industrial router for $10. At that price it was a no brainer and I was hoping it had a 3/4 collet since it was industrial. It did not so now I have 2 1/2" routers.
 
maybe try some tung or danish oil on one of the scrap bits to see what that looks like. A temporary test is just using mineral spirits. Gets you most of the visual look, but give it 20 minutes and it dries so you can do something else if the results aren't what you were after.
 
I've used paddle bits and gotten good results, but it usually involves drilling part way through from one side, flipping the piece, then finishing from the other direction. Have to run it deep enough that the pilot comes through the back side so it has any chance of having a straight hole though. For something you really want to be nice its probably worth buying the better tool.
If the paddle bits have a tooth on each side they make a cleaner hole. I have a few of those. I've collected some Forstner bits too. None of the Forstners were very expensive and they made really nice clean holes.
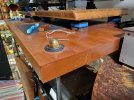
I've even used them on aluminum. As long as you set your drill press to the slowest speed and use a light oil or cutting fluid to cool the bit they work great for aluminum. The key is to go slow. Drill a bit, brush away the Shavings, add a bit of oil and repeat. The three Forstner bits I used on a 1/2" thick face plate are still nice and sharp too.
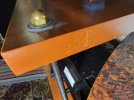
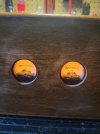
In the second picture, I had to relieve the back side of the thick face plate for the selector and pilot light to be able to get a nut on them. The volume control had to be relieved on the front.
 

Attachments

  • 20240118_114243.jpg
    20240118_114243.jpg
    92.4 KB · Views: 14
  • 20230426_082713.jpg
    20230426_082713.jpg
    131.4 KB · Views: 14
Thanks again @elcoholic. As soon as I saw your pic the dim light bulb went off in my head and yes that is exactly what I need. I scrapped my idea and came up with one similar to what you have pictured. Even used the cut out from the hole saw for the handle. This will be the ticket no doubt and thank you for this great idea.
20240121_144537handle.jpg
 
The jury is still out on how to drill the holes smoothly. I did get a set of forstner bits so I'm leaning towards those. Also have some new hole saws that cut a nice hole. I don't think I'll be using paddle bits as I've never had good luck with them not splintering when they come through. I also have a new metal drill bit that drills a smooth hole. I'll probably try all my options out on a scrap piece of butcher block and see which one works the best.

As far as the stain I have decided it's not going to be stained dark. Natural would be a lot easier but that's not a sure thing yet either. I appreciate all the helpful suggestions.
 
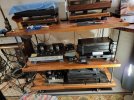
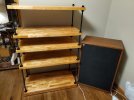
I did not seal the ends on mine. Carpentry was a fine toothed circ saw and spade bits. Finishing was 200 grit sandpaper, followed by a couple coats of stain, then 6 coats of wipe on poly, gloss. There's some boogers in there. Hardware is 3/4" allthread and nuts and washers and neoprene washers in between. Spray painted satin black, assembled, and touched up.

Been up for two years. I need to expand it since I went to quadraphonic and a lot more sources than planned.

Edit: masking tape over the holes, and drill a pilot, and spade bit from each side.


20210314_125638 - Copy.jpg20210324_230650 - Copy.jpg
 
I did not seal the ends on mine. Carpentry was a fine toothed circ saw and spade bits. Finishing was 200 grit sandpaper, followed by a couple coats of stain, then 6 coats of wipe on poly, gloss. There's some boogers in there. Hardware is 3/4" allthread and nuts and washers and neoprene washers in between. Spray painted satin black, assembled, and touched up.

Been up for two years. I need to expand it since I went to quadraphonic and a lot more sources than planned.

Edit: masking tape over the holes, and drill a pilot, and spade bit from each side.


View attachment 3095560View attachment 3095562
That looks great! I'm also a quaddie, albeit only recently got my set up. Still working on the CD4, got the decoder and had my sl1300 rewired, and a good empire DI cartridge, just a couple of bugs in the table to sort out, and then finish building a cabinet for it all...hard in the -20 Celsius weather.
Speaking of which, I'm not sealing my end grain either, I like the way it looks.
I suggested the endsealing as a possible way to cut down on the tone differences if you're dark staining, like a dark walnut.. Like I say, I dig it, so for my own stuff I don't but some people dislike it and the end sealing approach can work.
Thanks again @elcoholic. As soon as I saw your pic the dim light bulb went off in my head and yes that is exactly what I need. I scrapped my idea and came up with one similar to what you have pictured. Even used the cut out from the hole saw for the handle. This will be the ticket no doubt and thank you for this great idea.
View attachment 3095539
There ya go, That looks perfectly stable and safe, and like it didn't take longer that the main project, which I hate about some jigs.
 
Back
Top Bottom