• The move to the new server is done. There are some software and database maintenance updates in process. This has us passing the hat around to help out. We appreciate any donations. Seriously, even a dollar helps. The payment page may be found here - https://www.audiokarma.org/support.html

Butcher block question

So much for my idea about routing the radius's today. I turn the router on and it starts vibrating like a jackhammer. I turned it off quickly thinking there's a bent shaft in the router. All looks good though. The bearing has no slop and I recheck all my connections and retighten and no change. Come to find out the shaft on the brand new adapter is slightly bent. Almost impossible to see it but sure enough under close inspection the adapter shaft is bent. Just great; now I can start a dispute with the ebay seller. What fun would a project be without extra aggravation.
 
Hey motorstereo,

I need some clarification, please.

You are using a router with a 1/2" collet, correct?
And your router bit has a 1/2" shaft?

Wondering why you are using an adapter and the 2" block?
In your photo, there is a lot of shaft exposed which will certainly cause chattering.

In my shop,this is what I would do:

Make a template out of a 3/4" x by maybe 6" square piece of plywood.
Cut, sand your radius on one corner of the template.

Pencil the radius on all 4 corners of your shelf.

Jigsaw the excess material on all 4 corners of the shelf, leaving 1/8" of material to the line, at most.

Screw the jig to the bottom of the shelf, with countersunk flathead screws (you can putty the holes later-they won't be seen underneath.)
Obviously, flush the edges of the template to the edges of the shelf.

I would probably clamp the template to the shelf for installation with the screws.
Screw holes in the jig would be 11/64" clearance.
Pilot the shelf with a 1/8" bit through the jig and install the screws, remove clamps.
This will keep the jig from walking as you install it.

Since you have a top-bearing bit, clamp the shelf face-side down on the bench, overhung obviously so as not to route the bench.

Here is the tricky part if you have never done it (practice on a scrap piece or 2)
BACKCUT with your router-
In other words move the router in the opposite direction that you normally do and nibble away at the excess material, little by little.
This is not an exact science...and feels entirely wrong, but it works.
You certainly want to have a firm grip on your router and have your body of to the side of the cut which you would do anyway.

For the finish cut, run your router in the normal direction.

The basic challenge is that you are trying to remove a lot of material, as you know.

A single pass could probably be done on an overhead 3-phase Onsrud industrial router-but guessing that you don't have one of those... :)

Hope that this is helpful.
 
Last edited:
Thanks for the reply. Yes I've done and plan on doing almost everything you've mentioned. The routers I have take 1/4'' shanks and that's why I needed the adapter as the bit I have is a 1/2'' shank. I have 1/16- 1/8" of material left to remove as I took off most of it with a bandsaw. The pencil marks are showing on the pieces and I could probably do it with a belt sander if all else fails. That's a hack way of doing things I think and I really want to avoid it if possible.
It would be easy peasy I'm thinking if it wasn't for the out of round adapter. I tried it again thinking maybe just maybe I overlooked something but no. There's no way it will work as the vibration is downright scary. I put the adapter in my drill chuck and spun it up and sure enough the run out is easy to see on that. The adapter would be ok at portable drill speeds but at 20,000 rpm it really is a mini jackhammer.

Years ago I actually did a lot of routing. I shiplapped pine boards for my living room, tongue and groove pine board doors and did round over and cove bits for all the trim in my home. I have a good idea of what to do and what not to do but with the adapter being skewed I feel it would chatter and ruin the corner. In a worst case scenario the extreme vibration would loosen the collett and the bit would fly out requiring me to get stitches or worse.
 
You’re welcome, iI didn’t realize that you had so much router experience.

Hope that you weren’t offended.

Not to beat a dead horse but I thought that you found a used 1/2” router?
 
You’re welcome, iI didn’t realize that you had so much router experience.

Hope that you weren’t offended.

Not to beat a dead horse but I thought that you found a used 1/2” router?
No not offended at all. I hadn't used one in about 25 years and a refresher course is always welcome as there's always something to learn or relearn. As far as being experienced I'm of the opinion that I know just enough to be dangerous.

No the router I found wasn't a 1/2" unfortunately. But at $10 I couldn't leave it even though I more than likely won't use it again for many years.

I ordered a bit with a 1/4" shank but the problem is it's only 1 1/2" cutting edge. There are no 2" bits to be found with a 1/4'' shank. I'm thinking the rounding over bit will get the tiny amount I might miss. At this point I'm really wishing I'd left the corners square.
 
Before I found a 1/2” router, I had the same dilemma with length.

I found a collet on eBay that enabled me to use a 1/2” shank bit in my 1/4” router.

As you know, collets are brand and model specific.

Might be worth a look.
 
I've done this a buncha times. Use a coaster or better a hockey puck to draw the radius top and bottom and transfer the end of the radius up and down the side of the piece and sand until the line is still only slightly visible. I usually like to use a wood rasp to make sure it's all straight, then finish with an orbital. I only drew lines the first couple of times, you get a feel for it.

 
No not offended at all. I hadn't used one in about 25 years and a refresher course is always welcome as there's always something to learn or relearn. As far as being experienced I'm of the opinion that I know just enough to be dangerous.

No the router I found wasn't a 1/2" unfortunately. But at $10 I couldn't leave it even though I more than likely won't use it again for many years.

I ordered a bit with a 1/4" shank but the problem is it's only 1 1/2" cutting edge. There are no 2" bits to be found with a 1/4'' shank. I'm thinking the rounding over bit will get the tiny amount I might miss. At this point I'm really wishing I'd left the corners square.
A pair of 1 1/2” cutting length bits can get this done safely and cleanly. Use a top bearing bit with the pattern to cut the top half of the radius on all 4 corners. Change to a bottom bearing bit, flip the shelf and use the previously cut radius to guide the finishing cuts. Just make sure the cutting lengths will overlap taking into account the thickness of your template.
 
@elcoholic
Great suggestion!

@motorstereo now owns at least 2 routers so he wouldn't have to do any bit changing.
And you are only removing half of the material per operation instead of trying to hog all of it.
 
Last edited:
Well I do know a fair bit about wood as I make butcher block counters tops usually Maple ...
Not sure about your adapter here ... could end up too high depending on your router , my advice would be to get it cut at a shop and save your self buying crappy tools , router can be agressive when attacking 1.5 inch solid wood ...
 
As it turned out the adapter was slightly out of round which caused a terrible vibration. I'm receiving a refund on it and I now have a 1/2" router bit that will never get used. I ordered a 1/4" bit a week ago and it came in yesterday. I'm hoping to get back to work on the project today. If it wasn't for the radius's the rack would likely be finished by now.
 
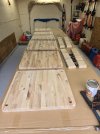
Finally some progress. Holes are drilled, routing and radius's are done and everything has been sanded with 120 grit. Stain is getting applied this afternoon and hopefully that goes well.

The only thing I have some concern about is some of the smaller pieces have a slight bow. Hopefully I can straighten them by clamping. They're going to be a base for my tt cover. If not I'll stick with my old oak base. I also got lucky with some big sheets of cardboard today as we had a new kitchen table delivered. Now the old table underneath the cardboard won't get stained.

I appreciate all the helpful suggestions I've gotten. There's no way I would've gotten the results I've gotten without all the helpful guidance.
20240131_120317shelves.jpg
 
Good stuff! Did you end up using the 1/4 inch bit? If you have time, let us know your process.
Thanks; Yes routed the radius and used a roundover bit for all the edges. Not much to it once the set up is done just go carefully and if the cut isn't perfect or close to it just rout it again. Routing was actually the easy part. Drilling the holes and getting every one of them to line up perfectly was much more of a hassle.

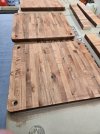
I was able to get a coat of light walnut stain on them. I started with undersides just in case I didn't like what I saw. I'm thinking I may do another coat of stain and see how that looks.
20240131_145341 stain.jpg
 
Last edited:
If you don't mind my asking; where did you purchase the blocks and how much were they? I am having a vision in my head, but feel the final cost may be out of my realm to pay for it all, at this time.
 
Back
Top Bottom