

You are using an out of date browser. It may not display this or other websites correctly.
You should upgrade or use an alternative browser.
You should upgrade or use an alternative browser.
Butcher block question
- Thread starter motorstereo
- Start date


Home Depot. I got 1 6' section and 1 8' section. It was $465 just for those 2 pieces. At that price I went to great lengths to make sure I did not screw up anything. So far so good with no major screw ups. There were a couple of slight boo boos but I was able to hide them in the back.If you don't mind my asking; where did you purchase the blocks and how much were they? I am having a vision in my head, but feel the final cost may be out of my realm to pay for it all, at this time.
If I had to do it over again I'm thinking I would not. I had no idea this project was going to be this expensive or this much work. Thankfully I had most of the hardware as that would've added at least another $200 or more. I did have to buy a box of washers and just that box was $22. Stain was $13 poly was $11 router bits were about $50. The end is close now as the first coat of poly went on today.
I'm a builder, carpenter, cabinet maker so here's a few suggestions, tricks if you will. Routing maple is easy, but it's very hard. Make sure your bits are sharp and go slowly. It can burn. If it does, no worries, it'll sand it off. Run your router in the direction opposite of the way the bit spins to prevent tear out. Drilling holes: A sharp bit is mandatory. Drill from both sides to prevent tear out. If it splinters a little. no biggie. Knock off the rough edges with some sand paper and here's a nice trick. Put a small round over bit in your router and run the router around the perimeter of your hole. It'll clean up the edges and wires will pass through easier. Rounding over the corners. Here's what I would do. I wouldn't use a stationary tool to cut the radius'. Your material is too big and heavy to try to hold. Clamp your material down securely. Mark your corners, Anything round will do. Rough cut it. Basically knock off the excess material, I'd use a skill saw. Now with your material clamped, round the edges over to your marks with a belt sander with a course belt. Hold the sander against your body and just work it gently making sure to hold it plumb. It'll make perfect round corners. Just go slowly.
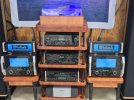
I finally finished the rack today and could not be more pleased. 1 coat of light walnut stain and 3 coats of satin oil based poly gave a nice low luster finish. I used 320 grit between coats which helped with a smooth finish. Thankfully the 3/4'' rods didn't get their paint knocked off during the assembly. All the hardware got spray painted black with a semi gloss clear on top. I used gorilla duct tape on the wrench jaw to keep the nuts from getting marked and that idea worked. I even had enough material to make a new and matching base for my tt dust cover. Thanks to everyone for the helpful suggestions. I used a LOT of those ideas.
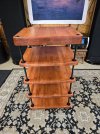
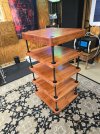
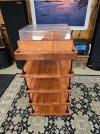
Nice clean jobI finally finished the rack today and could not be more pleased. 1 coat of light walnut stain and 3 coats of satin oil based poly gave a nice low luster finish. I used 320 grit between coats which helped with a smooth finish. Thankfully the 3/4'' rods didn't get their paint knocked off during the assembly. All the hardware got spray painted black with a semi gloss clear on top. I used gorilla duct tape on the wrench jaw to keep the nuts from getting marked and that idea worked. I even had enough material to make a new and matching base for my tt dust cover. Thanks to everyone for the helpful suggestions. I used a LOT of those ideas.
View attachment 3110604View attachment 3110605View attachment 3110606

Here's the rack all loaded up and put back into it's spot. A supreme hassle was getting it off the metal pieces on top of furniture sliders once it was in place. The 3/4'' rods have heavy duty spikes so I wanted to take advantage of that. Sure enough they did make for a very nice upgrade. Once it was set into place and I spun my first record I was amazed at the difference as I can now use the sub during lp playback. A few lp's tell me that a heavy spiked rack is easily the best mod I've done for my lp's in many years and maybe ever. Heck I may even start listening to vinyl once again.
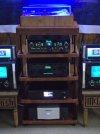
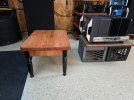
I now have butcher block amp stands to match the new rack. What a fun project that has kept me busy for most of the year so far. The stands are made to slide out as the rack is spiked and not able to be moved easily. I may have gone overboard on building the stands for sturdiness but they'll each be holding 147lb amps. Better safe than sorry.

So, re-reading your first post, all you needed was a little encouragement.I'm wondering if anyone has any experience using this 1 1/2'' unfinished butcher block? I plan on using it for flexi rack shelves and I'm wondering if the end grains are open and need filling? I also plan on routing edges either a rounding over bit or a cove and I'm wondering if it routs ok? Also plan on doing a radius on the corners. Would a compass and a bandsaw be the proper tools for that? I'm thinking the blade in a jigsaw would lay over and end up looking like hell. Any ideas on working with this stuff would be appreciated.View attachment 3081823
You obviously have the skill.
Nice job!
Thanks; plus advice from fellows in the know helped me out a great deal. I bought just barely enough butcherblock to get the entire job done with no extra material for a possible "accident". I was nervous about making a mistake but all I ended having for waste was 2 small pieces 3" by 11". Taking my time (patience is not one of my virtues) and listening to helpful advice worked well in keeping the mistakes at almost zero.So, re-reading your first post, all you needed was a little encouragement.
You obviously have the skill.
Nice job!
Last edited:
Thanks; plus advice from fellows in the know helped me out a great deal. I bought just barely enough butcherblock to get the entire job done with no extra material for a possible "accident". I was nervous about making a mistake but all I ended having for waste was 2 small pieces 3" by 11". Taking my time (patience is not one of my virtues) and listening to helpful advice worked well in keeping the mistakes at almost zero.
That's all you need is a little patience and coaching with carpentry or cabinet making. Measure twice, cut once. Being in the building business for many, many years I have plenty of experience. But when we have a job or project that's complex I build it in my head. I'll go over and over each step to make sure I get it right and figure out the best course to take. Just think it through and plan the next step and you'll be fine. Nice job.