• The move to the new server is done. There are some software and database maintenance updates in process. This has us passing the hat around to help out. We appreciate any donations. Seriously, even a dollar helps. The payment page may be found here - https://www.audiokarma.org/support.html

Crossover upgrade on RF-83's

Register to hide this ad
A history of mods

The RF-83 is a damn good speaker right out of the box but being the person I am nothing stays 'stock'. The first mod I did when I got these was to replace the internal wiring (the Monster cable looking stock wires were all oxidized around the terminals and down the wire a few inches) which made a nice improvement, especially in the bass.

The next mod was to block one of the three ports which took out some of the boom (these speakers go down to 29Hz) that was from room modes. After I did that the tweeter was too hot so I put a 5-ohm resistor in place of the buss-strap between the woofer and tweeter binding posts.

A little later I put adhesive damping pad material in the back-side of the horn. Another incremental improvement.

About a year ago I tried to add ferro-fluid to the horn drivers (they don't have any in the stock configuration) and it made things worse(!)- not what I was expecting; but in hindsight it altered the resonant frequency and changed the mechanical characteristics in such a way that it was no longer compatible with the crossover as designed. I cleaned it out and things were back to normal.

This put things back in balance and I enjoyed them this way for about 5 years. Until yesterday.

Though these speakers always sounded (and measured) nice and flat I would get fatigued after listening for about an hour or so, depending on music (the more simple acoustic stuff I could listen longer). There was an in-your-face quality that I didn't realize was there until after I did the crossover mod.

I read about how Dean G. modified someone's RF7II crossovers to great effect with just a handful of components so I thought I'd give it a whirl.

The layout is 3rd order on the tweeter and 2nd on the bank of 3 woofers. I ordered enough components to replace all the caps and resistors on the tweeter board and bypass caps for all the main filter caps but not the zobel caps.

I was going to replace all the resistors in the zobel networks but only ended up replacing the series pads in the tweeter network. I ordered Mills for the series resistors and Dayton audio grade for the zobels. I measured and compared the inductance of the stock resistors and they were exactly the same as the 'low-inductance' ones I purchased, so I left them in. Interestingly, the Mills 5-ohm resistor and the generic 5-ohm cement I was using for the external 'pad' measured exactly the same too. :scratch2::scratch2:

So after the modification I listened to a Pablo Today Basie album that I'm familiar with and here are my initial impressions:

At first there was a murky haze but this lasted less then a minute. Maybe my amp wasn't all the way warmed up. Then I noticed that, with the volume set to were I usually play music it didn't seem as loud.. and that I could hear 'into' the music more, there was more 'space' between notes, more silence. I could hear reverb tails deeper and transients seemed sharper. And the soundstage - I hadn't really heard it before, now stuff was over here, over there and back over there.. It's hard to describe without going into a bunch of audiophile lingo but even my wife commented on how good the sax sounded (she was first chair tenor all 4 years in High School jazz band).

I'll post pics and schematics after a bit but the wife just left so I'm going to go play some more music..:smoke:
 
Last edited:
Pictures, etc.

Ok, so the original parts look good, that's why I never bothered upgrading them.
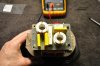
The first pic is the tweeter board, the second is the woofer board.
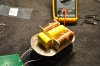
The third shows the board with the caps and the 1 series pad resistor removed. That glue is a bitch!
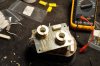
The fourth shows the tweeter board with the new caps and resistor installed, with bypasses on the two tweeter series caps in the 3rd order HP section. I ended up putting the original cap back into the zobel.

I used a great glue called 'Fix-All' to glue the components back to the board.

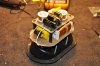
On the woofer board I simply bypassed the 'shunt' capacitor in the 2nd order filter.

The values are as follows:

3.9uf Jantzen Cross-Cap
5.6uf Jantzen Cross-Cap
.1uf Dayton film and foil
3.7 ohm Mills resistor

I'll post the schematic next.
 

Attachments

  • DSC_0164.jpg
    DSC_0164.jpg
    58.6 KB · Views: 126
  • DSC_0165.jpg
    DSC_0165.jpg
    73 KB · Views: 114
  • DSC_0166.jpg
    DSC_0166.jpg
    69.4 KB · Views: 100
  • DSC_0167.jpg
    DSC_0167.jpg
    69.4 KB · Views: 113
  • DSC_0168.jpg
    DSC_0168.jpg
    75.1 KB · Views: 128
Last edited:
Here's the schematic, hand drawn so it looks professional and stuff..

Keep in mind there's another 5 ohm series resistor (Mills) on the binding post so the total series resistance to the tweeter is around 8 ohms.
 

Attachments

  • DSC_0169.jpg
    DSC_0169.jpg
    27.9 KB · Views: 126
I have a pair in storage. Always thought crossover was the main shortcoming of the RF-83. Someday I'll get to mine.
 
Encouraged

After seeing this forum I decided to upgrade the entire crossover on my RF83's. I pulled the drivers, pulled out the terminal cup and removed the crossover boards. I purchased Solen Hepta inductors replacing all four. The capacitors are Solen AGM Silver series with .1uf bypass caps in the tweeter crossover but I did not put bypass caps in the Zobel network. The bass crossover caps are Solen PB series caps also with .1 bypass caps. All of the resistors were replaced with Mills resistors. I had to mount the components on a sheet of plastic (one for bass and one for treble) and mounted them to the sides (at the very bottom back side below and to the sides of the terminal cup) of the cabinet. All of the wiring was replaced with custom silver plated oxygen free cooper wire. The gauge to the bass drivers is 12 gauge and the tweeter is 16 gauge all multi stranded. All of the wiring to the drivers and terminal cup were soldered using silver solder. After breaking in the new crossovers for 24 hours I have much clearer mid-range and the edginess in the tweeter is gone. I also have much better depth in the music. I can place instruments and vocals much easier. Finally, I actually have to turn down my volume control about 2 db from before the mods. Thanks for posting the schematic it made it easy to order the parts without having to disassemble the crossover and measure the inductor values.
 
"Thanks for posting the schematic it made it easy to order the parts without having to disassemble the crossover and measure the inductor values. "

You bet.:thmbsp:
 
I'm curious if anyone tested the specs on the three woofers used in the RF-83. Are they wired in parallel? I would like to know the dcr on the woofers if possible. Anyone know? Thanks.
 
Yes, they are wired in parallel. I have the Theil / Small paramaters at home on my hard drive, as measured with the Dayton Audio DATS system.
 
Resurrection of a long dead thread here.. I've done another great mod on the RF-83's that I've now had about 15 years (or longer?). I installed PRV polymer horn drivers and re-engineered the crossover for the tweeter to match the new parameters. HUGE improvement over the stock tweeter drivers. If anyone is interested in the parts and crosover design let me know and I'll get into detail here.

The mid to high range is much smoother and more detailed across the board. Vocals sound much more vivid and real, horns have more texture and overtone...

Very happy. The highs, even after the above crossover mod mentioned in 2014, have always been a little bit fatigued but no longer.

I was puzzled at the original crossover design; it didn't follow a standard filter profile but I guess that's the prerogative of the manufacturer.
 
Last edited:
Back
Top Bottom