
• The move to the new server is done. There are some software and database maintenance updates in process. This has us passing the hat around to help out. We appreciate any donations. Seriously, even a dollar helps. The payment page may be found here - https://www.audiokarma.org/support.html

De-Soldering Questions

Prysmatyk

Member
Some of you have seen my post about fixing the DC Offset on the M7 receiver I have. I'm still going about gathering my equipment and learning about soldering better than I currently can as well as using junk to practice on, but I have a question about de-soldering on the M7.

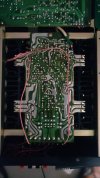
Being new to electronic repair I never expected the underside of the boards to have thick rivers of solder covering large areas of components. After reading about this and asking AI about the whjy it is there, I learned this 'glob' of solder was used to isolate 'like' components and ensure the soldered pieces stayed put.

While I am able to use the braided copper for de-soldering, this is a crap ton of solder to wick up and with the boards being older and easily damaged by too much heat, how does one remove that river of solder without overheating the board and replace it properly?

I'm sure there is a trick or method to it, but non of the vids I've seen has shown this type of repair.

If anyone has a means to do this without making a mess or causing the heat to penetrate the board which would/could lift the traces, I'd be willing to give you immense amounts of gratitude.

Thanks in advance.
(PIC COMING SOON)
 
Register to hide this ad
I saw the suckers on that site before posting my question which now after your response, I have a new question.

Once I use the 'sucker' to remove the solder, how do I remove the solder from the sucker? Doesn't it solidify inside the sucker making removal difficult from the tiny little tube it gets sucked into?
 
Output board showing the river of solder.

Once I remove the solder, I will assume I must replace the solder like it was in the pic. This is where the anxiety rears its head. I know I can accomplish this but before anything I need to know I have the proper way to do so.
 

Attachments

  • IMG_20260402_083801.jpg
    IMG_20260402_083801.jpg
    84.8 KB · Views: 88
I saw the suckers on that site before posting my question which now after your response, I have a new question.

Once I use the 'sucker' to remove the solder, how do I remove the solder from the sucker? Doesn't it solidify inside the sucker making removal difficult from the tiny little tube it gets sucked into?
The heated one i have has an air bulb and you just blow it back out. The cold ones have plastic tips usually. Solder won't stick well at all and I tap it off/out.

Its like a soldering iron in that the better it is, the easier and better your work will be. Braid works great in some cases, but especially on bigger joints a suckered is great and will clean the hole and pin much better.
 
Once I use the 'sucker' to remove the solder, how do I remove the solder from the sucker? Doesn't it solidify inside the sucker making removal difficult from the tiny little tube it gets sucked into?
When the solder is sucked up into the sucker it is very 'flakey' - not hard and in blobs. Manual solder suckers have a removable tip - which easily unscrews or unclips from the body of the sucker. Remove the tip, and tap the sucker over a bin and the solder should fall out.

Braid works great in some cases, but especially on bigger joints a suckered is great and will clean the hole and pin much better.
Very true, also Braid is expensive, use the sucker to get the vast majority of solder off - then use braid for the last bits.
 
The heated one i have has an air bulb and you just blow it back out. The cold ones have plastic tips usually. Solder won't stick well at all and I tap it off/out.

Its like a soldering iron in that the better it is, the easier and better your work will be. Braid works great in some cases, but especially on bigger joints a suckered is great and will clean the hole and pin much better.
Appreciate the insight and direction. I see they're either cheap 30$ or hundreds.. Might choose to get the more costly 'station' just to have the gun and automatic functionality.

What I expected to be a relatively cheap entry is turning out to be more costly than anticipated but still satisfying. Plus, I could spend my money on something useless like a subscription to my local gym.
 
I don’t see why that “River” of solder needs to be removed. You only need to remove it where the component legs are on the parts you want to replace. Unless I’m missing something.

Also, if you apply flux to the braid it works much faster! I have some flux that’s the consistency of jelly. I just brush it onto the braid. Works way better!

Good Luck! Mark
 
Some of you have seen my post about fixing the DC Offset on the M7 receiver I have. I'm still going about gathering my equipment and learning about soldering better than I currently can as well as using junk to practice on, but I have a question about de-soldering on the M7.

Being new to electronic repair I never expected the underside of the boards to have thick rivers of solder covering large areas of components. After reading about this and asking AI about the whjy it is there, I learned this 'glob' of solder was used to isolate 'like' components and ensure the soldered pieces stayed put.

While I am able to use the braided copper for de-soldering, this is a crap ton of solder to wick up and with the boards being older and easily damaged by too much heat, how does one remove that river of solder without overheating the board and replace it properly?

I'm sure there is a trick or method to it, but non of the vids I've seen has shown this type of repair.

If anyone has a means to do this without making a mess or causing the heat to penetrate the board which would/could lift the traces, I'd be willing to give you immense amounts of gratitude.

Thanks in advance.
(PIC COMING SOON)
You should not have to remove all of the solder . Just enough to remove the component.
Also, You might want a desoldering tool , like the Hakko fr-301 .
 
I don’t see why that “River” of solder needs to be removed. You only need to remove it where the component legs are on the parts you want to replace. Unless I’m missing something.

Also, if you apply flux to the braid it works much faster! I have some flux that’s the consistency of jelly. I just brush it onto the braid. Works way better!

Good Luck! Mark

I agree. There is no need to remove all of the excess solder, just around the thru-holes.
 
I don’t see why that “River” of solder needs to be removed. You only need to remove it where the component legs are on the parts you want to replace. Unless I’m missing something.

Also, if you apply flux to the braid it works much faster! I have some flux that’s the consistency of jelly. I just brush it onto the braid. Works way better!

Good Luck! Mark
I figured I didn't need to remove all of the solder but removing the glob around the component is what causes the trepidation.
Getting enough removed to see the components leg and to ensure it's clean enough to remove and replace is where the concern lies.

I suppose the info given is more than enough with some practice and patience.
 
Some of you have seen my post about fixing the DC Offset on the M7 receiver I have. I'm still going about gathering my equipment and learning about soldering better than I currently can as well as using junk to practice on, but I have a question about de-soldering on the M7.

Being new to electronic repair I never expected the underside of the boards to have thick rivers of solder covering large areas of components. After reading about this and asking AI about the whjy it is there, I learned this 'glob' of solder was used to isolate 'like' components and ensure the soldered pieces stayed put.

While I am able to use the braided copper for de-soldering, this is a crap ton of solder to wick up and with the boards being older and easily damaged by too much heat, how does one remove that river of solder without overheating the board and replace it properly?

I'm sure there is a trick or method to it, but non of the vids I've seen has shown this type of repair.

If anyone has a means to do this without making a mess or causing the heat to penetrate the board which would/could lift the traces, I'd be willing to give you immense amounts of gratitude.

Thanks in advance.
(PIC COMING SOON)
Look up Soldapullt.
 
I also agree with @Stereodiver. Just remove the solder holding the components you want to work on.

It was expensive, but once I used my Hakko FR301 for the first time, I understood. It's so worth it! @billyz is right!
So I should bite the proverbial bullet and spend the 300 for the tool... well now, I see this hobby is FUNDS and games. lol

Of course, I am not opposed to borrowing one from someone... jk
 
So I should bite the proverbial bullet and spend the 300 for the tool... well now, I see this hobby is FUNDS and games. lol

Of course, I am not opposed to borrowing one from someone... jk
I am happy I did! The cost is not just the money. With good tools like the Hakko (there are likely other good options), you get a much cleaner result, and you save A LOT of time.
 
Well with this new information my time frame is extended as I'll need to save a bit before the investment but I am sold on the Hakko or similar product. Ease is much better for the aged than technique. lol
 
Well with this new information my time frame is extended as I'll need to save a bit before the investment but I am sold on the Hakko or similar product. Ease is much better for the aged than technique. lol

There is really no substitute for a good de-soldering station if you are going to be doing a lot of repairs on thru-hole circuit boards.
 
I buy the cheap spring loaded solder suckers for about $10. They work just fine. You can clear the nozzle with a micro screwdriver that you would use for tightening glasses or a small nail. I have both a solder removal station and a soldering iron with a suction bulb but I don't use either very often.
After using any of the solder suckers, you will probably need to use a braid to clean up the holes or surfaces. I get two sizes, a thin for small trace and a wide for tube sockets and terminal boards.
 
Back
Top Bottom