

You are using an out of date browser. It may not display this or other websites correctly.
You should upgrade or use an alternative browser.
You should upgrade or use an alternative browser.
Mach One 4024, 4024A, 4029 Information and Upgrades!
- Thread starter Raddek
- Start date


videolady201
AK Member-Design Engineer
4024a vs 4029, a comparison
This is a recap of what I found different so far between the 4024a and the 4029. Test graphs will be coming!
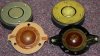
On the tweeters the 4024a model has a paper voice coil, the 4029 has an aluminum voice coil. The 4024a dome is mounted to a card board form and the 4029 is on a plastic form. I had stated before that you could add Ferro-Fluid to the 4024a and now that I know it has a paper/card board voice coil I no longer suggest adding any Ferro-Fluid. I believe it will attack the form and make it fail. The 4029 also measures around 1.2 ohms less which should give it a little more output which is much needed. Both units have alignment tabs to center the voice coil. I will test the SPL later and post the output of each unit. Both are very good build quality.
On the midrange units the 4024a also has a paper/card board voice coil and again the 4029 mid has an aluminum VC. The impedance of the 4024a and the 4029 match and the output of each should be the same. The 4029 has a self aligning dome assembly while the 4024a does not. This only matters as the unit is put together. Everything else is the same between the two.
More to come...
This is a recap of what I found different so far between the 4024a and the 4029. Test graphs will be coming!
On the tweeters the 4024a model has a paper voice coil, the 4029 has an aluminum voice coil. The 4024a dome is mounted to a card board form and the 4029 is on a plastic form. I had stated before that you could add Ferro-Fluid to the 4024a and now that I know it has a paper/card board voice coil I no longer suggest adding any Ferro-Fluid. I believe it will attack the form and make it fail. The 4029 also measures around 1.2 ohms less which should give it a little more output which is much needed. Both units have alignment tabs to center the voice coil. I will test the SPL later and post the output of each unit. Both are very good build quality.
On the midrange units the 4024a also has a paper/card board voice coil and again the 4029 mid has an aluminum VC. The impedance of the 4024a and the 4029 match and the output of each should be the same. The 4029 has a self aligning dome assembly while the 4024a does not. This only matters as the unit is put together. Everything else is the same between the two.
More to come...
Attachments



pete_mac
Super Member
Once again, LOVE YOUR WORK!!
In light of the above, how would you align everything on the 4024a's? It is something easily done by the home DIY'er?
The 4029 has a self aligning dome assembly while the 4024a does not. This only matters as the unit is put together.
In light of the above, how would you align everything on the 4024a's? It is something easily done by the home DIY'er?
videolady201
AK Member-Design Engineer
4024a vs 4029
The magnet flux of each mid and tweeter models measure the same! Both midrange domes are of the same material, the mid housing, the complete assembly, all the same. The only thing I find different is the alignment tabs on the front plate and the VC material! I haven't done it yet but I will. I believe that both mid horn units will sound very much the same and measure the same as well. Those test are coming...
Both tweeters use the exact same dome material as well. The 4029 being darker in color is only from being stained by the Ferro-Fluid in them, they are both coated textile domes. The method of VC alignment in each model is different, but again the real difference is in the VC of the two. I do expect to see a difference in the measurements between the tweeters. Those test are coming too...
The magnet flux of each mid and tweeter models measure the same! Both midrange domes are of the same material, the mid housing, the complete assembly, all the same. The only thing I find different is the alignment tabs on the front plate and the VC material! I haven't done it yet but I will. I believe that both mid horn units will sound very much the same and measure the same as well. Those test are coming...
Both tweeters use the exact same dome material as well. The 4029 being darker in color is only from being stained by the Ferro-Fluid in them, they are both coated textile domes. The method of VC alignment in each model is different, but again the real difference is in the VC of the two. I do expect to see a difference in the measurements between the tweeters. Those test are coming too...
Last edited:
videolady201
AK Member-Design Engineer
Status
No, I am not, I promise. I am trying to get my head above water. I have been slammed at work again. Big water leak and the carpet had to be replaced after the class window. It's killing me... I feel bad you guys have waited so long. I promise as soon as I can finish it I will post the info. I have to keep the boss happy first as this other is on the side. Thanks for you guys not giving up. It is coming..!!!!:yes:
Videolady is just building up the anticipation...
No, I am not, I promise. I am trying to get my head above water. I have been slammed at work again. Big water leak and the carpet had to be replaced after the class window. It's killing me... I feel bad you guys have waited so long. I promise as soon as I can finish it I will post the info. I have to keep the boss happy first as this other is on the side. Thanks for you guys not giving up. It is coming..!!!!:yes:

pioneersound
Active Member
I have a pair of these packed away in storage, there still in desent shape
the grills could use some new fabric and one of the dust caps is pushed in
I was wondering if anybody new a good way to fix the cap or should I even
bother. I would like to get the cap fixed and put them up for sale. I"m looking
to up grade my amp and tuner and I have to many speakers already ( so she says )
any advise. Thanks
the grills could use some new fabric and one of the dust caps is pushed in
I was wondering if anybody new a good way to fix the cap or should I even
bother. I would like to get the cap fixed and put them up for sale. I"m looking
to up grade my amp and tuner and I have to many speakers already ( so she says )
any advise. Thanks

newguy1
Super Member
I was wondering if anybody new a good way to fix the cap or should I even
bother. I would like to get the cap fixed and put them up for sale.
any advise. Thanks
Some advice would be to use the search function at the top. Discussed many times elsewhere in AK.

Buttercup
Well-Known Member
I have a pair of these packed away in storage, there still in desent shape
the grills could use some new fabric and one of the dust caps is pushed in
I was wondering if anybody new a good way to fix the cap or should I even
bother. I would like to get the cap fixed and put them up for sale. I"m looking
to up grade my amp and tuner and I have to many speakers already ( so she says )
any advise. Thanks
I've had success using black electrical tape... just press a piece on the dust cap leaving both ends free and quickly but gently pull the dent out. It may take several attempts.

robmorin
Mr. Legacy
Some people claim they are glued, but removing mine did not prove that....
Once all 8 nuts are removed, and some versions, like mine have an L bracket that also needs to have a nut & bolt removed, you simply wiggle it out towards the front of the speaker , NOT the back, so it exits the front. a little bit of tapping with the palm of your hand on the magnet in the back can help too... i figure most of the horns are just stuck due to being in there for decades without being removed...
When i removed mine, i just wiggled and tapped it out gently.... then it was easy to free it after that....
When i put mine back i will add some sticky caulking tape , like 1/8 of an inch around the area of the edge of the horn, to help seal air leaks...
Hope this helps a bit... just do not be too harsh with the horn...

Good Luck
Once all 8 nuts are removed, and some versions, like mine have an L bracket that also needs to have a nut & bolt removed, you simply wiggle it out towards the front of the speaker , NOT the back, so it exits the front. a little bit of tapping with the palm of your hand on the magnet in the back can help too... i figure most of the horns are just stuck due to being in there for decades without being removed...
When i removed mine, i just wiggled and tapped it out gently.... then it was easy to free it after that....
When i put mine back i will add some sticky caulking tape , like 1/8 of an inch around the area of the edge of the horn, to help seal air leaks...
Hope this helps a bit... just do not be too harsh with the horn...
Good Luck

re installing horn
I see you happen to be in Montreal ,at the moment my neck of the woods. When reinstalling the horn i picked up some closed cell 1/8 weatherstripping and lined to the exterior mark of the horn assembly and just used an awl to puncture holes to allow the bolts to re-enter the box. It seals it very well and will allow for removal in the future if needed. Pete
I see you happen to be in Montreal ,at the moment my neck of the woods. When reinstalling the horn i picked up some closed cell 1/8 weatherstripping and lined to the exterior mark of the horn assembly and just used an awl to puncture holes to allow the bolts to re-enter the box. It seals it very well and will allow for removal in the future if needed. Pete