

You are using an out of date browser. It may not display this or other websites correctly.
You should upgrade or use an alternative browser.
You should upgrade or use an alternative browser.
Mini-tutorial: How to disassemble Marantz pushswitches for better cleaning/de-Oxiting
- Thread starter Leicalover
- Start date


Leicalover
Love vintage cameras too!
Quadtech, thank you for the detailed tips!
I have another one: While pulling out the switch, you can just pull the big rounded spring over the small ones. It hold them. The cleaning is much safer then.
:tresbon:
I have another one: While pulling out the switch, you can just pull the big rounded spring over the small ones. It hold them. The cleaning is much safer then.
:tresbon:

I'm looking for a 2235B Dolby switch shaft. Does the store in Taipei you reference have a website?
I've decided not to pull the shaft out. But I would like the silver button for the Dolby switch on a 2235B as the shaft broke flush with the button (more or less) prior to my purchase of the receiver. I will glue/epoxy the button to the shaft stub. Does anyone know of a source for the button?

TR6man98
Well-Known Member
I've tried to follow the procedure since the power swich on my 3300 pre-amp started acting up; well, I've removed the spring and the white shaft doesn't go out no matter how I pull.
Maybe metal piece and spring inside are loose and blocking it?
No mater what, I can't make swithc back to work.
Any advice apart from getting a new swith?
I might as well do that but button seems to be bonded to the old shaft...:<
thanks
Maybe metal piece and spring inside are loose and blocking it?
No mater what, I can't make swithc back to work.
Any advice apart from getting a new swith?
I might as well do that but button seems to be bonded to the old shaft...:<
thanks

harleyrider
Super Member
We all know, that the switches of the Marantz receivers often cause problems. In most cases, it is sufficient to spray de-oxit in there as often recommended here on AK. But the spray will go all over the board, too. I don't like that so much... ;-)
Sometimes, I also had really dirty switches with bad contacts. The switch even did not MOVE properly. So I thought it is better to remove the switch. You can easily clean all contacts then.
Here is how I do. You do not even need access from the inside of the receiver. (but it`s of big advantage though....)
One word on the beginning: please use this small tutorial at your own risk! If your switches are working well, there is probably no need to do this, of course. It's on you to decide! Make yourself familiar with how the switch works before you start! This is just, how I do it. If you don't feel to have very skilled fingers, better don't do it. Thank you.
Here we go:
First remove the front of course and put the receiver upside down. Here it is a 2245.
VERY IMPORTANT: the switch has to be in the OFF-position:
Pull the little spring towards yourself and hold it in that position until you have access to the little metall piece you see on the top.
Now, lift up that piece carefully and pull the switch out. It's a good idea to have a look inside too, to see how it works. If you know, and with a little bit of practice, it's possible to do it from outside only...
Take care of the little springs inside. There is a spring behind every contact on the stick. They easily get lost and tend to fly through the whole working room!
WARNING AGAIN!!! EDIT: As of today (January 2011) I receive nearly every second week a message from people who lost at least one of these little springs! I have not many left and if you loose this spring, I cannot help you anymore with spare part springs! So, be careful! And again: If you do not feel to disassemble the switch, don't do it. Thank you for your understanding!
Here I added a photo, of what you can expect:
Now you have acess to the contacts for cleaning. Don't forget to clean the contacts inside the unit, too. These are usually worse, than the one on the stick. Use a cotton swab, or whatever you like. :thmbsp:
Reassemble vice versa:
Done!
If you want, you can put a little bit of grease on the moving elements. (Where the metall piece is)
Here another switch:
Some switches have a different mechanism, they look like this. I havent figured out yet, how to open them. And there might be others, I dont know. :sigh:
Thanks for watching and good luck.


Ok i got how to remove the switch itself , i had a broken one . But what about getting those silver caps off the switch itself ? How can this be done with out breaking the switch ? Thanks and thank you for the imfo on this .
Leicalover
Love vintage cameras too!
If they don't come off easily, leave them on.
Leicalover
Love vintage cameras too!
Great tutorial and great pictures! Thank you so much!
These switches are in other units also, not only in Marantz.
Great! :tresbon:
Jan.
These switches are in other units also, not only in Marantz.
Great! :tresbon:
Jan.

1978_DREAMER
Active Member
Let me try this again. "other style Marantz push switch"
This thread has really opened my eyes on how these push switches function! I thought that I was prepared to attack my 2285B, until I noticed that my switches go together different. I settled for working in some Deoxit as best that I could and that corrected some of my receiver problems. Now I am re-capping this unit and I thought that this would be a good time to understand my style of push switch. What I learned is that these can be opened up if needed but I'm going to try to get by cleaning them without dis-assembly. After conferring with one of the moderators I was instructed to add to this already great thread. As stated by Leicalover, proceed at your own risk! Here's how mine came apart:

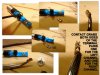
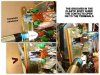
First pull back the spring and capture it with a tie wrap or piece of wire.

There are 4 small tabs that hold the plastic cap in place, carefully bend each one up until they clear the cap and remove the cap.

Don’t loose the reversing link or the return spring. You can now pull the center unit out.

This style switch has 2 ‘U’ shaped contacts. These straddle the terminals as you push the switch in.

These photos show the standing grooves in the housing that guide the contacts to the terminals.
I need to add more photos than the system allows so this is continued on my next post.
This thread has really opened my eyes on how these push switches function! I thought that I was prepared to attack my 2285B, until I noticed that my switches go together different. I settled for working in some Deoxit as best that I could and that corrected some of my receiver problems. Now I am re-capping this unit and I thought that this would be a good time to understand my style of push switch. What I learned is that these can be opened up if needed but I'm going to try to get by cleaning them without dis-assembly. After conferring with one of the moderators I was instructed to add to this already great thread. As stated by Leicalover, proceed at your own risk! Here's how mine came apart:
First pull back the spring and capture it with a tie wrap or piece of wire.
There are 4 small tabs that hold the plastic cap in place, carefully bend each one up until they clear the cap and remove the cap.
Don’t loose the reversing link or the return spring. You can now pull the center unit out.
This style switch has 2 ‘U’ shaped contacts. These straddle the terminals as you push the switch in.
These photos show the standing grooves in the housing that guide the contacts to the terminals.
I need to add more photos than the system allows so this is continued on my next post.
Attachments


Last edited:
1978_DREAMER
Active Member
"other" continued

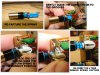
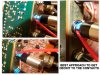
Now replace the tie wrap with something that doesn't take up as much space so that when you get the unit slid back into the housing you have room to start the plastic cap back on. Be gentle, you don't want to force anything, those contacts are thin!!! Remove the spring capture & slide the unit in far enough to install the cap. Be sure the leg of return spring is in the groove allowed for it in the cap and seat the cap. Test the operation while holding the cap in place. If it works bend the 4 tabs back over the cap, locking it in place.

I am currently more comfortable just working in the Deoxit as shown in the last photos. Those contacts are very thin and the one that I had out wasn't formed real well, making it a little tricky to re-assemble. Good Luck! Jerry P.S. I see that I didn't photograph putting the contacts back into their pockets before sliding the shaft back into the assembly, don't forget them!!!
Now replace the tie wrap with something that doesn't take up as much space so that when you get the unit slid back into the housing you have room to start the plastic cap back on. Be gentle, you don't want to force anything, those contacts are thin!!! Remove the spring capture & slide the unit in far enough to install the cap. Be sure the leg of return spring is in the groove allowed for it in the cap and seat the cap. Test the operation while holding the cap in place. If it works bend the 4 tabs back over the cap, locking it in place.
I am currently more comfortable just working in the Deoxit as shown in the last photos. Those contacts are very thin and the one that I had out wasn't formed real well, making it a little tricky to re-assemble. Good Luck! Jerry P.S. I see that I didn't photograph putting the contacts back into their pockets before sliding the shaft back into the assembly, don't forget them!!!
Attachments
Last edited:


Gum Parker
Active Member
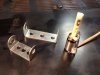
Yet another idea for retaining springs on those little round push switches so you can get those darn tiny pins back in.
I am finding myself often doing a quick cleaning with just the faceplate off.
First I am fighting the spring so I can remove the tiny pin to get the inside of the switch out. Next, a DeOxit cleaning the switch and button's contacts -(as thoroughly explained already in this thread).
So at this point, reassembly gets tricky. My solution was to make a reusable piece of metal to function as a spring retainer. I'm not sure where these little brackets came from, but they seem to bend into shape with a little elbow grease. - (Might be pieces from an Erector Set).
http://www.audiokarma.org/forums/attachment.php?attachmentid=333424&stc=1&d=1330736828
I put the CLAW end above the spring, (with the Ivory colored ridge side of the push switch facing the metal back with the hole in it). Pull the claws (with the spring now compressing) toward the silver button end until it fits snugly into the half round opposite end of the spring retainer.
This should now give you a compressed spring, with both of your hands now free. It can be easily put back into the slot, so you can get that tiny pin back in without having to fight the spring.
http://www.audiokarma.org/forums/attachment.php?attachmentid=333423&stc=1&d=1330736828
Once the pin is back in place, I find the claw spring retainer clip comes off with little problem.
I hope this helps some of you DIY folks. I have spent way too much time searching for these tiny pins that have fallen into the inside of my projects, as well as on the floor. Some say that "necessity is the mother of invention" I would then surmise, "laziness" might well be it's father. I enjoy solving these little problems. Enjoy! - Gum
I am finding myself often doing a quick cleaning with just the faceplate off.
First I am fighting the spring so I can remove the tiny pin to get the inside of the switch out. Next, a DeOxit cleaning the switch and button's contacts -(as thoroughly explained already in this thread).
So at this point, reassembly gets tricky. My solution was to make a reusable piece of metal to function as a spring retainer. I'm not sure where these little brackets came from, but they seem to bend into shape with a little elbow grease. - (Might be pieces from an Erector Set).
http://www.audiokarma.org/forums/attachment.php?attachmentid=333424&stc=1&d=1330736828
I put the CLAW end above the spring, (with the Ivory colored ridge side of the push switch facing the metal back with the hole in it). Pull the claws (with the spring now compressing) toward the silver button end until it fits snugly into the half round opposite end of the spring retainer.
This should now give you a compressed spring, with both of your hands now free. It can be easily put back into the slot, so you can get that tiny pin back in without having to fight the spring.
http://www.audiokarma.org/forums/attachment.php?attachmentid=333423&stc=1&d=1330736828
Once the pin is back in place, I find the claw spring retainer clip comes off with little problem.
I hope this helps some of you DIY folks. I have spent way too much time searching for these tiny pins that have fallen into the inside of my projects, as well as on the floor. Some say that "necessity is the mother of invention" I would then surmise, "laziness" might well be it's father. I enjoy solving these little problems. Enjoy! - Gum
Attachments

1978_DREAMER
Active Member
Those spring retainers are SLICK! I could have used those on my style switches too. Nice idea! Jerry


slim60
Member
Just started experiencing a problem with the power switch on my Marantz 2230 - it won'y stay in the 'on' position. I depress the button, the lights come on and everything, but it doesn't seem to 'catch' and stay on when I release the button.
I'm wondering whether this is a symptom of something that requires cleaning, or perhaps dis-assembly for a look-see inside, or if it makes more sense to simply replace the button?
ETA: looks like consensus is these power switches are vulnerable and often need replacement. No amount of DeOxit seems to be able to make the switch stick in the ON position. Now just need to order the part and try and get the old one out (to me it's in a kind of awkward space to work).
I'm wondering whether this is a symptom of something that requires cleaning, or perhaps dis-assembly for a look-see inside, or if it makes more sense to simply replace the button?
ETA: looks like consensus is these power switches are vulnerable and often need replacement. No amount of DeOxit seems to be able to make the switch stick in the ON position. Now just need to order the part and try and get the old one out (to me it's in a kind of awkward space to work).
Last edited:
Hello, I am a new forum member from Finland. I recently acquired a ”new” huge amplifier/receiver for to be used with my vintage record players, a beautiful Marantz MR-250 which is fully functional and after a good cleaning seems to be in a quite nice condition excluding the missing power button and some minor pitting in a couple of knobs. Because of the missing power switch the previous owner sold me this unit for 90€, I think it still was a bargain and I already love it.

Now the problem is that I cant find a similar replacement power button anywhere, the ones found with google search are plastic (the button bar itself which is surrounded by a spring) and mine is metallic slide which goes all the way throught the button ”housing” - When you open the amps wooden casing you can see that the metallic button slide comes through from the back of the button mechanics (Check the third picture) when you push the button all the way in. You can pull it back and forward with small pincers via the empty hole and make the unit go on and off but that is pretty annoying in everyday use. Inside the amp there also seems to be four different terminals where the wires are soldered on the top of the button housing and some kind of hanging ”balls” in a plastic sack under it all.


What kind of new power switch should I get for a replacement that would have same dimensions/values/functions as the original? The worst part is that I dont have the original silver cap so if anyone here knows where to get a new complete button unit with the cap I would be really greatful. I am not that experienced in soldering or in electronics in general, I might be able to unsolder the old button and replacing it with a new complete unit if there isnt any other serious ”electrical stuff” involved in the process. If there is be a forum member willing to sell me one please send me a PM. A link to a compatible button mechanism would also be highly appreciated. Please help me make this old amplifier whole again
Now the problem is that I cant find a similar replacement power button anywhere, the ones found with google search are plastic (the button bar itself which is surrounded by a spring) and mine is metallic slide which goes all the way throught the button ”housing” - When you open the amps wooden casing you can see that the metallic button slide comes through from the back of the button mechanics (Check the third picture) when you push the button all the way in. You can pull it back and forward with small pincers via the empty hole and make the unit go on and off but that is pretty annoying in everyday use. Inside the amp there also seems to be four different terminals where the wires are soldered on the top of the button housing and some kind of hanging ”balls” in a plastic sack under it all.
What kind of new power switch should I get for a replacement that would have same dimensions/values/functions as the original? The worst part is that I dont have the original silver cap so if anyone here knows where to get a new complete button unit with the cap I would be really greatful. I am not that experienced in soldering or in electronics in general, I might be able to unsolder the old button and replacing it with a new complete unit if there isnt any other serious ”electrical stuff” involved in the process. If there is be a forum member willing to sell me one please send me a PM. A link to a compatible button mechanism would also be highly appreciated. Please help me make this old amplifier whole again

Rob Burns
Member
Arghh!!!! In trying to clean the tape monitor switch on my 2325, I succeeded in getting the switch out. After an hour trying to get the little springs back in place with the small plate, all was good. Then I tried to figure out how the small locking pin fits back under the main spring on the switch. Stupidly, (and by gad I am stupid) with needle pliers I was putting the pin in place when it popped out of the pliers and went into the unit. Could not retrieve it. Love the 2325, but lose a piece inside it and you are doomed. Now I have a tape monitor switch that does not engage.
Warning!!!! This is a "riskier" task for amateurs like myself...take heed of the warnings at the start.
Warning!!!! This is a "riskier" task for amateurs like myself...take heed of the warnings at the start.


Marantz 2252b speaker system switches
I have a 2252B receiver and the switches for the speaker system don't work properly. When I push them in they don't spring out by themselves. I tried squirting alcohol in them and working them back and forth. And I used contact cleaner and lubricant to no a vale. These switches have a long channel from the front to the back of the unit. I also noticed the one switch doesn't have the small U shaped rod inside to make that clicking sound. Is it possible to get into these switches and free them up easily? And where can I get another U shaped rod to replace the one that isn't there.
Concerning that U shaped rod. Would it be possible for it to have fallen out by itself. During shipping? Or is it something that could be missing only by taking it apart and removing it manually?
I have a 2252B receiver and the switches for the speaker system don't work properly. When I push them in they don't spring out by themselves. I tried squirting alcohol in them and working them back and forth. And I used contact cleaner and lubricant to no a vale. These switches have a long channel from the front to the back of the unit. I also noticed the one switch doesn't have the small U shaped rod inside to make that clicking sound. Is it possible to get into these switches and free them up easily? And where can I get another U shaped rod to replace the one that isn't there.
Concerning that U shaped rod. Would it be possible for it to have fallen out by itself. During shipping? Or is it something that could be missing only by taking it apart and removing it manually?
1978_DREAMER
Active Member
If your switch is the same style as the ones that I documented then it is possible to have one with a missing U shaped rod if the plastic pin that is molded into the component is broken. If you look at my second close up photo of the white plastic part, there is a small crossing pin that holds the rod in place. If yours is missing then there is nothing to hold the rod in place. I would think that you would have to find a replacement switch. If the pin is still there you might be able to fabricate a replacement rod out of piano wire. Good Luck, I hope you can solve this!
Jerry
Jerry