

You are using an out of date browser. It may not display this or other websites correctly.
You should upgrade or use an alternative browser.
You should upgrade or use an alternative browser.
Pat Tobin 104t crossover
- Thread starter amante
- Start date

Register to hide this ad

Correct! I've got both versions, the A is just the newer version. Please keep your psyche tight though. The input terminal's position is reversed. So, when translating the 104T schematic to your crossover, just make you get the #1 and #2 position correct.
Biggles
Biggles

amante
Active Member
Phewf! Good to know, drbiggles!! I'll post pictures well before for other eyes to triple check. Don't want to blow up anything expensive.Correct! I've got both versions, the A is just the newer version. Please keep your psyche tight though. The input terminal's position is reversed. So, when translating the 104T schematic to your crossover, just make you get the #1 and #2 position correct.
Biggles
Yeah, I had the same question a few months ago. It's not a difficult build, but it does have plenty of fiddly bits you simply must pay attention to. I finished my 3rd pair two mornings ago, been an interesting ride.
I would suggest securing the 50uF or two 25uF caps first, get them into place. That way you'll know how much room you're going to have for the tweeter and midrange bits. Those can be shifted around a lot easier than that huge cap.
Biggles
I would suggest securing the 50uF or two 25uF caps first, get them into place. That way you'll know how much room you're going to have for the tweeter and midrange bits. Those can be shifted around a lot easier than that huge cap.
Biggles

Yeah, no kidding huh? FAR superior when attempting to make sense of those fancy scheeematics. And yeah, I just used 18 gauge wire. I know people use larger gauges. But the runs are so short. If I ever feel like going that way, I can surely re-wire them both in less time it takes to bake a Mrs. Smith's apple pie. It's always redoable.
Biggles
Biggles
Oh, and if when you fire the suckers up and the treble is shy, or something sounds WAY off? Try moving the jumpers on the inductors to another one and see how that sounds. Just because the schematic shows the midrange jumper on the top one, doesn't mean that's how it's going to be on yours. Trust me on this, and don't ask.
Biggles
Biggles
amante
Active Member
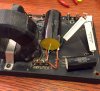
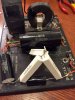
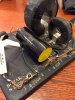
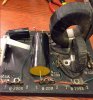
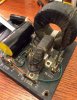
I'm really slow this summer with so much going on with the kids but here's one crossover attempt. (I actually have four altogether even though I only needed two.) Would you please look it over? I haven't hot glued anything down in case I made an error. Thanks!
Attachments
Hey man,
It should work! The #1 terminals on your crossover are Positive. The #2 terminals are Negative. Just keep in mind that you've got the input terminals reversed. They'll work just fine, just use the color of the wire for phasing and not the digits.
Biggles
It should work! The #1 terminals on your crossover are Positive. The #2 terminals are Negative. Just keep in mind that you've got the input terminals reversed. They'll work just fine, just use the color of the wire for phasing and not the digits.
Biggles
amante
Active Member
Awesome! I'll get on the second one tonight. (And thrice for my pea brain, the "green" wires are now considered positive and the "orange" now negative.) Biggles, next favor I may ask is re the wiring of the crossover to the drivers…oy. I think I have an original wiring diagram for a 4000 but not the Concert Grands. I'll see if I see an orange/green pattern in the 4000 to get my head around it, particularly the tweeters. Thanks!
Whoa there Tex. You need to test what you have before you make another. I said it "should" work. I just completed nearly 2 weeks of complete and utter failures with mine. I've built 6, so far. But they all failed miserably. I'll spare you the details. But it wasn't until I completely gutted the crossover, used new terminal strips and new wires that I was able to get 1 to work.
The Green wires are -, negative. The Orange wires are +, positive. Your drivers are also marked, 1 & 2. Just match up those numbers with what's on the crossover and you're good to go.
Here's a shot of mine, halfway through. The tweeter section with the Zobel network and the 7.5 ohm attenuating resistor haven't been added yet. It's complete today, but dang man. It was a grueling ordeal to say the least.

Biggles
The Green wires are -, negative. The Orange wires are +, positive. Your drivers are also marked, 1 & 2. Just match up those numbers with what's on the crossover and you're good to go.
Here's a shot of mine, halfway through. The tweeter section with the Zobel network and the 7.5 ohm attenuating resistor haven't been added yet. It's complete today, but dang man. It was a grueling ordeal to say the least.
Biggles
With your treble and bass knobs (if you have them) set at center/null, the speaker should be well balanced. Your tweeters, mids and woofers should all play well together. If you have to jack the treble up to 3 or 5 o'clock to get what you need, you've miswired something or have shorts or simply need to replace the old terminal strips with new.
Biggles
Biggles
Six! Man!! Okay, I'll definitely test it out first. Nice clean pic above.
Yeah, well I'm a glutton for punishment. Now I just need to make the other 5 look like the one above. No more screwing around, I want it done right so I don't have to think about it ever again. The original crossover boards are too small for those of us who are new to the work, and don't solve space puzzles all that well. A little more room gives me the space to work out the kinks in getting the pieces down cleanly, with less mistakes and possible issues that get overlooked.
Biggles
amante
Active Member
Tested them...yes, on Father's Day...because I could...and the first one passed. The second one had an illusive tweeter disconnect that I think I solved. Won't know more until they are in the cabinets with drivers. Now, the cabinets are all I'm waiting for. I've cleaned up the drivers, too. Guess I'll use the time to mentally plan out wiring all the 1s to the 1s and the 2s to the 2s.
That shouldn't take more than a few moments, straightening out the 1 versus 2 swap. Patience and a clear head should get the job done. You could leave it. However, at some point someone else is going to stick their head inside your speakers. You want them to be able to view your work and give you The Nod. The last thing you're going to want to do is have to make excuses as to why something is done sloppily.
Biggles
Biggles
I placed an order the other day for about 14 billion new terminal strips. I tore through my last order that I thought was large enough, pretty darned quickly. I've been doing the same with other needful bits, capacitors, screws, binding posts, you get the idea. Now when a project shows up, I just paw through some trays and find what I need within a few moments. This is especially nice when it comes to capacitors.
I nearly got started on mounting the covers for the backs of the B209B midrange drivers yesterday, no luck. Maybe today!
Biggles
I nearly got started on mounting the covers for the backs of the B209B midrange drivers yesterday, no luck. Maybe today!
Biggles
Similar threads


- Replies
- 10
- Views
- 998

