

You are using an out of date browser. It may not display this or other websites correctly.
You should upgrade or use an alternative browser.
You should upgrade or use an alternative browser.
Pioneer HPM-100 Recapping Walkthrough
- Thread starter xoaphexox
- Start date


Boss302
Active Member
I just picked up some beat up HPM-100s for $50 and while re-reading this old thread in preparation for the crossover recap I noticed something in this photo I'm not sure of.
There looks to be some sort of material / padding underneath the two Theta bypass caps that are mounted on the back of the board on the left.
Is this something I need to know about before I just solder / hot melt glue them on as usual.
Thanks!
There looks to be some sort of material / padding underneath the two Theta bypass caps that are mounted on the back of the board on the left.
Is this something I need to know about before I just solder / hot melt glue them on as usual.
Thanks!

rsmalling
Member
Great Thread!
Im new here and just read most of this thread, thanks to the OP and all the people who posted!
I'm doing the recap and resistor as outlined in post 1, all the parts are still easy to come by. Im also going to upgrade the speaker binding posts while Im at it. I bought these speakers new in the late 70's. There are the HPM 100 (50-100) as I recall, they were $300. each way back then. I like em.
My question:
I want to make sure all speakers are working. After I finish the crossovers can I test each speaker in the cab by unplugging the other 3 and listening for a short time to each speaker individually without damaging the amp or crossovers? Is there anything else I need to check out while Im here?
Thanks for any info. :thmbsp:
Rob
Im new here and just read most of this thread, thanks to the OP and all the people who posted!
I'm doing the recap and resistor as outlined in post 1, all the parts are still easy to come by. Im also going to upgrade the speaker binding posts while Im at it. I bought these speakers new in the late 70's. There are the HPM 100 (50-100) as I recall, they were $300. each way back then. I like em.
My question:
I want to make sure all speakers are working. After I finish the crossovers can I test each speaker in the cab by unplugging the other 3 and listening for a short time to each speaker individually without damaging the amp or crossovers? Is there anything else I need to check out while Im here?
Thanks for any info. :thmbsp:
Rob

Dr. Mordo
Doctor of Rockology
I wouldn't unplug speakers. I typically test by getting my head in front of the speaker, then I wave my hand over each driver I'm testing. If it's working, you'll hear a difference as you hand passes in front of the driver. The supertweeter might be harder to hear unless the test cd you pick has a lot of high end.
Like Dr. Mordo says, it's pretty easy to hear each driver just by putting your ear up to it. Super tweeter not so much.
You can't hear the super tweet unless it is running all by itself. Disconnect the other drivers and you'll hear it.
Tonight I recapped my third pair of Pioneer HPM-100's, so I decided to take photos along the way in hopes that it might help someone who has never attempted a recap before, either on these particular speakers or others.
My first step was to purchase parts. For this, I chose Partsexpress. My cart was as follows:
2x 005-10 Mills 10 Ohm 12W Non-Inductive Resistor $3.50
2x 027-419 Dayton DMPC-4.3 4.3uF 250V Polypropylene Capacitor $1.86
2x 027-220 Dayton PMPC-3.0 3.0uF 250V Precision Audio Capacitor $2.79
2x 027-462 Jantzen 0.15uF 1200V Z-Superior Capacitor $7.68
My goal was to replace all three capacitors as well as the resistor for each crossover. I have chosen Solen brand capacitors in the past and find them to be brighter than the Dayton counterpart. They are basically the same price, and since the HPM-100 to my ears is a pretty forward speaker, I went with the Daytons as to not exacerbate the issue.
Here is the speaker prior to doing anything:

Here we see the back of the speaker. Behind this rear panel is the crossover.

Here are the parts that arrived. Note parts shown are for both crossovers:

You will need a phillips head screwdriver to remove the six screws that hold the back panel/crossover to the unit. This part comes off easily.

To fully remove the crossover, I found it easiest to remove the super tweeter from the front. It is attached with four phillips head screws. This will allow you to take the yellow (+) and white (-) wires off the back of the supertweeter. They are the socket-kind and do not require unsoldering. At this point I was able to reach through the speaker from the back and remove both wires from the woofer (blue and white) so that I would not have to mess with unscrewing and removing the woofer. There was plenty of room for my arm. A penlight will help here if you arent in a bright enough room to see the color of the wires as they attach to the woofer posts.

Now that you have the crossover in hand, there are four more screws that hold the crossover board to the black plastic holder, and you can unscrew the speaker posts themselves to allow the crossover to come off completely.

At this point you can use wire clippers, scissors, or needlenose pliers to remove the old caps and resistor. I choose to clip off the old parts and then use desoldering braid to suck up the solder on the pads. The clipped leads that remain just fall out.

Now put the new parts in where you took the old parts out and solder them in well!

It is a pretty straightforward task. Now sit back and enjoy!!
Rob
This process was a little unclear to me, as a completely non-technical person. After the leads are clipped, and small leads are left, can the new capacitors be soldered to the older remaining portions of leads? I am contemplating recapping a pair of Design Acoustic PS-10As and a pair of KLH 6s. Whichever I do firs will be my first recap. I have not looked inside either of them to see what the cross-overs are like, or how to access them.
If anyone has a suggestion as to which to do first, I would appreciate any suggestion or any other advice.

xoaphexox
Supernatural Anesthetist
This process was a little unclear to me, as a completely non-technical person. After the leads are clipped, and small leads are left, can the new capacitors be soldered to the older remaining portions of leads? I am contemplating recapping a pair of Design Acoustic PS-10As and a pair of KLH 6s. Whichever I do firs will be my first recap. I have not looked inside either of them to see what the cross-overs are like, or how to access them.
If anyone has a suggestion as to which to do first, I would appreciate any suggestion or any other advice.
You want to unsolder the old capacitor leads that are left in the circuit board if you clip the old capacitors out. Ideally before inserting the new capacitors you want to be able to see through the holes in the circuit board where the old capacitors were soldered.
Leaving the old clipped leads soldered to the board and soldering the new capacitors on to those leads is undesirable.
Hope that helps!
Thank you.
Thank you. Would there be a worry about damage to the board?
You want to unsolder the old capacitor leads that are left in the circuit board if you clip the old capacitors out. Ideally before inserting the new capacitors you want to be able to see through the holes in the circuit board where the old capacitors were soldered.
Leaving the old clipped leads soldered to the board and soldering the new capacitors on to those leads is undesirable.
Hope that helps!
Thank you. Would there be a worry about damage to the board?
xoaphexox
Supernatural Anesthetist
Does it matter which way I put the new caps and resister in? In other words, is there a positive and negative side to the caps? Polarity?
Thanks.
No, it doesn't really matter. These are bipolar capacitors meaning they can go in any which way.
xoaphexox
Supernatural Anesthetist
Thank you. Would there be a worry about damage to the board?
'Standard' damage concerns from unsoldering apply here (too much heat = lifting traces) but nothing specific to the HPM-100 crossover.

Petter
Active Member
One little thing that does a lot to clear up the sound, at least as much as the recapping, is to bypass the cheap pot's. Replace them with fixed resistors. -1 on the pot = 2,2 ohm in serial and 10 in parallell. It gives you -4 dB, which was right in my case, with HPM-150's.
For even smoother sound, use the midrange from HPM-900/1100, but not its tweeter.
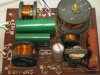
Edit: Slightly different x-over., pic from 150.
For even smoother sound, use the midrange from HPM-900/1100, but not its tweeter.
Edit: Slightly different x-over., pic from 150.
Attachments
Last edited:

joehalo
New Member
Not good!
Well just finished the recap and have been listening to them for about an hour. The results are not good. The highs are much more harsh. Bass is tighter but the highs are just killing my ears. I must have done something wrong but I have no idea what! I cannot get them to sound good no matter what I set the pots to. At high volume the tweeters are distorting also. :tears:
Well just finished the recap and have been listening to them for about an hour. The results are not good. The highs are much more harsh. Bass is tighter but the highs are just killing my ears. I must have done something wrong but I have no idea what! I cannot get them to sound good no matter what I set the pots to. At high volume the tweeters are distorting also. :tears:

well, that is troubling. After having mine recapped, it was a serious improvement over those harsh highs I had before.
Double check everything. Something isn't right.
Double check everything. Something isn't right.

Frank Sol
Lunatic Member

patate91
Well-Known Member
I just recapped my hpm-100 (100w version), and I want to make sure that I plugged woofer correctly since, they were connected differently.
As per service manual the blue wire should be plug on +, on the woofer there's a little red dot beside a connector, is this connector the + ??
As per service manual the blue wire should be plug on +, on the woofer there's a little red dot beside a connector, is this connector the + ??
Last edited: