• The move to the new server is done. There are some software and database maintenance updates in process. This has us passing the hat around to help out. We appreciate any donations. Seriously, even a dollar helps. The payment page may be found here - https://www.audiokarma.org/support.html

Pioneer SA 7500 II restoration help

laike

New Member
Hey this is my first post here and my first restoration project as well. I'm hoping to get a little insight on this SA 7500 II I picked up the other day.

This thing was on marketplace for $80 and I couldn't pass it up. I am a huge fan of the old 70s pioneer sound, my dad had one when I was growing up and I've been chasing the opportunity to have my own for a while now.

The previous owner turned it on and the left channel was clearly dead. The right channel was coming through crystal clear and everything else (beside a dead power LED) seemed to be fully functional.

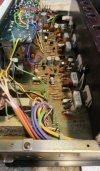
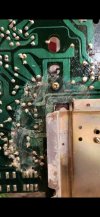
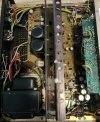
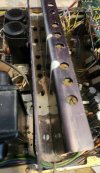
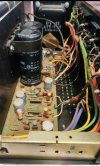
As soon as I got it home I popped it open to clean it out since the insides are FILTHY, but I found what looks to be some sort of corrosive substance was spilled down the grate, on to the heatsink and it looks to have pooled at the bottom of the unit, leaving quite an ugly mark at the bottom of the PCB. I tested a small area of the mark with a q-tip, and while it gave only a slight sign of actually cleaning whatever it is off the PCB I noticed that a tiny bit of the green film of the board flaked off as well.

Do you think this unit is toasted because of whatever spilled on to the board? I'm fairly experienced when it comes to electronics, but like I said this is my first amp restoration project and I hope I am not biting off more than I can chew.

Thanks!
 

Attachments

  • Screenshot_20250927_125852_Gallery.jpg
    Screenshot_20250927_125852_Gallery.jpg
    101.6 KB · Views: 35
  • Screenshot_20250927_125857_Gallery.jpg
    Screenshot_20250927_125857_Gallery.jpg
    82.9 KB · Views: 34
  • Screenshot_20250927_125847_Gallery.jpg
    Screenshot_20250927_125847_Gallery.jpg
    141.8 KB · Views: 36
  • Screenshot_20250927_125848_Gallery.jpg
    Screenshot_20250927_125848_Gallery.jpg
    150.2 KB · Views: 36
  • Screenshot_20250927_125850_Gallery.jpg
    Screenshot_20250927_125850_Gallery.jpg
    94.8 KB · Views: 34
  • Screenshot_20250927_125851_Gallery.jpg
    Screenshot_20250927_125851_Gallery.jpg
    102.6 KB · Views: 35
Register to hide this ad
I would say you need to get this thing cleaned properly before even starting to test and work on the circuit. I'll let others chime in on the best way to tackle the cleaning of something like this as I have limited experience with a situation such as this.
 
+1 for the alcohol and toothbrush. If a little green solder mask comes off it is not a big deal as long as the copper traces are OK.

Sometimes I take a piece of thin cloth like a t-shirt, lay it over the messy area, hit it with some alcohol, hold it down so it won't move and scrub the cloth with the tooth brush. The gunk gets sucked up by the cloth. Similar to @TomSc 's dabbing with a paper towel. Works really good to suck up excess flux mess.
 
Last edited:
+1 for the alcohol and toothbrush. If a little green solder mask comes off it is not a big deal as long as the copper traces are OK.

Sometimes I take a piece of thin cloth like a t-shirt, lay it over the messy area, hit it with some alcohol, hold it down so it won't move and scrub the cloth with the tooth brush. The gunk gets sucked up by the cloth. Similar to @TomSc 's dabbing with a paper towel. Works really good to suck up excess flux mess.
I hadn't thought to use an old t-shirt, but that's a great idea!
 
Thank you
The deoxit along with the toothbrush and t-shirt trick got me quite a way with the pcb. Whatever it was that made its way on to the board was sticky as hell, I'm guessing it must have been soda or beer.

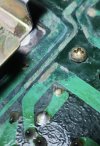
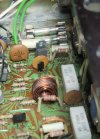
I got most of it up today while being able to avoid damaging the board any more than it already was, there is just some bubbling of the mask and a little oxidization on exposed copper traces and solder joints left over from the mess. I have some close up shots of the current state it is in, highlighting the worst spots. One looks like it may be corroded enough to warrant bypassing?

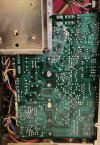
flipping the unit over I'm not finding anything wildly obvious in terms of fried components besides a 2sd357 transistor right by the spill location that seems like it may be toast.

At this point what do you think my best plan of action would be?

I really appreciate all the input
 
Here is the unit post-cleaning
 

Attachments

  • Screenshot_20250928_185924_Gallery.jpg
    Screenshot_20250928_185924_Gallery.jpg
    105.7 KB · Views: 24
  • Screenshot_20250928_185922_Gallery.jpg
    Screenshot_20250928_185922_Gallery.jpg
    112 KB · Views: 23
  • Screenshot_20250928_185921_Gallery.jpg
    Screenshot_20250928_185921_Gallery.jpg
    101.5 KB · Views: 24
  • Screenshot_20250928_185919_Gallery.jpg
    Screenshot_20250928_185919_Gallery.jpg
    120.5 KB · Views: 24
Here is the unit post-cleaning
Did you just scrub with the cloth over the board? If so it looks like you may need to go back and scrub a bit without the cloth, and and see if you can get some more off.

The traces look OK to me.

Do you have a dim bulb tester? If so you should use it as a safety protective measure when you proceed with testing.
 
Once you get it cleaned to your satisfaction I would get out the deoxit and clean all the switches and pots. Work the switches MANY MANY times and twirl the pots many times as well.

Since it was powered up and had one channel working I would test it again after the cleaning.

Even though it powered up before it may be wise to power it up the first time with the DBT, if it dims plug it into the wall and see if you have both channels.

Lets see where that takes us.
 
I acquired a similar filthy unit from good will that wouldn't power on. It was dirtier than yours. I gave it a good cleaning with Deoxit, alcohol, tooth brushes and cloths. I fixed several broken traces, recapped it changed out those dual transistor packs Q3, Q4 and it was singing again.
 
Thank you all for the input so far!

I had hoped to post a little earlier but I spent most of the afternoon building the dim bulb tester which, thankfully the unit passed. I spent another few hours detailing the board, switches and pots as well before the power testing and it is looking much much better.

After powering on I ran through and tested every function. As before the right channel is still running perfectly and I am only getting intermittent crackling on the left channel at best, but mostly no signal is making it through that channel. Another problem I am finding is the tone switch dramatically drops the volume and introduces some awful distortion and noise. Besides that, Low Cut works great, Loudness works great and zero popping in any of the pots.

Next on the list is to replace r68 which looks to have suffered a little scorching and replace Q3 & 4

As far as the tone knob I'll do a little more digging to see if I can suss out the problem, but nothing stood out to me on my cleaning passes
 
I acquired a similar filthy unit from good will that wouldn't power on. It was dirtier than yours. I gave it a good cleaning with Deoxit, alcohol, tooth brushes and cloths. I fixed several broken traces, recapped it changed out those dual transistor packs Q3, Q4 and it was singing again.
Did you go the dual KSA992 route for Q3 & 4? I'm reading that it seems to be a common workaround on here
 
Did you go the dual KSA992 route for Q3 & 4? I'm reading that it seems to be a common workaround on here
I purchased the transistor pack that a member linked. This individual makes a drop in replacement on ebay.
 
I purchased the transistor pack that a member linked. This individual makes a drop in replacement on ebay.
Is that the hifiaudio upgrade kit? I saw that one on ebay. If so it's just a bit more than I was hoping to spend, do you feel like the benefit of the complete kit was worth the price tag?
 
I'll try to find the replacement transistors in my eBay purchases. Got it, Seller was Affinity for Artifacts dual transistor pack.
 
Did you go the dual KSA992 route for Q3 & 4? I'm reading that it seems to be a common workaround on here
FYI the dual KSA992's work well, but it is important that they be well matched for low offset, especially on the 7500II since it does not have an offset adjustment.

The "kit" with the dual SMD transistor and adapter board will be great since the dual transistor package used should be very well matched giving low offset.
 
Back
Top Bottom