• The move to the new server is done. There are some software and database maintenance updates in process. This has us passing the hat around to help out. We appreciate any donations. Seriously, even a dollar helps. The payment page may be found here - https://www.audiokarma.org/support.html

Quad ESL-63 rehab

mrehorst

Super Member
I recently bought a pair of ESL-63s via CL for $300. One speaker plays fine, the other makes lots of noise. I have started the repair process on the noisy speaker. I'll go through the other one after I get the bad one working properly. Right now I'm looking for suitable replacements for all the foam tape that was used in these things.

I replaced the 220 uF nonpolar electrolytic coupling caps in them with new ones, bypassed with 4.7 uF film caps.

The noise (recording of it here) indicates that one or more of the diaphragms is torn and/or the stator(s) have come unglued from the plastic grids. I got the speaker open today and cleaned up a bunch of the foam and gaffer tape residue, then took the drivers out of the frame. At least two of the drivers have stators that have come unglued. I will inspect the diaphragms tonight. The dust covers are loose and wrinkled, but the tape seems to be holding up OK. I'll try heat shrinking them but if that fails, I'll make new dust covers with fresh tape.
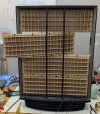
driver coming out.jpg


I had a pair of these back in the 90s and had forgotten what a nightmare they are to work on. There's far too much foam and gaffer's tape used to hold them together. I still have panels from the old speakers, so I may ultimately rebuild these with two extra bass panels per speaker (assuming the transformers won't complain).

I'll be posting more on this thread as I get through the rehabilitation.

I have about 1000m of 6 uM polyester film left from back when I used to build ESLs, so if I need to replace diaphragms (or dust covers), it won't be too hard to do. 6um is a little thicker than the original diaphragms, but I don't think it's going to make much difference in the way the speakers sound, at least not to my 66 YO ears.
 
Register to hide this ad
OK, opened up all the drivers- the diaphragms are all good! The stators need to be reglued. I'll start that as soon as I decide what type of cement to use. Hopefully something that will last another 40 years...
 
6uM is almost twice the thickness of the original material. This will impair both resonance frequency and high frequency response. Refurb kits are available from ER Audio that I will highly recommend. Been there 4 years ago and never had any problem since, enjoying the wonderful ESL63s everyday.

Good luck.
 
I knew someone was going to say that! My experience comparing original and 6 um diaphragms is that there is no audible difference (to my ears). Yes, I know, 6 um film is a few ug higher mass, so the resonance should be lower, but I think the resonance isn't really much of a factor in these things. There's a cloth damper glued to one side of each driver that seems to do a pretty good job suppressing the resonance.

Good link! Thanks! I am curious to know what their tensioning tool/process is like. The tensioning tool is described as "Spring Type Balance with Adaptor Plate", so it sounds like they recommend the "tape and pull" method that I abandoned decades ago. Their film prices seem a bit steep- I bought 1200m of 6 um polyester film from Toray in Japan for about $90 (12 or 13000 yen) in 1986 (and still have at least 1000m of it).

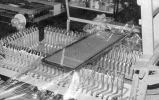
This is the machine that they use in the factory to tension the film- the driver is turned and laid on top in this photo:
1739361080149.png
It looks like there are a bunch of levers with "fingers". I believe there are cables connecting to each lever, and they all go to a foot pedal (?) under the stretcher. The film is laid down and stuck to each finger, then the foot pedal pulls on all the cords/fingers/levers at once, pulling the film tight. I think there's a platform that holds the driver frame inside the center of all the fingers, lowered out of sight in this photo, that lifts the driver up into contact with the film.

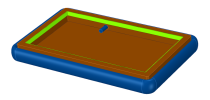
When I was building my own ESLs I tried several methods to tension the film, the first being the "tape and pull" method that a lot of people try to use. I also tried heat shrinking the film. I could never get satisfactory tension doing either. I eventually came up with a simple, extremely effective pneumatic tool that allows setting any tension desired right up to the point of bursting the film. Underside of the tool shown here:

1739360824436.png
It's a bicycle tire inner tube stretched over the edge of a small "table". The film is laid flat on top of the table, then wrapped under and attached to the tape (green in the picture above). Then the tube is inflated, pulling the diaphragm tight. You can make a couple marks on the film with a permanent marker before tensioning, and measure their movement to get uniform tension from one driver to another. One of the advantages of using this technique is that the air goes where it is needed and provides uniform tension on the film. More here: https://drmrehorst.blogspot.com/2018/10/diy-electrostatic-loudspeakers.html

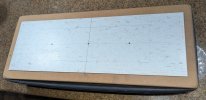
This is my table for tensioning diaphragms specifically for ESL-63s. There's a small hole at the center to release air trapped under the film. Once the film is tight, I apply 4693H contact adhesive to the film and the ESL frame then set the frame down on the stretched film. I let the glue set, then release the air pressure and cut the film free of the table.

ESL-63 film stretcher.jpg

Fortunately, the diaphragms on my new acquisition are all good, so all I have to do is reglue the stators. A bottle of Gorilla (urethane) Glue costs about $5. Woohoo!

This would be a quick, easy job except for replacing all the rotted foam tape they used in these speakers. Most of it is inside the area covered by the dust covers, so crumbled foam from the tape can get into the drivers and cause all sorts of noise to develop. Cleaning the foam tape's adhesive residue off the frame pieces is a slow, tedious process. Once it is clean I'm going to use EPDM rubber foams to replace the original stuff. The EPDM rubber shouldn't dry out and crumble like the original stuff did, even after 40 years, but who knows? I won't be around to see...
 
I've cleaned up a lot of the old tape residue and replaced the tape. I still have to get the double sided foam tape for mounting the steel grids and the gaffer's tape for the edges of the grids and to wrap around the top and bottom edges of the driver enclosure. It's going to be a while before I need that stuff- I want to finish work on the drivers and test them in the speaker before I button it up tight. I don't want to have to keep going back in to fix stuff.

Some parts can come out of the speakers easily, so on those I used Goo Gone orange oil solvent to remove the adhesive, followed by detergent and hot water to remove the orange oil. Parts that can't easily come out of the frames, such as the vertical support rods near the center of the speaker get cleaned with Goof Off. It also takes the paint off those parts, but they're covered with foam tape, metal grids, and socks so they won't be visible. The hardest part to clean is the dust cover mount at the bottom of the driver enclosure. There's a LOT of goo and it takes multiple applications of Goof Off to get that crud out of there.

I tested the conductivity of the coating on the diaphragms and got 10^7 -10^8 Ohms/square. I also tested one of my old repaired drivers with Licron antistatic coating and got the same numbers. I put that Licron on at least 20 years ago and it is still sticking to the diaphragm and still high resistivity. Good stuff!

Now I need to start thinking about how I'm going to approach regluing stators on the sides of the drivers that have the diaphragm glued to them.
 
Sheesh... Just cleaning off the old tape residue has taken me 3 days. Today I cleaned off the steel grids from the front and back sides of the driver housing. First I scraped them, then hit them with a wire brush. The old adhesive had turned solid so it all came off without any chemicals.

This is why 40 year old ESLs can be bought cheaply. It would cost more than a pair of new ones to have them professionally restored.
 
Sheesh... Just cleaning off the old tape residue has taken me 3 days. Today I cleaned off the steel grids from the front and back sides of the driver housing. First I scraped them, then hit them with a wire brush. The old adhesive had turned solid so it all came off without any chemicals.

This is why 40 year old ESLs can be bought cheaply. It would cost more than a pair of new ones to have them professionally restored.

Yes, that's why.

Plus the sad truth which is that very few professionals are able to restore them properly.

Keep on with the good work :)
 
I started a blog post on this project. Lots of photos!

At this point I have removed and inspected the drivers, cleaned up all the crud from the old tape (except for the dust cover frames) and I'm at a point where I can start regluing the stators, once the supplies arrive.

I had a pair of these back in the 90s and had forgotten what a pain in the butt they are to fix, mostly because of the overly complicated, flimsy construction. I still have the parts from the old speakers, and I built t-slot aluminum frames for them, but haven't gotten around to reassembling them. Maybe after these are done... Or maybe I'll decide to steal the bass panels from these and add them to the drivers from the other speakers and turn them into more bass capable speakers (like the Quad 989s).
 
You know, now I'm thinking maybe I should build up a pair of ESL989s from these speakers and my old ones. I know I can make more solid frames for them using t-slot aluminum that I already have. I'm going to have to look for a schematic of the 989s and see if there are any differences other than the additional bass panels. Maybe they changed the transformers that step up the amp signal due to the increased capacitance. Hmm. Definitely worth a try...
 
You know, now I'm thinking maybe I should build up a pair of ESL989s from these speakers and my old ones. I know I can make more solid frames for them using t-slot aluminum that I already have. I'm going to have to look for a schematic of the 989s and see if there are any differences other than the additional bass panels. Maybe they changed the transformers that step up the amp signal due to the increased capacitance. Hmm. Definitely worth a try...
As far as I know, there was no change in the electronics apart from a slightly different layout to accomodate with the new speaker's base. Basically the 989s are ESL63s with two more panels...
 
I finished regluing the stators on the driver halves that don't have diaphragms. Now I have to work out the technique for the halves with the diaphragms. I'm going to try to do it without touching the original diaphragms that are all in good shape.

The metal grids of the front and back sides of the speakers were held in by the vertical edges of the grids fitting into slots in the aluminum frame pieces, also by some double sided foam tape at the top and bottom edges, and finally by a wrap of what looked like duct tape around the top and bottom edges of the driver enclosure. It seems like the double sided foam tape at the top and bottom edges is superfluous. I may replace that tape with some of the narrow EPDM rubber tape that I'm using elsewhere in the speaker to replace rotted foam tape. If I ever have to get back into the speakers - knowing what I know about Quad ESL-63s, I'll probably have to - not having to remove that double sided foam tape will make the job easier.
 
Interesting thread, and blog. I have a pair of ESS Superquads that were given to me on the condition that I restore them to their former glory. The heart of those is a pair of ESL57s, with some Jantzen electrostatic tweeters filling in the very upper range and outboard transmission line subwoofers for the bottom end. I kind of think they were a little too complicated for most audio enthusiasts circa 1970 or so, as they came with an electronic crossover and required six channels of amplification.
 
Interesting thread, and blog. I have a pair of ESS Superquads that were given to me on the condition that I restore them to their former glory. The heart of those is a pair of ESL57s, with some Jantzen electrostatic tweeters filling in the very upper range and outboard transmission line subwoofers for the bottom end. I kind of think they were a little too complicated for most audio enthusiasts circa 1970 or so, as they came with an electronic crossover and required six channels of amplification.
Yikes! That would be too much for me.

I may end up biamping mine with active crossovers. I had a pair of these back in the early 90s and did that. I used some 4th order Linkwitz-Riley crossovers that I built and had the crossover frequency set at 100 Hz IRIC. If you keep the lower bass out of them, they can play as loudly as any other speaker, but with a lot less distortion.
 
Yikes! That would be too much for me.

I may end up biamping mine with active crossovers. I had a pair of these back in the early 90s and did that. I used some 4th order Linkwitz-Riley crossovers that I built and had the crossover frequency set at 100 Hz IRIC. If you keep the lower bass out of them, they can play as loudly as any other speaker, but with a lot less distortion.
I've never really messed with ESLs. I have had and rebuilt Maggies, which are planar magnetic, not electrostatic, but IMO they share the same basic strengths and weeknesses. I think they are going to be an interesting project, provided that I live that long. Hopefully I will be rewarded with some great sound. I certainly don't lack for amplification around here, and have the proper crossover. The power supplies on the ESLs don't intimidate me, but rebuilding the panels looks like a real asswhip. Oh, and all I have for the TL subs is the KEF race track woofers. Everything else is long gone.
 
One difference between Magnepans and ESLs is that the ESLs are driven from both stators. In the Magnepans (and Apogees), there are magnets on one side of the diaphragm. That means nonlinear drive. Apparently it isn't enough to be an audible problem, but theoretically it could be. Some planar magnetic speakers put magnets on both sides of the diaphragm which should result in linear drive like ESLs.
 
Thanks for keeping this thread alive.

I'm going to try to do it without touching the original diaphragms that are all in good shape.
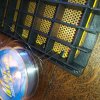
I invented a method that proved to be efficient, although requiring a lot of precautions : threading a fishing line in the stator's holes (highly tedious) and attaching it to the chassis holds the stators firmly against the frame while the glue is curing. Great care shall be taken to not rip or pierce the highly tense diaphragm with the tip of the fishing line. To minimze this risk, forming a rounded tip by melting it with a heat source will help (flame, hot air).

1616569879100.jpg1616569879112.jpg1616577868908.jpgIMG_20210324_092914.jpg.
 
Thanks for keeping this thread alive.


I invented a method that proved to be efficient, although requiring a lot of precautions : threading a fishing line in the stator's holes (highly tedious) and attaching it to the chassis holds the stators firmly against the frame while the glue is curing. Great care shall be taken to not rip or pierce the highly tense diaphragm with the tip of the fishing line. To minimze this risk, forming a rounded tip by melting it with a heat source will help (flame, hot air).

View attachment 3437189View attachment 3437190View attachment 3437191View attachment 3437193.
How do you get it to come back out of one of the stator holes?
 
How do you get it to come back out of one of the stator holes?

I did it by bending the end of the line in such a way that I could very patiently sneak it upwards. Not easy but feasible.

Take care to not pull too hard on the line, the stator's PCB breaks quite easily.
 
I did it by bending the end of the line in such a way that I could very patiently sneak it upwards. Not easy but feasible.

Take care to not pull too hard on the line, the stator's PCB breaks quite easily.
I've seen another technique using blunted screws to go into the holes and grip the stator, then invert it and hang weights from the screws. I'm thinking of something like that except using rubber bands to go to a board with an array of hooks. Once each band is hooked, then I'll adjust the spacing between the grid and the board to put a little tension on the rubber bands. I'll apply glue like I did with the other halves of the drivers- via a syringe and 18 gauge needle, except for these I'll go alongside the ribs instead of trying to lift the stator off and get the glue on top of the ribs. If they are sticking now, I want to leave them in place and just add glue.

My clamping tool for the stators without diaphragms worked very well and all of them came out perfect. The soft foam weatherseal compressed just enough to ensure that the stator contacted all the ribs on the grid.
 
Last edited:
After closely examining all the driver halves that have diaphragms, I found a couple stators that were almost completely free of the grids or about to be. I can't see any way to grab the stators safely so I think I'm going to replace the diaphragms. That will allow me to reglue the stators securely. I ordered some 3 um film to use, but it's going to take a month to arrive here, so progress is going to slow down. Maybe I'll tear into the other speaker and get it cleaned up to the same point as the first one- then I can reglue stators and replace diaphragms of all 8 drivers in one go.
 
Last edited:
Back
Top Bottom