• The move to the new server is done. There are some software and database maintenance updates in process. This has us passing the hat around to help out. We appreciate any donations. Seriously, even a dollar helps. The payment page may be found here - https://www.audiokarma.org/support.html

S-Ruddy's Executive IV Restoration Thread

It looks like you can go to the left another inch or so based upon your cutout. Given the glides, you could probably 'hang' a bit over the left edge of the mounting plate (it would look a bit weird, but should be functional). If it doesn't work, I would try and find either a Dual 1009 or a Technics SL7 or SL10 for that spot (yes, I know the Technics won't look 'period', but I've used one successfully with a Fisher Medalist 2 console). Alternately, if you need to route out the inside of the cabinet to still fit, you could place a piece of wood on the inside of the speaker cabinet with the same finish treatment (or flat black) - after all, the fabric backs of the speaker cabs indicate that the interior volume of the cabinet is not critical.

-D
 
I had thought about cutting into the cabinet but I'm pretty sure it would put a hole into the speaker compartment. Then if I sell it I will have to explain that it can only be played open or closed depending on were I put the hole. So I'm left with the hinges you are referring to or move it to the extreme left. I guess I have to decide if I want to be able to play it closed. I need more feedback on that. Thanks for the hinge name as I had no idea how to figure that out!

If you decide to cut a notch, using a plunge router and a straightedge you could get a very professional looking cut that could run horizontally. You wouldn't need the notch the rear, or front of the side so the structure wouldn't be compromised. That way it could be played open, shut or anywhere in between. Then, as Derekva says, if the hole goes completely through you could put a backer inside and paint it all in flat black. It could even be painted with a stone finish black like the turntable mount you made. You could keep the turntable centered and also use the existing guides.
 
Last edited:
It looks like you can go to the left another inch or so based upon your cutout. Given the glides, you could probably 'hang' a bit over the left edge of the mounting plate (it would look a bit weird, but should be functional). If it doesn't work, I would try and find either a Dual 1009 or a Technics SL7 or SL10 for that spot (yes, I know the Technics won't look 'period', but I've used one successfully with a Fisher Medalist 2 console). Alternately, if you need to route out the inside of the cabinet to still fit, you could place a piece of wood on the inside of the speaker cabinet with the same finish treatment (or flat black) - after all, the fabric backs of the speaker cabs indicate that the interior volume of the cabinet is not critical.

-D

If you decide to cut a notch, using a plunge router and a straightedge you could get a very professional looking cut that could run horizontally. You wouldn't need the notch the rear, or front of the side so the structure wouldn't be compromised. That way it could be played open, shut or anywhere in between. Then, as Derekva says, if the hole goes completely through you could put a backer inside and paint it all in flat black. It could even be painted with a stone finish black like the turntable mount you made. You could keep the turntable centered and also use the existing guides.

All of the sudden routing the cabinet is making more sense. I didn't think of an inside patch if it goes through. It's the only way to keep the nice aesthetics of a centered player while maintaining the ability for a closed playing option.
 
You could maybe turn the Miracord 90* counterclockwise, which would put the tonearm in the back. I've seen quite a few older FISHER Mono cabinets with newer turntables and the turntable was oriented 90* counterclockwise to clear the tonearm with the surrounding cabinet. You may have to remove the back panel.

Looking closer at the plinth it's rectangular, so you may not be able to do the 90* with the Miracord. Either Move it off to the Left or last resort do the router trick. I hate cutting in to a piece of furniture unless it's absolutely necessary.

If you can't make the Miracord work without extensive woodworking, I would go with either a Garrard AT-6, AT-60 or to really get some room, the Autoslim. It's got all the guts of an AT-6 but has a smaller platter and footprint. Uses the same manual as the AT-6. Of the other two it's a toss up. They are very similar in performance.
 
Last edited:
Can you post a photo showing just the drawer so I can see how the offset looks and do you play it with the drawer open or closed. Beautiful console BTW!!!!

I play it with the door open and closed. I'll post a pic of the player in place later this evening. I also was concerned with how the offset would look when I needed to do it but now it doesn't bother me at all.
 
You could maybe turn the Miracord 90* counterclockwise, which would put the tonearm in the back. I've seen quite a few older FISHER Mono cabinets with newer turntables and the turntable was oriented 90* counterclockwise to clear the tonearm with the surrounding cabinet. You may have to remove the back panel.

Looking closer at the plinth it's rectangular, so you may not be able to do the 90* with the Miracord. Either Move it off to the Left or last resort do the router trick. I hate cutting in to a piece of furniture unless it's absolutely necessary.

If you can't make the Miracord work without extensive woodworking, I would go with either a Garrard AT-6, AT-60 or to really get some room, the Autoslim. It's got all the guts of an AT-6 but has a smaller platter and footprint. Uses the same manual as the AT-6. Of the other two it's a toss up. They are very similar in performance.

Going to have to keep the Miracord as the TT. I don't have any of the TT's you're referencing but now I have some to choose from for the next project. Thanks Larry.

I play it with the door open and closed. I'll post a pic of the player in place later this evening. I also was concerned with how the offset would look when I needed to do it but now it doesn't bother me at all.

Yep, sure would be nice not to have to do any cutting. I look forward to your pics.
 
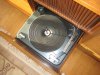
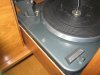
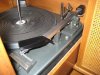
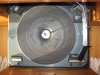
Here you go, pics of replacement TT. I also notice that your TT could be moved forward as well (as I had to do) and to the left to free up the counterbalance. I hope these help.
TT Top Looking Left.JPG

TT Left Side.JPG TT Right Side.JPG TT Directly Overhead.JPG
 

Attachments

  • TT Top Shot 2.JPG
    TT Top Shot 2.JPG
    103.9 KB · Views: 2
BTW, Which photo input will you be using? I found the RIAA 1 to have the best sound balance and the appropriate ohm load for my cartridge.
 
I've decided to try it mounted flush to the left side. Before I purchase a new piece of plastic I think I will cut the piece I have to see if it will work. Last night I put the TT up on spacers so I could move it over and test. I ended up with 1/16" on each side when running it through a 33 rpm cycle. Running a 78 seemed to have it just touching the side but it did cycle. Lesson learned for next time.

I'm curious about the option of changing a RC Garrard's tonearm with a TPA 12. Has anyone ever done this? Seems like it may have been a better option in this case. Thanks for all the replies, I feel good about my decision as it will allow for turning it back to original condition without to much work or indication it had been altered.
 
Here you go, pics of replacement TT. I also notice that your TT could be moved forward as well (as I had to do) and to the left to free up the counterbalance. I hope these help.

Thanks very much! The Miracord is not as wide as your A-70 so the offset will be much more noticeable. I am going to try it anyway. If it doesn't work or I hate the look I have a Type A on the shelf. I am also interested in a TPA 12 tonearm for the original RC88 or the Type A as an option. I installed it a little to the rear on purpose to make operation easier. There is plenty of clearance in the rear.

BTW, Which photo input will you be using? I found the RIAA 1 to have the best sound balance and the appropriate ohm load for my cartridge.

I just read your whole Executive thread and saw the resistance figures for the two inputs. Riaa #1 - 50K, Riaa #2 - 100K Thanks for that as I may not have figured it out. I'm using #1 as my cart calls for 47K.

FYI - My thread on my Executive III is at: http://audiokarma.org/forums/index.php?threads/newly-acquried-executive-iii-w-1000-2a.586328/ . It may be of interest to you. Unfortunately the pics were lost when the system was upgraded.

Thanks, nice work, and great thread. BTW we are the same age. I have a 1958 Contemporary as my first console!!
 
I am going to try it anyway. If it doesn't work or I hate the look I have a ...
You will forget all about how it looks when the record is playing and great sound is filling the room. You can also use the extra space to hold your stylus brush.
Same age and same Fisher appreciation - must have been a very good year.

BTW - One other amp modification you may wish to consider. The stand alone amp and the console version are exactly the same (circuits) except for two low frequency bypass caps. I noticed when running the console amp without modification that the bass was not particularly deep. Did a little research on audiokarma and found out that the console amp's frequency bypass cap values are different from the stand alone amp's . I turns out that the console amp was intentionally designed with cap values to limit some low end, thereby limiting the potential for rumble/distortion from the TT that sits in the console vibrating along with it's powerful speakers. The stand alone amp had no such concerns since it and the TT could be located separate from the speakers. I changed the caps to the stand alone value and gained back the low end. I find the change didn't effect the TT playback performance perhaps because of modern cartridges. I'll look up the diagram notes when I get home to give you the cap numbers and value differences.
 
Last edited:
sruddy, what did you use to clean the amp chassis to get it to shine up so nice? :idea:
 
Sruddy, On my lunch break walk I thought of another possible TT fix that may help you. If you add weight to the tone arm's counterbalance weight you will need to move the weight forward to compensate. That may give you some extra room for clearance so either you don't have to move the TT or the move to the left can be minimized.
 
Four caps total (two per side). Here are the cap values for the console amp (X 1000) and stand alone amp X 101 ST:
X 1000: caps C53, C49, C51, C52 = .0047
X 101 ST: same cap numbers as above = .047
Changed my X 1000 to .047.
Regards
 
You will forget all about how it looks when the record is playing and great sound is filling the room. You can also use the extra space to hold your stylus brush.
Same age and same Fisher appreciation - must have been a very good year.

BTW - One other amp modification you may wish to consider. The stand alone amp and the console version are exactly the same (circuits) except for two low frequency bypass caps. I noticed when running the console amp without modification that the bass was not particularly deep. Did a little research on audiokarma and found out that the console amp's frequency bypass cap values are different from the stand alone amp's . I turns out that the console amp was intentionally designed with cap values to limit some low end, thereby limiting the potential for rumble/distortion from the TT that sits in the console vibrating along with it's powerful speakers. The stand alone amp had no such concerns since it and the TT could be located separate from the speakers. I changed the caps to the stand alone value and gained back the low end. I find the change didn't effect the TT playback performance perhaps because of modern cartridges. I'll look up the diagram notes when I get home to give you the cap numbers and value differences.

I have read about the cap thing as well and always wondered if that was the reason the consoles speakers sounded small. They seem to have plenty bass but they do sound small and unable to fill the 20 x 20 room very well. I just figured it was the speakers. I have been using my recently reconditioned X-10 speakers and unlike the console speakers they fill the room with big sound. I can't turn the base up more than midway when using them as it just gets to be too bass heavy.

sruddy, what did you use to clean the amp chassis to get it to shine up so nice? :idea:

I use Heavy Duty Goof Off. Just don't leave it sit on the printing for long and don't let it touch the ink stamped serial number. No elbow grease is needed, which keeps the natural luster to the chassis. I haven't found anything to get the tube shields clean though, so I end up using 0000 steel wool the polishing with mothers metal polish. I wish I could keep the natural finish on them but haven't found a way yet.

Sruddy, On my lunch break walk I thought of another possible TT fix that may help you. If you add weight to the tone arm's counterbalance weight you will need to move the weight forward to compensate. That may give you some extra room for clearance so either you don't have to move the TT or the move to the left can be minimized.

That won't help as the end of the arm is hitting before the weight.

Four caps total (two per side). Here are the cap values for the console amp (X 1000) and stand alone amp X 101 ST:
X 1000: caps C53, C49, C51, C52 = .0047
X 101 ST: same cap numbers as above = .047
Changed my X 1000 to .047.
Regards

Thanks I'll give that a try!
 
Tube shields. Try this. slather your choice of metal polish on them and let them sit about 5 minutes. Take an old white sock and wrap it around the shield. Fit the shield over your thumb or index finger, and twist the sock back and forth a few times around the sock. bend your finger to maintain it in place. This gets 99% of the junks and crud off. then polish with clean dry sock.
 
The TT is on the back burner for a moment. In the meantime I'm finishing the tuner. I just replaced the last 2 caps and got the dial glass back on. This time I just used distilled water on the printed side. It worked great and I didn't lose any lettering! Yay! I'm waiting on a new EM84 tuning tube to arrive. Both tuning tubes are dimmer than I like. The EM84 for the AM band is a bit brighter so I swapped it with the EM840 for FM just to see if there was any difference. It didn't come together as far as the EM84 did so I'm assuming the EM840 is more sensitive and can't be replaced with a EM84. I have only been able to find one EM840 and they want too much for it. If anyone knows a source that has one please let me know. In the meantime I was thinking about doing the mod to get more brightness from this tired tube. Has anyone ever done that and what's the directions to do it to this tube?
 
Back
Top Bottom