• Please note that Audiokarma will be offline briefly for updates early on Monday morning, September 28th.

Some teaser pics of a current Redboy project

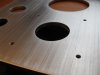
I spent a little time experimenting with sandpaper on the plates today. I think I'll leave them raw, with a faux brushed finish like this...

What do you think?

attachment.php


attachment.php
 

Attachments

  • IMG_2635.jpg
    IMG_2635.jpg
    46.3 KB · Views: 720
  • IMG_2642.jpg
    IMG_2642.jpg
    61.5 KB · Views: 785
I like it! I did a little bit of metal finishing myself recently for my tt but that was on stainless. I think Darren knows of a place that does anodizing to help keep it from tarnishing. That shouldn't really change the look you have.
 
Beautiful looking plate Nate. An idea to consider: Anodized clear coating. You'll have to sand away small spots for grounds and such, but it would sure help keep it looking pretty a lot longer.

In the meantime, I'm gonna sit back and enjoy the show. Gonna be better than "Avatar," I'm sure.:thmbsp:

Best,

John
 
I spent a little time experimenting with sandpaper on the plates today. (...)
What do you think?
I think they're purdy. You could really just leave them as they are and I'd be impressed. (No need to bolt any electrical components to them or anything!)
 
Nate,
That is some fine looking work. I will be following as well.
Regards,
Jim
 
I used to work at a sheetmetal shop that would punch aluminum sheetmetal parts. Some aluminum parts prior to bending on the brake, (if bent) would go in the sanding/graining room.

The graining machine had a overhead type of belt sander, which used a sanding belt roughly a foot and half to two feet wide.

A perforated belt type of automated conveyer ran under the belt sander, and had speed plus height adjustment. IIRC, it had a water/soap type of rinsing, to keep the belt from loading up, and to keep dust down.

You could adjust the conveyer table to apply more pressure on a part against the sanding belt. You could get it to apply a light grain on a part, then adjust more pressure for a more heavy graining.

Too much pressure, and you would start rounding the ends and corners of the part, where the ends aren't flat any more.
You could kind of get away with that, if the parts are smaller and can be butted end to end.
Otherwise, you would have to lighten the pressure for a larger part. So the sanding belt doesn't climb up on the front of the part, and drop back down when the part passes through. Rounding the ends.....

Then if bent, they go to the brakes. Then anodized.

So how did you go about graining those parts, Nate?
 
Ah, was it a "Timeslaver" I mean Timesaver machine? :D I've used one of those at an old shop I used to work at. It was pretty crazy if you ran the first part and the belt was too low. You would hope the belt wouldn't fly apart before you let up on the belt pressure.
 
I spent a little time experimenting with sandpaper on the plates today. I think I'll leave them raw, with a faux brushed finish like this...

What do you think?

attachment.php


attachment.php
I think that would work for me. I have been meaning to bring you a couple of samples of different finishes If you wish to do some more experimenting with those plates (and you may have already done this), try hitting them with a grit that is about a couple of hundred higher, i.e. a finer grit after you have established the texture that you want with the brushed finish. That tends to knock down the edges of the grain and develops a more uniform aspect.
Since this is all about custom work, I thought a finish like this might be the cat's nats:

images.jpg


I agree with others about anodization, it is the best finish for aluminum. I would presume the tubes are going to heat those plates and there will be a significant heat differential, so much, that a laquer or any other clear finish won't hold up. A good wax job might work.
 
Ah, was it a "Timeslaver" I mean Timesaver machine? :D I've used one of those at an old shop I used to work at. It was pretty crazy if you ran the first part and the belt was too low. You would hope the belt wouldn't fly apart before you let up on the belt pressure.

I can't remember the brand name of the beast, it's been about 23 years since I've worked there.

I do recall the machine could be pretty dangerous, and parts could go flying if there was too much pressure.
I can't really recollect which direction the sanding belt would spin, either....
 
Thanks for the kind words, fellas. These are turning out nicer than I anticipated, but I keep stalling out on this project worrying about aesthetics. :rolleyes:
So how did you go about graining those parts, Nate?
It took a little playing around, but it ended up being pretty simple, really. Lay a sheet of coarse sandpaper face side up on a scrap of carpet and run the aluminum piece back and forth over it. I used the edge of the other plate as a guide, sliding the working piece alongside the long edge to keep the grain straight. Use long strokes, running the plate off the edge of the sandpaper occasionally to avoid visible "stop marks."
If you wish to do some more experimenting with those plates (and you may have already done this), try hitting them with a grit that is about a couple of hundred higher, i.e. a finer grit after you have established the texture that you want with the brushed finish. That tends to knock down the edges of the grain and develops a more uniform aspect.
Thanks for the tip, Lance! I did that, and they look even better now!
 
A couple people have asked about these lately, and coincidentally I have a little bit more to show, too.

Here's a test fit, where I learned that I'll need to poke a couple more holes through the top to make the subplate assembly do its thing. Can't have those giant caps falling out, you know... :)

0323007.jpg


0323004.jpg
 
Cool!

That top plate looks real nice Nate.
Yeah, it turned out pretty well.

I've spent too long trying to decide how to finish it, and whether to repaint the transformer bells. I finally decided that if I were to wait any longer, it might never happen, so unfinished aluminum and Edcor blue they will be! :thmbsp:
 
Hey Stan, the caps are made by ASC, and they're available from some of the big electronics houses in a 440V rating. I got mine from Allied Electronics. They're also available in higher voltage ratings from Angela Instruments and Parts Connexion, I think.

Try the technique outlined in that thread when you next use the hole saws. It's a bit of fussing around to get everything set up and aligned properly, but it's a world of difference. Highly recommended!

Are those motor run caps?
 
Looking good Nate. This is an inspiration to get mine done. I am only lacking three motor run caps to finish mine.

I like the top and bottom plate idea. Looks very clean.

Edit: do you have a scheem for us to look at?
 
Last edited:
Back
Top Bottom
