• The move to the new server is done. There are some software and database maintenance updates in process. This has us passing the hat around to help out. We appreciate any donations. Seriously, even a dollar helps. The payment page may be found here - https://www.audiokarma.org/support.html

Technics Dustcover Fix

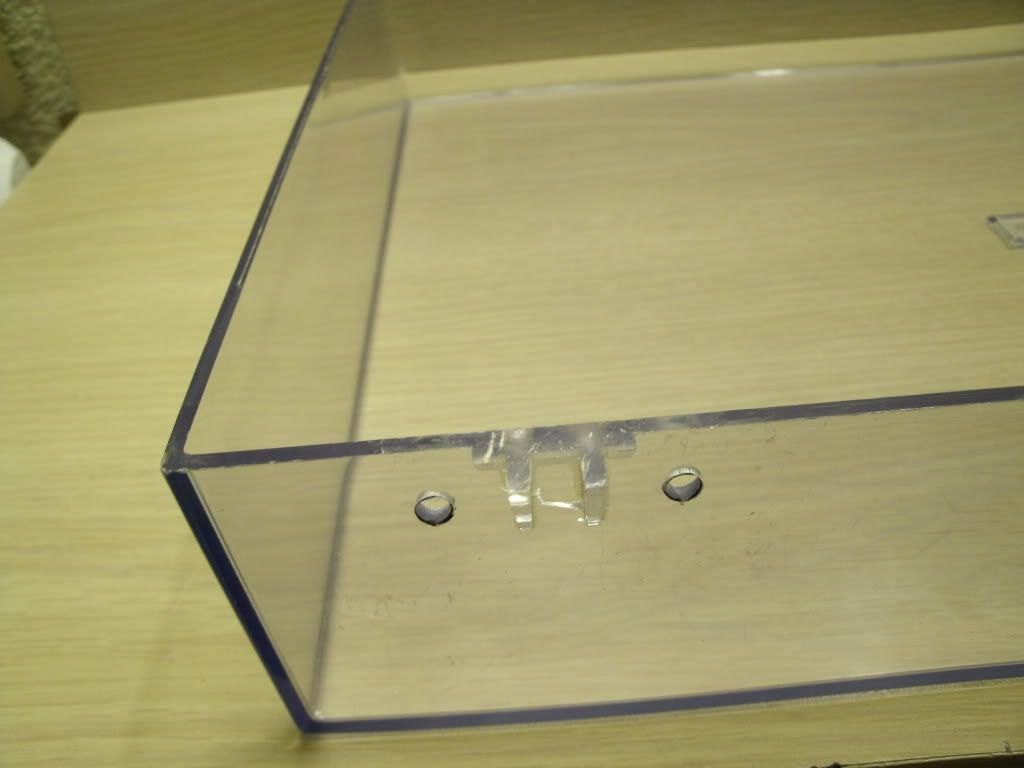
My solution to this problem is quite different, takes about half an hour, and the modified cover looks exactly like the original.

First step, I add some plastic shim (super glued) to the old tabs to make a perfect fit inside the hinges.

Step 2: With a pair of strong cutter, I cut the spring on each hinge. It is easier if you unfold the small steel tab that retains the spring, with a flat blade screwdriver. Then you can cut the spring.

Step 3: I remove a small amount (approximately 2mm X 4mm) of plastic on the hinges, with a fine toothed saw (steel saw), to allow the cover to open more than before, almost to 80 degrees. When I open the cover, it becomes in equilibrium.

With this solution I saved covers with both tabs broken.
 
No sweat, John:thmbsp:. I looked for aluminum angle today at Lowes but only could turn up steel angle. Not ideal, as any cutting is going to be done with my dremel...

I was even thinking making my own from some fibreglass cloth and resin. But my fibreglass kit seems to have gone off wandering.....

Home Depot does sell the aluminum angle. It comes in a couple of different lengths, the shortest being 3', I think. According to the web,they sell it for $9.97, the store SKU is #470885.

John
 
Last edited:
mine look pretty bad, i don't think is a fix for the damage. if anybody know a fix please let me know
 

Attachments

  • DSCN1144.jpg
    DSCN1144.jpg
    54.3 KB · Views: 236
  • DSCN1143.jpg
    DSCN1143.jpg
    59.6 KB · Views: 242
mine look pretty bad, i don't think is a fix for the damage. if anybody know a fix please let me know

Sadly, the ideas being put forward here are just to address the breakage on the little tabs that slot into the hinges on some Technics turntables. Damage such as you have seriously weakens the entire back panel of the dustcover.

The only fix I know of is to try to glue the cracks back together with really thin cyanoacrylate ("Super Glue") that actually wicks into the cracks and bonds them. There are also solvents that are designed for plastics that you can apply to the cracks. After it wicks in it doesn't glue the crack together but chemically welds it. Either of those is what I'd try.

John
 
I just got back from the Home Depot in the west end of Edmonton, so the Canadian HDs carry it as well. The price was a bit higher, though. I think it was $17.99 for 3 feet.
Now all I need is some "alone" time to get at it.
 
I just got back from the Home Depot in the west end of Edmonton, so the Canadian HDs carry it as well. The price was a bit higher, though. I think it was $17.99 for 3 feet.
Now all I need is some "alone" time to get at it.

Good grief! Six bucks a foot???? I can't see how it could be that much different in Canada, especially since I believe the Loonie's worth more than the Greenback these days. Or maybe the difference is web sales but I don't really get that either.

John
 
Good grief! Six bucks a foot???? I can't see how it could be that much different in Canada, especially since I believe the Loonie's worth more than the Greenback these days. Or maybe the difference is web sales but I don't really get that either.

John


It's weird here with pricing. Some stuff is quite similar, others not so much. Books and cars are two that can be a lot different. Electronics used to be, but I think most of it is closer now. I know when I bought my projector it retailed for north of $4000, but was being cleared out in the States at $1200-$1300. I asked around locally and the prices weren't even close. I think the best price was double what I got it for, even after shipping, duty, etc.

I spent more on the material, nuts&bolts, and a new drill bit than I did on the table in the first place. :lmao:
Unless I come up with another use for it, I have enough material to be breakin' and fixin' Technics covers for the rest of my life.:D
 
Even I, the most diy-challenged individual on the planet, can try this! I have a most willing victim for this elective surgical procedure! Thank you.
 
My solution...

I found the dustcover on my 30 year old Technics spring assembly had lost it's strength. The spring assembly is sealed on mine, so adding shims was out. So I added two fairly heavy bolts to the back of the hinge screw receptacles and used metal caps to cover their ends. The added weight acts as a counterbalance and keeps the lid open once raised.

attachment.php

attachment.php
 

Attachments

  • weight_a.jpg
    weight_a.jpg
    78.8 KB · Views: 363
  • weight_b.jpg
    weight_b.jpg
    67.4 KB · Views: 367
I repaired this once by adding some plastic shims where the spring is located. On that TT, the hinge mechanism was spring loaded. I believe that over time the spring's lost some of their tension and by adding the shims I was able to increase it. I had to play with it some to get the right thickness.

Thanks for the tip reneborg! I might give this a shot with my SL-B2.
 
Very Nice elegant solution, and I'm filing this one away for future use. I love the SL series TT's and have a SL-D3 and an SL-D1 "in production".

I did a similar repair on one of my hinges. I Dremeled off the broken tab, leaving the buttresses like you did. But instead of drilling and making full hinges like you, I took a scrap piece of plexiglass and reproduced the tab part. I then used plexiglass glue and glued the new tab to the old buttresses and let it cure overnight.

So far, it is holding up nicely and doesn't reveal itself unless inspected closely.
 
Excellent fix, excellent thread: I havent gotten thru the "dream phase" of how to fix the hinges on my SL-3; this will help!! I was actually thinking of running alum all the way acrossthe bottom of the back for strength but your fix is much nicer.....
 
boreas, those dimensions , on paper full size,, look rather big, but dont look all that big installed on your cover. Is it optical illusion?
I just have to put it to the DC and see how it fits.
 
boreas, those dimensions , on paper full size,, look rather big, but dont look all that big installed on your cover. Is it optical illusion?
I just have to put it to the DC and see how it fits.

They're correct but, yes, they're a little big. T he main reason is that you need to make them wide enough so the bolts fit either side of the triangular supports with enough room for nuts and washers.

John
 
Yes Boreas, I put a ruler to the DC and indeed those dims are what's needed.
Looks abit challenging cutting those tabs off but patience will prevale.
Thanks for giving out your fix project.
 
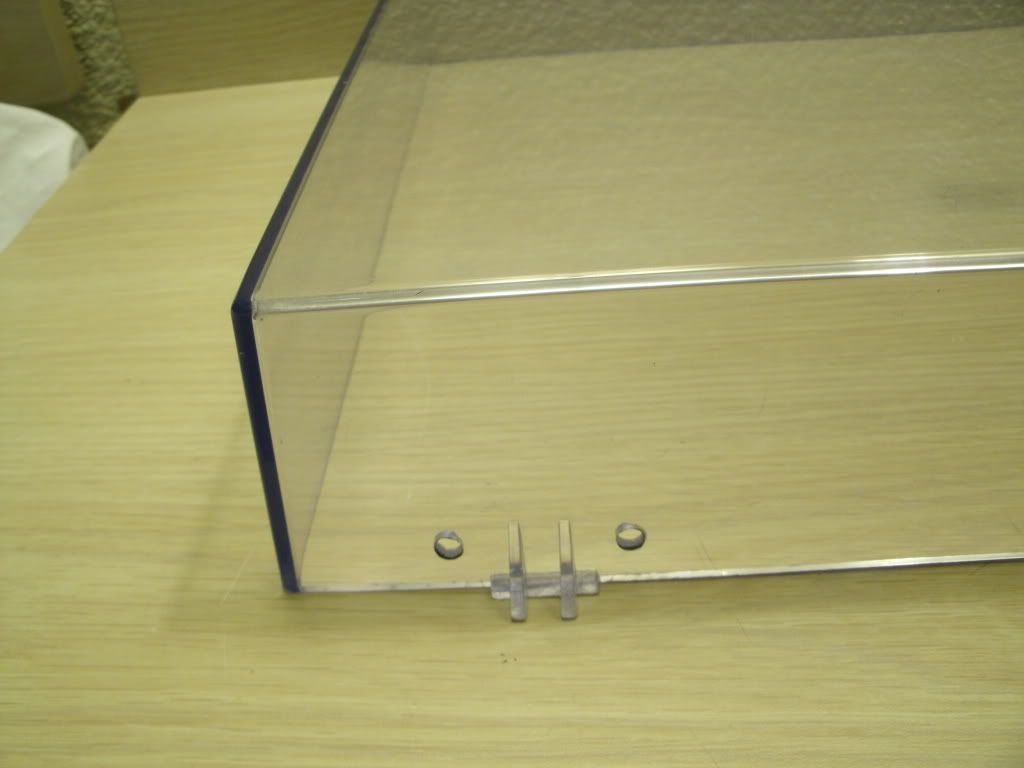
I guess pretty much anyone who has ever owned a Technics turntable with those plastic "tongues" on the dustcover that insert into the hinges has had to confront the issue of the ends of the tongues snapping off. I just picked up an SL-D3 with a badly scratched dustcover on which both tongues were gone and I came up with a fix that I thought I'd share.

The first thing I did was to cut off all of what remained of the tongues. This required that I make a horizontal cut which removed all of the tongue but left the little "buttresses" that are supposed to strengthen the tongues. Then I drilled four holes to mount the parts I was about to make to replace the tongues. (I did these things first because if I managed to screw up the dustcover there would be no point in continuing. ;)) Then I polished the dustcover.

TechnicsDustcoverRepair003.jpg


TechnicsDustcoverRepair002.jpg


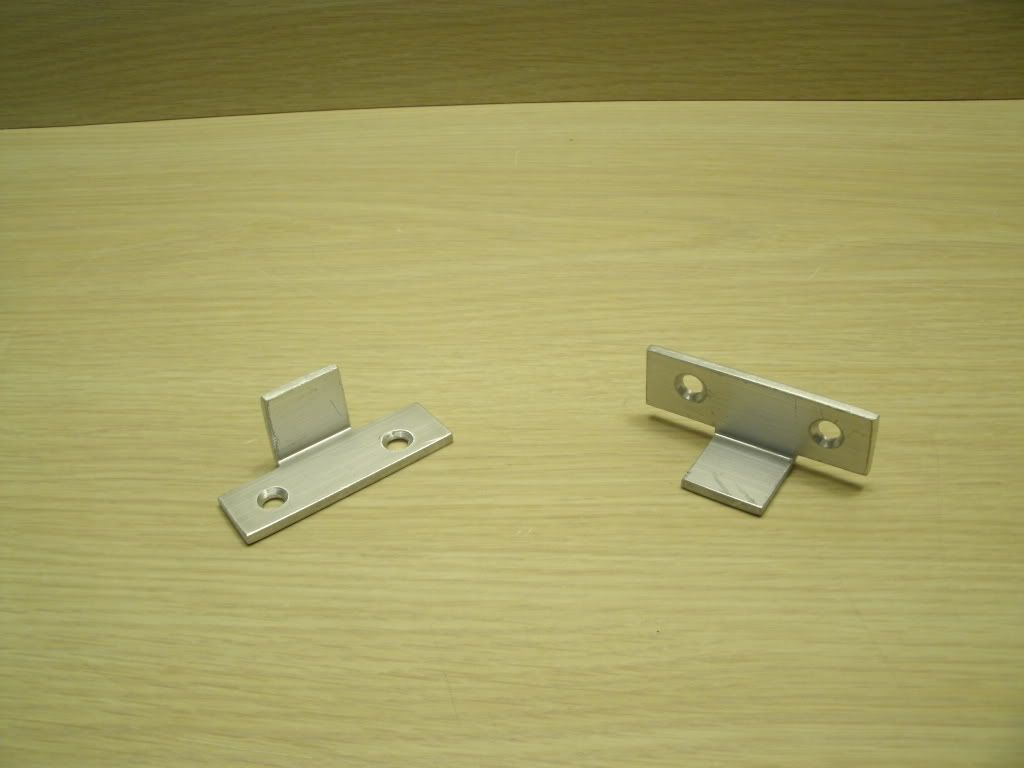
Then I got a piece of 1" x 1/8" aluminum angle and made up the replacement tongues. I made 2 pieces. The measurement of the tongue is 13/16" wide and 7/8" long as measured on the outside of the angle. The width of the part that bolts to the dustcover is 2 1/4" but that's not so critical.

TechnicsDustcoverRepair001.jpg


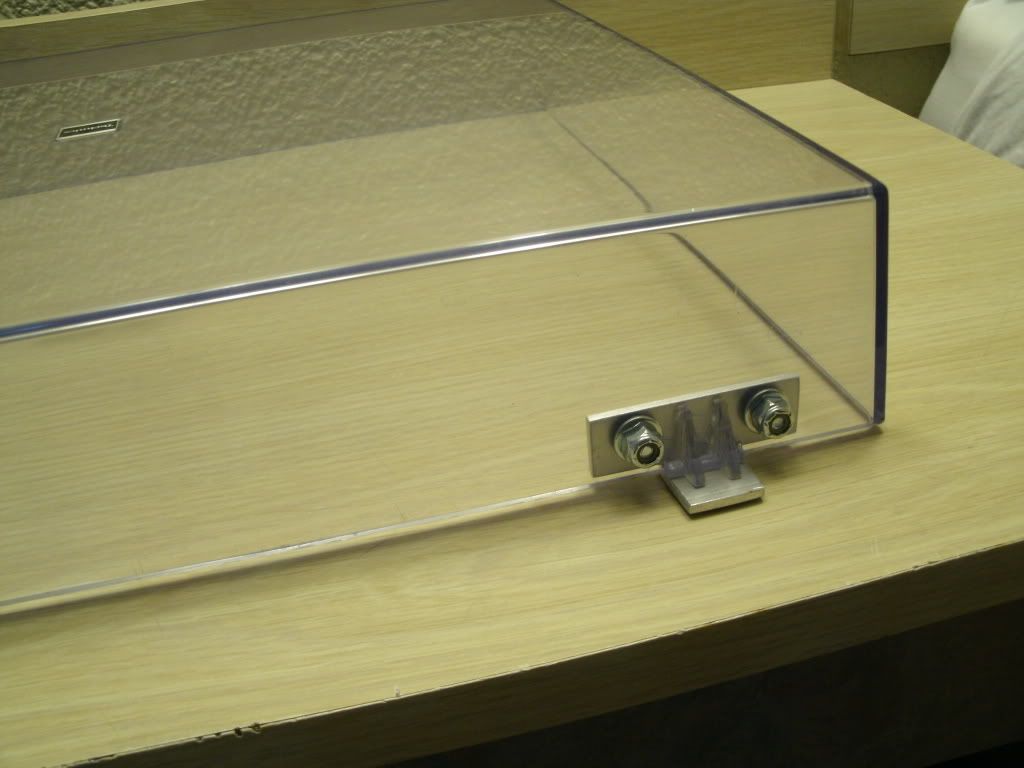
Then I attached them to the dustcover.....

TechnicsDustcoverRepair004.jpg


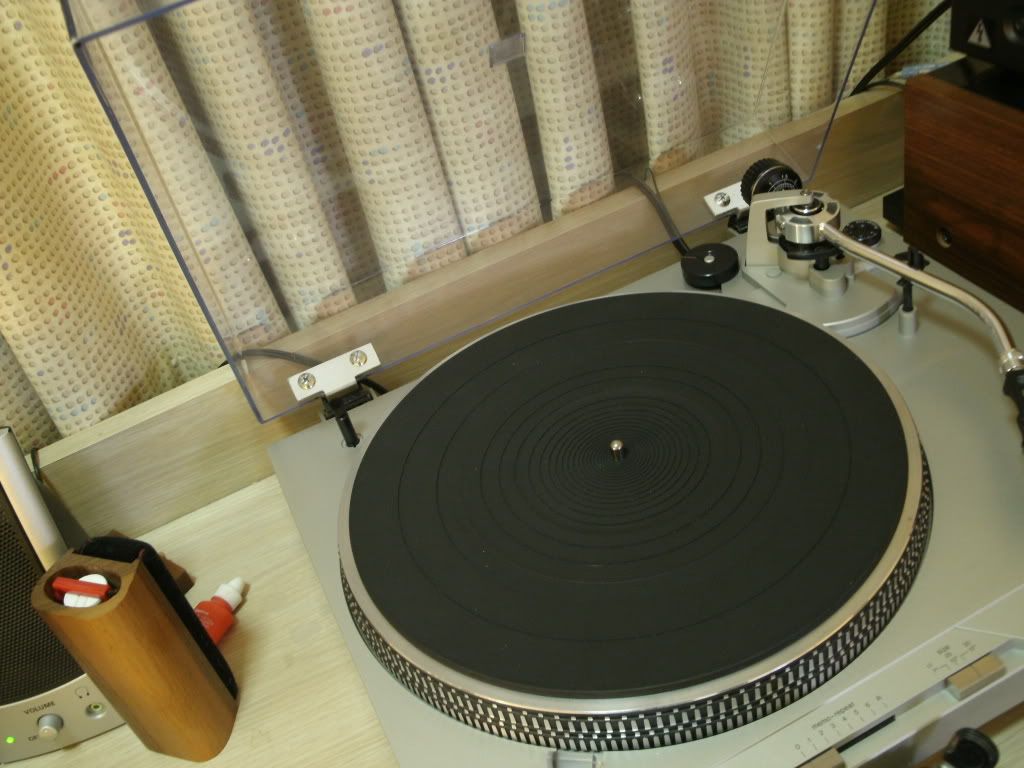
.... and installed the dustcover on the turntable.

TechnicsDustcoverRepair005.jpg


Overall, I'm quite pleased. The 1/8" tongues fit the hinges very well but they're slightly thicker than the originals. That means that the hinges have to be raised up out of the sockets they fit into very slightly in order for the cover to fully close. A small matter and a fair trade-off for repairing an otherwise usable dustcover.

John

You are the man! Excellent repair!:thmbsp:

John.:music::D
 
How do you drill the cover with out cracking it cause i know Plexi glass is a pain to drill and not crack and I know most or think most dust covers aren't plexi glass but what ever there made of they just seem like they'd be hard to drill.
 
my bet is styrene or close to it. Im gonna start with a "small" bit as a starter hole and go up to a $6 screw hole in maybe 2 steps.
 
How do you drill the cover with out cracking it cause i know Plexi glass is a pain to drill and not crack and I know most or think most dust covers aren't plexi glass but what ever there made of they just seem like they'd be hard to drill.

I just used a power drill with variable speed and went pretty slowly. Now, I did drill the holes before I did anything else, figuring that would be the most likely place to come to grief.

John
 
Back
Top Bottom