• The move to the new server is done. There are some software and database maintenance updates in process. This has us passing the hat around to help out. We appreciate any donations. Seriously, even a dollar helps. The payment page may be found here - https://www.audiokarma.org/support.html

Technics Dustcover Fix

The problem I've got on my SL-230 is the spring on the hinge has broken the black block that the cover slides into. Is there a way to repair the black plastic block that holds the spring and hinge pin that is splitting apart?
 
The problem I've got on my SL-230 is the spring on the hinge has broken the black block that the cover slides into. Is there a way to repair the black plastic block that holds the spring and hinge pin that is splitting apart?

I've made sheet metal replacements for the hinge sockets on a Pioneer PL-530 that had lost the originals. Those are metal to begin with but you might be able to do that on the Technics too.

John
 
technics SL-230 dustcover hinges

I've made sheet metal replacements for the hinge sockets on a Pioneer PL-530 that had lost the originals. Those are metal to begin with but you might be able to do that on the Technics too.

John
Are you saying that you take the hinge pin out of the bracket and remove the spring to make a metal sleeve to cover the outside of the black plastic block and drill holes in the sleeve to pass the pin thru?
 
Are you saying that you take the hinge pin out of the bracket and remove the spring to make a metal sleeve to cover the outside of the black plastic block and drill holes in the sleeve to pass the pin thru?

No, I'm saying that I made a set of the brackets ("sockets") that the hinges fit into.

From your earlier post:

"The problem I've got on my SL-230 is the spring on the hinge has broken the black block that the cover slides into. Is there a way to repair the black plastic block that holds the spring and hinge pin that is splitting apart?"

I assume the black block you're talking about is the hinge itself, specifically the part of the hinge that the "tongue" on the dustcover fits into and which fits into the socket molded into the turntable base. I doubt it's fixable. Those parts are common to a number of different Technics models. Since the failure point on those tables is almost always the "tongue" on the dustcover itself, you probably won't have too much trouble finding one. There are two or three different types, though, so a little research might be in order.

John
 
I guess pretty much anyone who has ever owned a Technics turntable with those plastic "tongues" on the dustcover that insert into the hinges has had to confront the issue of the ends of the tongues snapping off. I just picked up an SL-D3 with a badly scratched dustcover on which both tongues were gone and I came up with a fix that I thought I'd share.

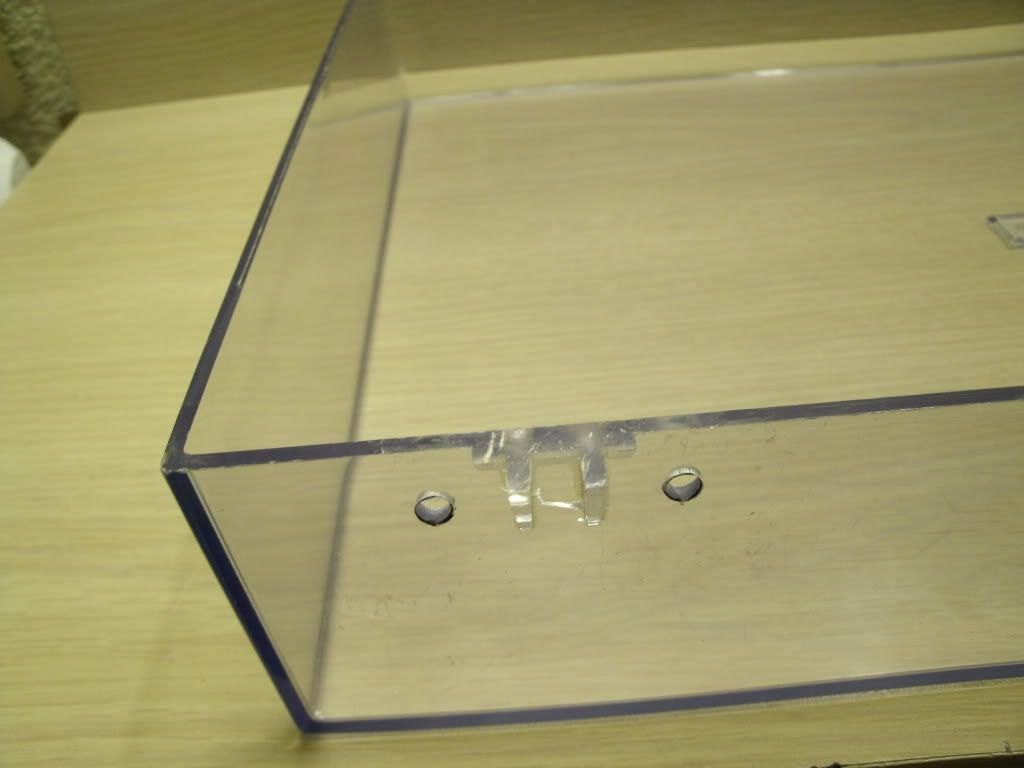
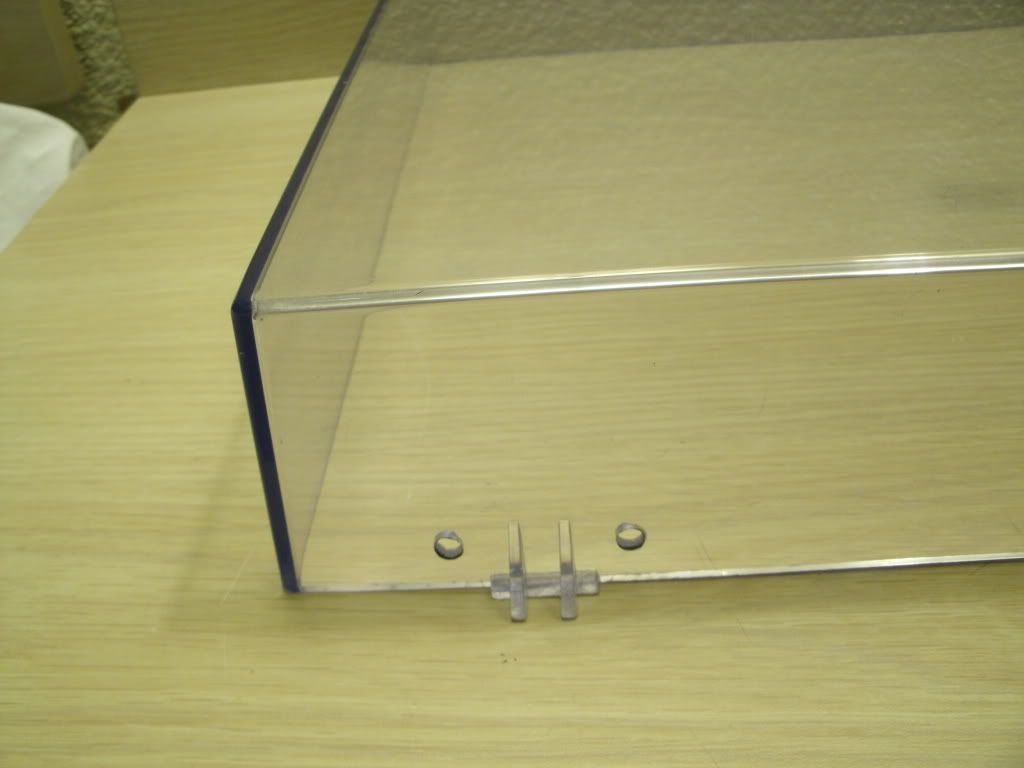
The first thing I did was to cut off all of what remained of the tongues. This required that I make a horizontal cut which removed all of the tongue but left the little "buttresses" that are supposed to strengthen the tongues. Then I drilled four holes to mount the parts I was about to make to replace the tongues. (I did these things first because if I managed to screw up the dustcover there would be no point in continuing. ;)) Then I polished the dustcover.

TechnicsDustcoverRepair003.jpg


TechnicsDustcoverRepair002.jpg


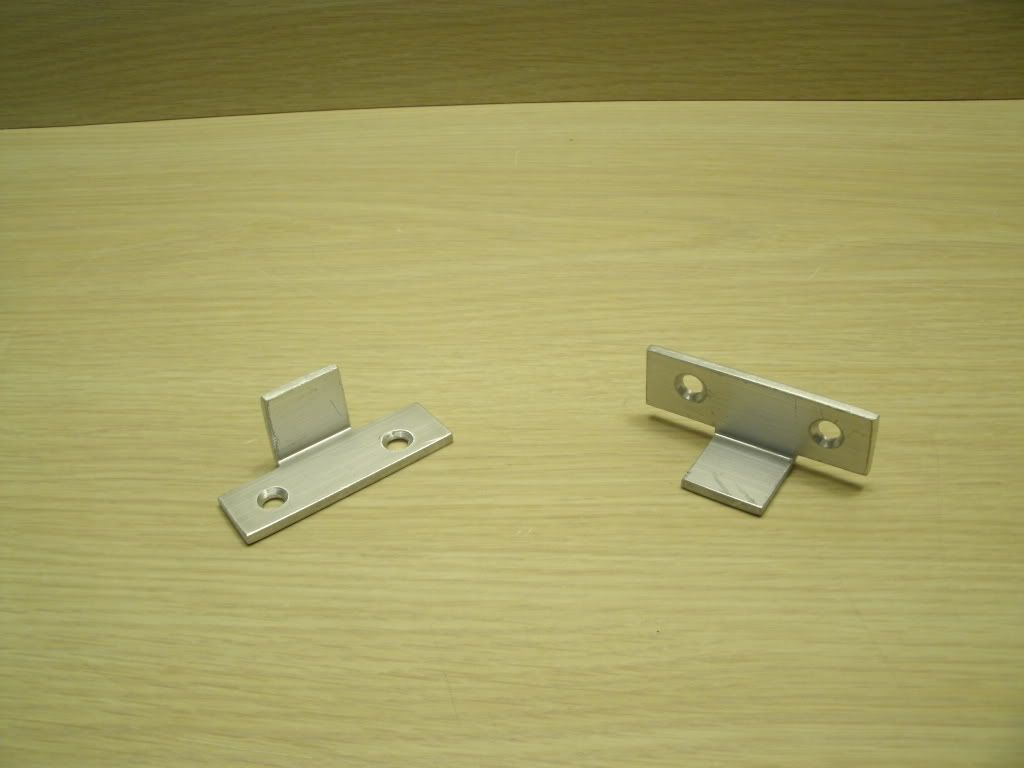
Then I got a piece of 1" x 1/8" aluminum angle and made up the replacement tongues. I made 2 pieces. The measurement of the tongue is 13/16" wide and 7/8" long as measured on the outside of the angle. The width of the part that bolts to the dustcover is 2 1/4" but that's not so critical.

TechnicsDustcoverRepair001.jpg


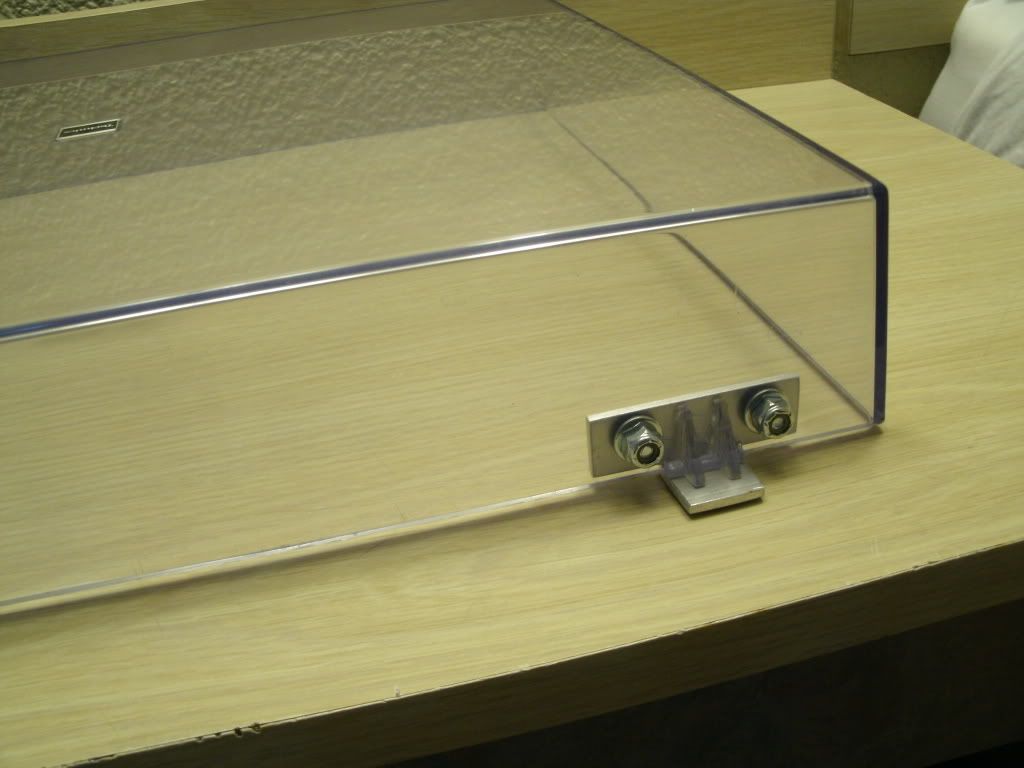
Then I attached them to the dustcover.....

TechnicsDustcoverRepair004.jpg


.... and installed the dustcover on the turntable.

TechnicsDustcoverRepair005.jpg


Overall, I'm quite pleased. The 1/8" tongues fit the hinges very well but they're slightly thicker than the originals. That means that the hinges have to be raised up out of the sockets they fit into very slightly in order for the cover to fully close. A small matter and a fair trade-off for repairing an otherwise usable dustcover.

John

That's really nice work . And it looks better than stock too .
 
Your repair to the tongqes on the dust cover looks very polished and professional! I have gotten the hinge pins to come out of the black plastic block along with the hinge springs. The spring is always under pressure pressed against the inside of the plastic block that the dust cover fits into. I did attemp JB Welding the cracked of side of the block, but it is under too much pressure to remain attached. I'm going to try covering the outer side after again reglueing the pieces of the block together and fit the steel sleeve over with holes drilled for the pin to pass thru. I'll let you know with photos if this is a success.
 
That's really nice work . And it looks better than stock too .

Thanks. I did that repair a little over 2 years ago and it's still holding up. My landlord owns the table now and he's quite happy with it.

John
 
Your repair to the tongqes on the dust cover looks very polished and professional! I have gotten the hinge pins to come out of the black plastic block along with the hinge springs. The spring is always under pressure pressed against the inside of the plastic block that the dust cover fits into. I did attemp JB Welding the cracked of side of the block, but it is under too much pressure to remain attached. I'm going to try covering the outer side after again reglueing the pieces of the block together and fit the steel sleeve over with holes drilled for the pin to pass thru. I'll let you know with photos if this is a success.

The failure you have is actually fairly common on some other types of hinges where the upper half is plastic and the spring presses against it. I fixed a set of them pretty easily and very successfully a while back by simply removing the plastic "web" that the spring presses on and inserting a pin at right angles to the spring so that the spring pressed against the pin.

Here's a picture:

attachment.php


Frankly, I'm not optimistic about this method's adaptibility to the Technics hinges but it might be worth a try if all else fails.

John
 
Very clever. You should think of selling them....

They're pretty fiddly to make with hand tools. Lotta hack sawing and filing. I'd have to charge an unreasonable price to make the time spent worthwhile. It's more fun to pass on the "how-to" to my fellow audiophools here.

John
 
Last edited:
Very nice! Thanks for sharing, I am quickly becoming a technics fan. This fix will undoubtably come in handy!
 
And my drill and bit of choice. I used a 3/16" and had no hint of cracking as I went through. Using a light drill like this is nice for finesse work. Getting the holes placed symmetrically is the hardest part. I didn't exactly but I will work with the metal pieces when I drill them.


Makita by Buhduh, on Flickr
 
I finished my set today. Having a friend who owns a machine shop with a band saw set up for metal helped. They had lots of metal scrap around and better tools than I do.

However as you can see on the left, describing how you want something cut can sometimes be misinterpreted ("No that's the part I wanted you to leave, not cut away"). The ones on the right worked out well though!

The stock is thinner than Boreas used so I ended up with less of the height problem but had to shim the tabs where they enter the hinges. My alignment on the holes in the lid wasn't great either but I made the holes in the metal match. I also ran the inside across a drum sander with some fairly coarse paper in it and it gave them a nice textured look.

After the basic shape was cut at the shop, I drilled and dressed and sanded at home in the garage. Having a drill press, grinder and stuff helped but I still had to some hack-sawing too. It will be good enough for whatever new owner it gets soon.


Technics hinge things by Buhduh, on Flickr
 
Last edited:
Back
Top Bottom