• The move to the new server is done. There are some software and database maintenance updates in process. This has us passing the hat around to help out. We appreciate any donations. Seriously, even a dollar helps. The payment page may be found here - https://www.audiokarma.org/support.html

Technics SU-8044 repair

I expected to see from one pair of terminals to measure the whole 250k no matter where you set the volume. I don’t, odd. Anyhow have you cleaned this pot yet? And the last pair was the most linear tracking to each other. The schematic doesn’t indicate the terminals by number, I want to know the wiper and input pair, but nothing makes sense, they all vary. The ground should be the easiest to find, it will measure ~0 ohms to the ground. The other two are the ones that matter.
 
Ok, I looked at your measurements table and you mentioned that 1 and 2 were grounded, I suspect they are also. So in my opinion your volume control is working correctly. What was the symptom that made you believe it was broken? The adjustable range of 75k is not unusual and is plenty for a volume control. The 250k may have been chosen to provide impedance to the previous stage.
 
Ok, I thought that because there was not adjustment in the resistance across 1,3 that there was a problem with the pot - but it didn't make cmplete sense as a problem - if that makes sense. So, have we exhausted this? It' a shame because behind the 'farty' noise is a nice sounding amp!
 
There are a couple things yet this amp likely needs to give it a fair shot. Due to the age of the amp, now forty plus years, changing the electrolytic caps out, and checking/adjusting the DC offset. Those might fix the remaining issue. "Farty" sound occasionally is hard too pin down. You don't have much money into it, and a recap is more time consuming than expensive, it might be worthwhile to you.
 
Ok, I'm quite up for trying that - although a quick look at the 'newbie cap replacement' thread fills me with fear!

Is it just those two big ones that need replacing or is it all of them? I'm finding this bit of information hard to find. There are kits online that seem to say there are 40 capacitors in the kit - that's quite a bit of soldering to get right! I suppose you do it one at a time an check it works still.
 
The two big ones are meant for power supply filtering and would likely mostly affect hum. To do it properly and refresh the unit, all electrolytic are suspect. Someone actually sells a recap kit for these? Interesting. There you are paying for their research time finding all the correct values and sizes. A person can also do the research themselves and buy everything from a distributer like Mouser, and pay much less.

Desoldering in my opinion is the more difficult step. As you need to leave the holes open while not lifting any pads. A desoldering iron is ideal and makes it even easier than soldering in. But not many have such a tool, I have a crude RadioShack one that uses a rubber bulb for vacuum. Solder wick will also work, but you are back to the struggle of getting the holes open. some use a small pin that can take the heat but doesn't solder well itself to keep the hole open. I have redone my own tuner, two preamps and several power amps, it can be frustrating as hell, or very therapeutic. Take some good clear photos of the board to Reference, do one cap at a time, make sure you reinstall each in the same orientation it came out.

Just remember this isn't a guarantee to fix the "farting" noise. As an electronics troubleshooter for many years this is just the next most likely action to take. For me troubleshooting by message board is not ideal. You could have a cracked solder joint or trace, a failing resistor or transistor also, but those are further down the most likely path.The fact the unit works well at times really pushes transistors far down the list at this point. Good luck.
 
I think it's probably a bit ambitious for my first fix - I'm going to shelve it for now - as you mention it hasn't cost me much. But many thanks for your time - I feel I have learned quite a bit already.

So I am going to move onto the next one now - a Technics SU C04 (it came free with the 8044). Its volume pot stops increasing resistance after about 2 o'clock - so it seems to be a similar issue to the one we were looking at 12 hours or so ago with the 8044. Do I need to start a new thread for this?
 
The plot thickens...

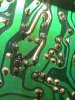
I was just about to put the case back on and I noticed that the bit of circuit board beneath R511 (that I thought was blown, mentioned above) had quite a bit of crap on it (see photos). I cleaned it off, turned it back on, connecting speakers to the 'main' circuit. The right one sounded great, the left a little farty (this is a new situation though). Just for the hell of it I plugged the speakers into the 'satellite' output. They both worked. So I plugged them back into the 'main' output. They both worked. No earth noise, no farty noise either. I guess I just have to run it for a bit now to see if it's stable!
 

Attachments

  • 73745ac4-7530-482a-b471-c6db2bc69ff9.JPG
    73745ac4-7530-482a-b471-c6db2bc69ff9.JPG
    118.4 KB · Views: 15
  • 49e3dd96-6321-4b5d-8f9b-efd85c668564.JPG
    49e3dd96-6321-4b5d-8f9b-efd85c668564.JPG
    104.4 KB · Views: 17
Would you advise having a gentle poke of the components with a non-conducting stick when it is playing to see if I can replicate the intermittency (not sure that is a word)?
 
...so I found the problem (sort of) - when you wiggle the case around, the left channel flickers on and off, so I guess there is a short somewhere. It seemed to occur most when I wiggled the transformer, but generally stretching the case one way and then another triggered it also. I feel I'm getting closer!
 
Cool, that is the thing with vintage equipment, you can have odd intermittent issues at any moment just due to age issues. I have chased them in a Dynaco ST70 now for over two years, wound up replacing damn near everything to make it completely reliable. Fortunately it is my forever amp at this point. Just this past Tuesday, I finally figured out what was causing a random distortion of certain frequencies in the left channel, it took months because it was random and could have been anything from the speaker through to the EQ plug-ins I run in the Mac mini I use as a streamer. I threw away a good six foot interconnect I had mistakenly thought corrected the issue. Distortion came back a couple days after the trash got picked up. Wound up being the volume pot in the preamp I had rebuilt. At the time I couldn’t get inside the block to clean it, thinking it was sealed. I knew it could be scratchy if sitting awhile but it could be cleared up with a few twists of the knob. After finally systematically isolating it to the preamp I broke down and pulled it apart completely so I could get the volume pot block out. Found out it could be pulled apart just enough too allow spraying in Caig pot cleaner and lube. Very well made pot by the way. It sounds better than ever before. So even after recapping it, replacing every carbon film resister with metal film ones and replacing all four IC chips with modern made ones, just missing getting inside that pot to clean it, bit me the ass. New has its charms.
 
lol - that sounds like a very familiar situation! After my tinkering on this amp I can see that I have thrown away some nice old stuff in the past through naivety - nice trio and sansui amps, and the SME 3009 tonearm that I thought was a cheap one and basically gave it away. Anyway hopefully we learn!

So, my current thinking is that my 8088 is shorting because something is connected to something it shouldn't be connected to, rather than something not being connected to something it should be, as it were. So my reasoning is that if I take the amp apart and separate all the conducting components, eventually I should be surrounded by a load of connected parts and a working amp. What do you think?
 
actually I would start with just reflowing the solder joints on those components in the photo you last attached. Some of them look iffy. Then if that doesn't correct the issue, your suggestion of moving things with a non conductive stick while it plays is also a good idea. I believe the opposite, instead of shorting something, you are breaking a tenuous connection as you flex the chassis. The circuit board is firmly attached to the chassis so flexing the chassis flexes the circuit board as well. Also it could be flexing a ribbon cable a little or even a wire.
 
Right, I'm nearly there - when I push down on the left 'darlington power pack' the sound cuts in and when I let go it cuts out. So I guess there must be a problem where it connects to the board.
 
A quick update - I just got my de-soldering and soldering Iron back so I'm going in tonight.

But, after staring at it for some time I can see now that there is a possible design flaw in that there is not enough reinforcement in the casing to stop flex being transferred to the solder joints. If you look underneath you can see the left channel has no steel 'stretcher' support bar while the right channel has one. I can see that the lack of stretcher might mean that flex in the case would transfer to the solder joints at the point where the power pack is soldered.

I'll update later
 
Back
Top Bottom