I recently bought a M-50 amplifier which the owner has said he had sitting for more than a decade. He powered it up in front of me and the protection light did not come on. Now I bought this from him knowing I will need to restore and replace many of the older components and replace the meter lights to LED's. I found a couple recap kits on eBay and was wondering if anyone has dealt with any of these kits. Or does anyone have any recommendations for any places to get these kits? Thanks for the replies!


You are using an out of date browser. It may not display this or other websites correctly.
You should upgrade or use an alternative browser.
You should upgrade or use an alternative browser.
Yamaha M-50 restoration /recap kits on eBay
- Thread starter RoddyRod
- Start date
Register to hide this ad
Thanks for the reply. Do you know of any reputable vendors that have a kit together ready for purchase?Welcome aboard Roddy.. Good luck with your project..
PS I,ve never used any kits on ebay..

No I don't. I make up my own BOM's and order from Mouser or Digikey..Do you know of any reputable vendors that have a kit together ready for purchase?

I do the same...I use Digikey. Power amps are the ultimate learner piece cuz they have fewer caps than pre amps & receivers. I don't recommend kits for power amps.
Grab a metric ruler and start with the smallest caps first. Measure height, width, and wire lead spacing. Write it down. At Mouser or Digikey, enter the capacitance value, then enter the Voltage rating in a range of minimum to higher values as needed. Then click the "audio grade" purpose/application. Then click "in stock".
That should narrow your options to less than 20 choices. Further narrow your choice of 20 via the metric ruler measurements you wrote down earlier. I order small and medium size caps in quantities of 10+ cuz it's cheaper and they'll get used in other Yamaddictions.
The large caps are more involved and ya need to focus on lead spacing with those and often can only be found in the general purpose category vice audio grade to find them. Kits are the pits and this job might cost ya $50 including the meter board caps & shipping if ya DIY.
Good luck.
Grab a metric ruler and start with the smallest caps first. Measure height, width, and wire lead spacing. Write it down. At Mouser or Digikey, enter the capacitance value, then enter the Voltage rating in a range of minimum to higher values as needed. Then click the "audio grade" purpose/application. Then click "in stock".
That should narrow your options to less than 20 choices. Further narrow your choice of 20 via the metric ruler measurements you wrote down earlier. I order small and medium size caps in quantities of 10+ cuz it's cheaper and they'll get used in other Yamaddictions.
The large caps are more involved and ya need to focus on lead spacing with those and often can only be found in the general purpose category vice audio grade to find them. Kits are the pits and this job might cost ya $50 including the meter board caps & shipping if ya DIY.
Good luck.
Last edited:

Semanon
Super Member
Hello Roddy. I also put together my own BOM and orders. It makes me familiar with the equipment, the schematic, and the layout, plus I capture any factory changes that the kit assembler misses. It takes me two hours or so (though the first few took longer). I find that I save about 50% to 60% off the cost of the preassembled kit. If your time is very tight and valuable to you, then go with a kit.
Get the names of the sellers you are considering and post in the DIY or General Audio forums to get some opinions. I've read some horror stories about some sellers taking forever to ship, or shipping incomplete or incorrect kits. These forums will have more readers and you can get a wider range of responses.
Good luck.
Get the names of the sellers you are considering and post in the DIY or General Audio forums to get some opinions. I've read some horror stories about some sellers taking forever to ship, or shipping incomplete or incorrect kits. These forums will have more readers and you can get a wider range of responses.
Good luck.
Last edited:

Well, I ended up getting a hold of another M-50 amp. The first one I had got stolen from my garage  . So I found one that does need a little servicing. The previous owner mentioned the amp would go into protection once he has had it on for a while and stay like that for a couple days. After it would sit for a couple days, it would work again and go back into protection after listening to it for a while again. When I opened it up, it looked like there was a bit of corrosion around the silicone diodes that are next to the output relay on one channel. It looks like a drip of water started it. The other channel looks ok. Could this be part of the reason why it would go into protection? He mentioned a technician took a look at it and listened to it for a while without any problems. Does it sound like I will have to replace any of the output transistors? Thanks for the help.
. So I found one that does need a little servicing. The previous owner mentioned the amp would go into protection once he has had it on for a while and stay like that for a couple days. After it would sit for a couple days, it would work again and go back into protection after listening to it for a while again. When I opened it up, it looked like there was a bit of corrosion around the silicone diodes that are next to the output relay on one channel. It looks like a drip of water started it. The other channel looks ok. Could this be part of the reason why it would go into protection? He mentioned a technician took a look at it and listened to it for a while without any problems. Does it sound like I will have to replace any of the output transistors? Thanks for the help.
Last edited:
Maybe, maybe not. Take some good, sharp, close up photos of all the boards. This is not the amplifier for a rookie to learn on. X-power supplies can be tricky. What is your mains voltage ? 120VAC or something else ?Could this be part of the reason why it would go into protection?
120v. No voltage selector in the back. I took out the main and pre-driver board to clean up. The boards had a lot of dust and grime that I wanted to clean up before working on them. Besides what I have mentioned, I do not see any burned out components or anything that may be leaking or overheated. Is there anything else to look out for that may be obvious? This model doesn't have the faulty C607 cap that I see others have had problems with. Would pictures still help if these two boards were cleaned up? Thanks for the help.

Sparkplug
Super Member
Yes.Would pictures still help if these two boards were cleaned up? Thanks for the help.
what a dickThe first one I had got stolen from my garage
I'd try and keep it as simple as possible at the moment. Tap on the relay and suspected area with a non conductive poke stick while it's on to try and trigger the protection mode. Hopefully just a broken solder connection on the relay.a bit of corrosion around the silicone diodes that are next to the output relay on one channel
Last edited:
Before I started taking it apart,I did listen to it for a little bit. I didn't notice anything over heating. Sounded good, just smelled a little when it started getting warm. That's why I wanted to clean it out. Found a couple dead critters inside so this is really motivating me to get it apart and clean it inside and out. So at this point I cannot try tapping these relays. Are these relays known to be a problem? Making a BOM for all the electrolytic caps for now.what a dick
I'd try and keep it as simple as possible at the moment. Tap on the relay and suspected area with a non conductive poke stick while it's on to try and trigger the protection mode. Hopefully just a broken solder connection on the relay.
Many people replace them due to age from all the repetitive mechanical operation. Sometimes the pitting of contacts causes oddities. Solder cracks on the board side can happen from all the clicking over time.Are these relays known to be a problem?
As a hobbyist with a piece like that...I just clean them out, re-cap it, clean all controls. I usually find the faults during that process. Aka loose grounds, bad solders, over cooked parts,etc.
Here's the secret for a nice re-cap. Take a fine point marker pen & notch the top of the old caps getting replaced. Notch mark them all toward the front of the piece before swapping anything. You'll see what I mean as ya re-cap afterward. Enjoy.
Here's the secret for a nice re-cap. Take a fine point marker pen & notch the top of the old caps getting replaced. Notch mark them all toward the front of the piece before swapping anything. You'll see what I mean as ya re-cap afterward. Enjoy.
Last edited:
Got a voltmeter? This amp behaves like an amp I bought "broken" once. The seller had the idle current/bias turned up too high on the right channel. Went in & out of protection when the amp warmed up. Easy fix.After it would sit for a couple days, it would work again and go back into protection after listening to it for a while again.


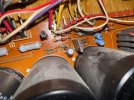
Sparkplug
Super Member
What about the solder side? That’s where the beef is …Here are the pictures of the boards. Havnt got to cleaning all of them, but the main amp board and input board were the worst, so I had taken care of those first.
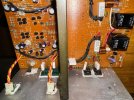
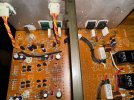

Sparkplug
Super Member
LOL, these look pretty clean to me, almost mint …Here are some more. Circled the little corrosion area.