• The move to the new server is done. There are some software and database maintenance updates in process. This has us passing the hat around to help out. We appreciate any donations. Seriously, even a dollar helps. The payment page may be found here - https://www.audiokarma.org/support.html

Air Guns

explaining, ^,.....

The Beeman high-pressure air valve is a faulty design. It leaks. I've tried numerous times to get it corrected in warranty (I lived close to Beeman, and, was able to hand-carry warranty work, same day in and out). Even with having been given a whole new air chamber tube under warranty, and all of the high-pressure air works, it kept failing.
So, when the warranty ended, I tried modifying the valve on my own, trying to get it to hold air. At least my DIY mod worked better than the Beeman stock units. My DIY fix was a nylon washer, and slow-dry JB-Weld to the end of the plastic valve poppet.
Well, my fix kept working, just alright, but satisfying enough. It worked for a few years, in fact.
Then the rifle got shelved, because I ran out of Ground Squirrels.
When I pumped it up, recently, and tried to shoot it again, after a couple of years of being shelved, it pumped to pressure just fine, but, something in the valve was stuck, and, it wouldn't shoot. So, I disassembled it again for the odd hundredths of times, and I lubed all of the works, and, it fired again. And, it seemed to hold perfect pressure this time, as I had applied some grease to the valve seat on reassembling it all. I was ecstatic. This worked out for the better part of a month.

Well, I store the rifle in a corner of the bedroom, in a slot beside a dresser. Its out of the way there. We also sleep with the cat on the bed, as she insists on being there.
We were all asleep, when suddenly at like 1am, my DIY fix, the nylon washer at the poppet valve seat, which had lasted a few years, it failed, and cracked into a "C" shape, producing a lot cracking pop, and then a long extended air escaping hissing noise as 2000lbs of pressure leaked out the "C" crack in the nylon washer.
Sarge and I sat straight up, and Kitty, she hit the ceiling, and was clawed in up there until things settled.

So, for the umpteenth time, I tore into the rifle again, as the valve is the deepest part of it, and the heart of the system.
In the ensuing years, I had found a person that turned me a new valve poppet out of white delrin plastic, to the exact specs of the OE poppet. So, I tried it, and had to reassemble everything in order to pump up the air chamber, and,.... guess what?,..... it leaked as well.
So, I tired polishing the valve seat, but that met with various levels of fail. I tried re-epoxying a new washer to the poppet, and fail. I tried spinning both the new poppet and washer repired poppet, and melt them into compliance, so to mate it to the valve seat,... various layers of failure, and leaking.
Finally, in desperation, I took a Dremel grinding bit, and, chucked it into my hand-drill, and, slowly rotated the grinder bits end grain, and slightly ground a new seat in the aluminum body of the valve. It worked, and I was able to pump to 2k, and it passed the soap in water leak bubble test.
That is,.... it worked until the first shot was fired. Then it was unable to find its seat again, and leaked. This time, I lost 2k.psi in just a few hours.

As one last try, I chucked the grinding bit into the Dremel motor, and, used the lead end to grind the valve seat from the inside, to create a larger freshly lapped valve seat, and also did the spin-in burnishing of the plastic poppet end, the palstic half of the valve seat interface. and, this time,... it worked. It held pressure, and, I've since dialed in the scope, and, shot it likely 20 times at a sighting target/pellet trap, and, then repumped it for a two night pressure holding test to monitor, and even after having shot it a bunch of times, we are still holding pressure, perfectly. And it has held now for three days. This might just work out well.

I spent a lot of time with a disassembled Beeman this past week.
 
Still flexing my Umarex Ruger .22 and have pretty much cleaned out the tree squirrel population here. The only thing I have against it is it's weight. With my choice of scope (not the one pictured) it feels like it weighs as much as an elephant gun but once sighted in, it has been consistently spot-on deadly with the bushy-tailed vermin.Umarex.jpg
 
Still flexing my Umarex Ruger .22 and have pretty much cleaned out the tree squirrel population here. The only thing I have against it is it's weight. With my choice of scope (not the one pictured) it feels like it weighs as much as an elephant gun but once sighted in, it has been consistently spot-on deadly with the bushy-tailed vermin.View attachment 2976622
If it's scoped, take off the rear sight and that hideous muzzle brake in front for a little weight savings and slimmer profile.
 
explaining, ^,.....

The Beeman high-pressure air valve is a faulty design. It leaks. I've tried numerous times to get it corrected in warranty (I lived close to Beeman, and, was able to hand-carry warranty work, same day in and out). Even with having been given a whole new air chamber tube under warranty, and all of the high-pressure air works, it kept failing.
So, when the warranty ended, I tried modifying the valve on my own, trying to get it to hold air. At least my DIY mod worked better than the Beeman stock units. My DIY fix was a nylon washer, and slow-dry JB-Weld to the end of the plastic valve poppet.
Well, my fix kept working, just alright, but satisfying enough. It worked for a few years, in fact.
Then the rifle got shelved, because I ran out of Ground Squirrels.
When I pumped it up, recently, and tried to shoot it again, after a couple of years of being shelved, it pumped to pressure just fine, but, something in the valve was stuck, and, it wouldn't shoot. So, I disassembled it again for the odd hundredths of times, and I lubed all of the works, and, it fired again. And, it seemed to hold perfect pressure this time, as I had applied some grease to the valve seat on reassembling it all. I was ecstatic. This worked out for the better part of a month.

Well, I store the rifle in a corner of the bedroom, in a slot beside a dresser. Its out of the way there. We also sleep with the cat on the bed, as she insists on being there.
We were all asleep, when suddenly at like 1am, my DIY fix, the nylon washer at the poppet valve seat, which had lasted a few years, it failed, and cracked into a "C" shape, producing a lot cracking pop, and then a long extended air escaping hissing noise as 2000lbs of pressure leaked out the "C" crack in the nylon washer.
Sarge and I sat straight up, and Kitty, she hit the ceiling, and was clawed in up there until things settled.

So, for the umpteenth time, I tore into the rifle again, as the valve is the deepest part of it, and the heart of the system.
In the ensuing years, I had found a person that turned me a new valve poppet out of white delrin plastic, to the exact specs of the OE poppet. So, I tried it, and had to reassemble everything in order to pump up the air chamber, and,.... guess what?,..... it leaked as well.
So, I tired polishing the valve seat, but that met with various levels of fail. I tried re-epoxying a new washer to the poppet, and fail. I tried spinning both the new poppet and washer repired poppet, and melt them into compliance, so to mate it to the valve seat,... various layers of failure, and leaking.
Finally, in desperation, I took a Dremel grinding bit, and, chucked it into my hand-drill, and, slowly rotated the grinder bits end grain, and slightly ground a new seat in the aluminum body of the valve. It worked, and I was able to pump to 2k, and it passed the soap in water leak bubble test.
That is,.... it worked until the first shot was fired. Then it was unable to find its seat again, and leaked. This time, I lost 2k.psi in just a few hours.

As one last try, I chucked the grinding bit into the Dremel motor, and, used the lead end to grind the valve seat from the inside, to create a larger freshly lapped valve seat, and also did the spin-in burnishing of the plastic poppet end, the palstic half of the valve seat interface. and, this time,... it worked. It held pressure, and, I've since dialed in the scope, and, shot it likely 20 times at a sighting target/pellet trap, and, then repumped it for a two night pressure holding test to monitor, and even after having shot it a bunch of times, we are still holding pressure, perfectly. And it has held now for three days. This might just work out well.

I spent a lot of time with a disassembled Beeman this past week.
Delrin is much harder than the viton rubber in the stock valve stem seal. I've had luck putting the stem seal inside the valve and then chucking it in an electric hand drill, pulling it in to the valve seat while it spins. No high speed so as to burn it in but rather to make it seat just a bit. Good luck on yours.
 
Delrin is much harder than the viton rubber in the stock valve stem seal. I've had luck putting the stem seal inside the valve and then chucking it in an electric hand drill, pulling it in to the valve seat while it spins. No high speed so as to burn it in but rather to make it seat just a bit. Good luck on yours.
Rubber?
Its not a rubber.
I was talking to the Beeman repair tech, and, we assimed it to have been a delrin of some form. It is a black plactic, and, it quickly developed a pear shaped Kardashian fat hips where it met the aluminum valve body seat. That is why I tried to laminate a nylon flat washer onto the end of the OE poppet, in order to try a different plastic.
What I replaced the original poppet with was arranged for prior to any aftermarket replacements (which do exist now). And, when i got them, i was hot to try nylon, as my washer fix revealed it to be a possibility. So, there is a chance that my replacements are made of nylon? Its been a few years since they arrived.

Bottom line on the air leak,....
I've held perfect pressure now for nine days.

then what happened, Mike,..... ??
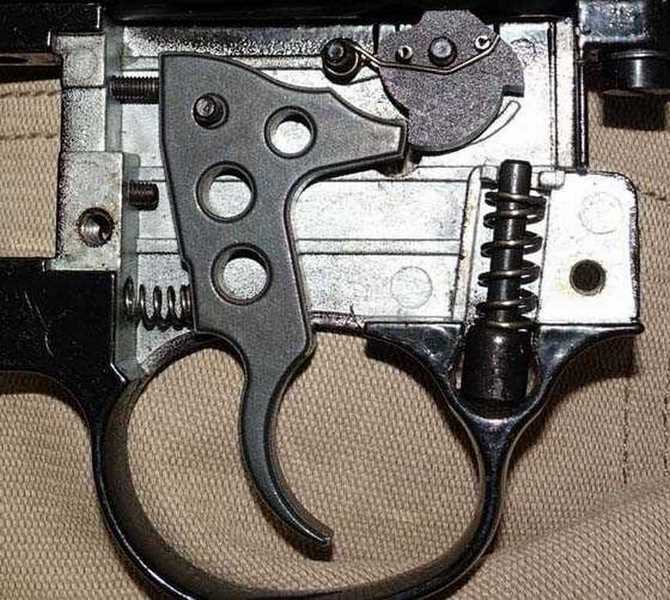
my trigger mechanism decided it was time to get some attention. It would not hold a cocking because the Sear mechanism was dying for some lubrication.
When you pull the bolt back, the round sliding hammer catches a sharp protrusion on the Sear. When the trigger is pulled, it releases the sear, and the hammer flies forward under spring loading.
Problem,... The Sear would catch once, per breakdown, and resetting. Then it would not rotate back into place. SO, it all got removed, lightly deoxidized with a green scrubbing pad, grease and oil applied, and, finally, the Sear decided to cooperate, and allow cocking.

The Sear is to the top and right of the trigger mechanism.
06-20-18-04-Beeman-PCP-trigger-sideplate-off.jpg


getting to know this thing real well.
Its a nice rifle when the checklist if stuff is completed
 
Oh yeah,.... forgot to mention,... what else might have gone wrong,...

I've had this rifle stripped down hundreds of times. And in all of those times, I've always remembered to remove the breech seal, which is essentially a flanged flat O-Ring; a tall sided o-ring, with a slight riser/nipple that is supposed to help transfer the air from valve to barrel. It is held in, in compression fashion, by the breech which drops down over the seal, and, forces it into compliance between the air tube, and barrel when the breech is screwed back down.
Well, I forgot about that little seat in this latest go-round of tear downs. Stupidly, I stepped outside, and fired the rifle without the breech on, and that little seal just launched itself into never to be found oblivion.
I tried replacing it with a normal o-ring, which came close to fitting, but, ultimately it was justy a teence too skinny.
Hey,... I'll just buy another one. NOT!
Breech seals seem to start at $12, and go up depending ultimately on how much you paid for your air gun. Some were as high as $25 for a fancy o-ring.

So, I shot down to the hardware store, and rooted around in their rubber fittings, o-rings, packings, etc,... nothing.
I then found a piece of hose that was labeled as fuel line hose. But it was clear red and, a very hardy rubbery hose that I could not collapse when squeezed, but with suppleness that I knew would work; iow, it held its roundness perfectly under compressive pressure. It fit the o.d. of the seat for the breech seal. So, I cut a piece about twice the thickness of a doubled o-ring (stacked on top of each other thickness). I put the breech back over it, and compressed it down with the set screws that hold the breech in place. It worked perfectly, and drastically reduced the output noise on firing it.
 
Rubber?
Its not a rubber.
I was talking to the Beeman repair tech, and, we assimed it to have been a delrin of some form. It is a black plactic, and, it quickly developed a pear shaped Kardashian fat hips where it met the aluminum valve body seat. That is why I tried to laminate a nylon flat washer onto the end of the OE poppet, in order to try a different plastic.
What I replaced the original poppet with was arranged for prior to any aftermarket replacements (which do exist now). And, when i got them, i was hot to try nylon, as my washer fix revealed it to be a possibility. So, there is a chance that my replacements are made of nylon? Its been a few years since they arrived.

Bottom line on the air leak,....
I've held perfect pressure now for nine days.

then what happened, Mike,..... ??
my trigger mechanism decided it was time to get some attention. It would not hold a cocking because the Sear mechanism was dying for some lubrication.
When you pull the bolt back, the round sliding hammer catches a sharp protrusion on the Sear. When the trigger is pulled, it releases the sear, and the hammer flies forward under spring loading.
Problem,... The Sear would catch once, per breakdown, and resetting. Then it would not rotate back into place. SO, it all got removed, lightly deoxidized with a green scrubbing pad, grease and oil applied, and, finally, the Sear decided to cooperate, and allow cocking.

The Sear is to the top and right of the trigger mechanism.
06-20-18-04-Beeman-PCP-trigger-sideplate-off.jpg


getting to know this thing real well.
Its a nice rifle when the checklist if stuff is completed
The older stem seals had a hard rubber surface then switched to Delrin.

Simple one stage trigger. I will polish the mating surfaces with a Dremel polishing wheel and light polish compound. Then, apply a thin coat of moly to the polished surfaces and pivot points. Obviously all you have for adjustment is sear engagement and over travel. If trigger pull is hard you can lighten it a bit with a lighter spring in back of the trigger. Ball point pen springs work there.
 
nearly a month later, and still holding pressure. I think i got it whooped.

Regarding the Beeman trigger mechanism, and adjustability,..
I had never really worked with the trigger, prior to the sear needing to be lubricated. I found that I was having a problem with pulling off target center when I pulled the trigger. So, I studied up on adjustments.
I found that there is a trigger spring preload adjustment screw that the factory sets at somewhere in the 3.5lb+ range. It can be made to be tighter, and, looser. So, I backed it off about two turns, and wow, far smoother. It feels about half of what it was. It feels really nice like this.
I also made sure that the setting was safe for hard set-downs, and, not going to go off spontaneously.

Refinishing the stock.
The factory did a blended sprayed-on fog coat finish to obscure the grain a bit, and make them more consistent in their appearance.
Every time that I take the stock off, I look at the wood graining, and, I see beautiful tiger striping in areas where the fog coat never went. I really like what I see there, and can see it under the obscuring fog coating as well. I think it deserves to be seen. And, I think it would look better without the deep Beeman branding and highlighting that they did.
Would you do a refinish? Or, for what ever reason, are we better off not touching finishes?
Its the cheapest production PCP rifle out there; I doubt that I'd ruin any value in a refinishing (I was an extremely high end finisher back in my working days, fwiw).
 
Most don't suppress much
A springer isn't loud to begin with. More mechanical sound from the spring and piston. Most I've seen come off. Some need persuasion.

I haven't found my springers to be quiet. The 177 that breaks the sound barrier has quite the crack when fired. My 22PCP is quiet.
 
Last edited:
I haven't found my springers to be quiet. The 177 that breaks the sound barrier has quite the crack when fired. My 22PCP is a quiet.
Use heavier pellets. Pellets don't perform accurately at supersonic speeds. Those advertised speeds of 1200 fps are marketing gimmicks and they use super light alloy pellets.
 
Use heavier pellets. Pellets don't perform accurately at supersonic speeds. Those advertised speeds of 1200 fps are marketing gimmicks and they use super light alloy pellets.
Have never used light weight pellets. 800fps gets you past the speed of sound
 
Most don't suppress much
A springer isn't loud to begin with. More mechanical sound from the spring and piston. Most I've seen come off. Some need persuasion.
I was just gonna reply to usedto "what's to suppress? Just yank the darned thing off the barrel." But, you already got there.
 
It doesn't just "yank" off the barrel, according to what I've read.
Is it a hunk of plastic maybe splined onto barrel? Any grub screw? You could take a board and drill a hole a tad larger than the diameter of the steel barrel just past the brake. Then rip the board in half and clamp it together around the barrel using wood screws. Whack both sides of it with a rubber mallet to drive it down off the barrel and it should come off.
 
Back
Top Bottom