• The move to the new server is done. There are some software and database maintenance updates in process. This has us passing the hat around to help out. We appreciate any donations. Seriously, even a dollar helps. The payment page may be found here - https://www.audiokarma.org/support.html

FF/REW fix ctf-8282,9191,1000 RXA-581, NOT DIY

Its the tire slipping. I marked it and the clutch . I tried a few tires before and this one seem better but I never marked it . It fits with the squeaking sound I was hearing . The FF/RW acts the same with all the tires I have . I'll check them all again. I might use drive grip on the I.D. of the tire. I clean the counter and give it few sprays of deoxit F100, I'll check it out , thanks
 
Last edited:
Wjoe's AE size idler is a tighter fit. than my other tire but was to thick , so I thin it down to fit in pulley.. It works and no slip but not the fix the deck still slows down.
I see some wobbling of the clutch. I'll try the moving spring on FF level assembly. I notice the replacement drive tire has larger diameter than the original . Everything is suspect .
 
Hello Zebulon1. I have two of the CT-F1000 decks, and I replaced the belts and tires with some difficulty. The first deck works like a dream, but the clutch on the second deck cracked rather easily. Of course, I tried to glue the cracked component which seemed to work well for a while, Now, that deck plays well, but will not engage in fast reverse. I am an instructor at a MakerSpace in Indiana with access to the newest 3D printers. Would you share the 3D print file in a PM?
 
Start by cleaning and relubing the counter. That added drag, which is slight, will still cause trouble. Especially when in FF, when the take up drive is through the cassette tape.
There’s an adjustment for the clutch assembly tension by using those adjustment holes at the end of the pivot arm. Its in the SM.
Hello Zebulon1. I have two of the CT-F1000 decks, and I replaced the belts and tires with some difficulty. The first deck works like a dream, but the clutch on the second deck cracked rather easily. Of course, I tried to glue the cracked component which seemed to work well for a while, Now, that deck plays well, but will not engage in fast reverse. I am an instructor at a MakerSpace in Indiana with access to the newest 3D printers. Would you share the 3D print file in a PM?
 
Some food for thought, my collar fixed idler pulley slows down each way after the half way point, I'm now looking at worn axial's bore holes as the cause .
Can 3D printers make these holes for the axial precise? There are two holes, one in tire pulley and one in snap on end cap.
 
Would you share the 3D print file in a PM?
Of course!
The tape counter gets stiff with the aging grease. Fader 5 to clean and lube the counter, will help the REW take up reel drag the tape through, in what is the hardest operation the transport has.
 
Last edited:
I've done the Fadder lube counter clean. You can disconnect the counter belt on CTF 9191 and and the deck will still FF/RW ,I did that too and still no change. I get some black deposit on the outer rim of the bearing hole on tire pulley and a little on the bearing end cap's hole also. Sometimes the deck will struggle a little but will do the whole tape, I can hear it when it starts to bind. There are spots of rubber on the ribbed idler drive wheel. and I see some up and down movement of the FF/RW assembly when more torque is needed.
 
Last edited:
Of course!
The tape counter gets stiff with the aging grease. Fader 5 to clean and lube the counter, will help the REW take up reel drag the tape through, in what is the hardest operation the transport has.
Hello Zebulon1. I am pleased to report the FaderLube treatment worked quite well for my CT-F1000. The more i tested all functions, the better my transport worked. Tubing the mechanical counter resolved the FF chatter noise and REV is working again with nearly no chatter. I don't expect the adhesive i used will last forever, but the clutch is working for now. Still, sometime in the next several months, I would like to create and install a new clutch if I could get the 3D print file. Thank you!
 
I need to make a decision on my CT-F9191. I can see the clutch start to wobble when more torque is applied to it when the tape reels start to get full. I have some bronze bushing that might work on the tire pulley ,not sure about the snap cap on the other end. I'm just not sure either if I can drill the hole (5mm) for the bushing on my drill press precise enough. I can do a practice run on molded clutch pulley I made see how that goes. I'll be back.
 
Hello Zebulon1. I am pleased to report the FaderLube treatment worked quite well for my CT-F1000. The more i tested all functions, the better my transport worked. Tubing the mechanical counter resolved the FF chatter noise and REV is working again with nearly no chatter. I don't expect the adhesive i used will last forever, but the clutch is working for now. Still, sometime in the next several months, I would like to create and install a new clutch if I could get the 3D print file. Thank you!
Hello again Zebulon1. I appreciate your help thus far. I have a 2nd CT-F1000 and this one has an unusual issue. The playback volume produced through the right channel is a bit less than half the left channel volume. The deck seems fine when I trim down the left channel output, and there does not seem to be any distortion in either channel. The test tone is perfect, generating 100% volume among left & right channels. Only half the playback volume is given for the right channel. This is the same through headphones and is observed in the VU meters. I have the service manuals, block diagrams and schematics. I recapped the following PC boards but no change:
  • 177 Flat Amp
  • 079 PB EQ
  • 175 Int Assembly
  • 180 Master Assembly
  • 179 Peak Amp
Before I continue replacing the remaining electrolytics and getting into some of the transistors, I thought I would ask you for any suggestions. Thanks!
 
Hi Folks, I just successfully sleeved mine and thought I'd show how I did it.

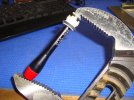
Below is a picture showing the tubing that I started with, held in a collet on the lathe. The tubing, is 304 SST with a 1/4" OD, and .028" wall. A chuck would likely have too much runout to do this successfully. I turned a plug to .1955" diameter X about 3/4" long, with a head on it to pull it out. That's important because the tube got very tight on in once the OD was turned. The plug started out as a slip fit into the stock tube, and probably should have been .196" or .1965" since the sleeve ended up tighter than necessary.
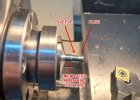
20260306_131321.jpg

I turned the tube to .201" diameter, and pulled the plug out. That made the wall thickness less than .003", and allowed it fit inside the RNK-189 Idler bearing without modification, shown here-
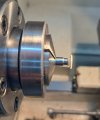
20260306_131519.jpg

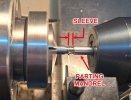
Next the plug was pulled out, and the sleeve was parted off to a length .115". A (slip-fit) .194" diameter mandrel was inserted and held in the tailstock chuck to accommodate that. Parting the sleeve off with the plug still inserted would have made it too difficult to remove since it got very tight. The parting mandrel was made from 1/4" solid stock.
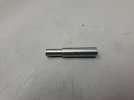
20260307_162648.jpg

Here it is being parted off with the mandrel inserted.
20260306_132938.jpg

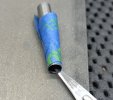
Next it was slid a little past the end of the mandrel, and taped in place for deburring with a scalpel blade on the ID, and a sharpening plate for the OD.
20260306_133305.jpg

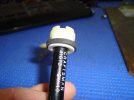
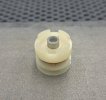
I neglected to get a picture of the sleeve by itself, but here it is pushed onto Idler A, making a partial assembly.
20260306_133925.jpg

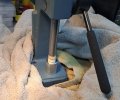
At this point, the two parts spin free but won't come apart because the sleeve OD is larger than the ID of Idler B. I made a little aluminum stub to support it, and pressed the rest together. The mini arbor press gave me a good feel for how tight it was, and it seemed a lot tighter than necessary.
20260306_141732.jpg

Here is the completed assembly sitting on the support, and it seems to work as intended.

20260306_143451.jpg

It was a little touchy but doable, and it allowed all of the parts to remain unmodified. I figured the less I screwed with them, the less chance I had to ruin something. I have a second deck that needs it, so I'll be doing this one more time and then hopefully never again. If anyone wants a clearer picture of anything let me know soon.

 
Last edited:
Yesterdaze
Start your own thread with the playback issue. It will be much easier to post and follow.
 
Of course!
The tape counter gets stiff with the aging grease. Fader 5 to clean and lube the counter, will help the REW take up reel drag the tape through, in what is the hardest operation the transport has.

Yesterdaze
Start your own thread with the playback issue. It will be much easier to post and follow.
I need to make a decision on my CT-F9191. I can see the clutch start to wobble when more torque is applied to it when the tape reels start to get full. I have some bronze bushing that might work on the tire pulley ,not sure about the snap cap on the other end. I'm just not sure either if I can drill the hole (5mm) for the bushing on my drill press precise enough. I can do a practice run on molded clutch pulley I made see how that goes. I'll be back.
Yesterdaze
Start your own thread with the playback issue. It will be much easier to post and follow.
Good idea. I am not very familiar with forum rules and culture. I started my own thread and hope to solicit a little advice soon to correct the volume output issue. I am still interested in the 3D file, but if you would rather sell one of your clutch parts, I would consider that too. Thanks again.
 
Start your thread on the issue.
I think it will be interesting to the other members. This issue will entail checking the circuits over the transport mechanism.
 
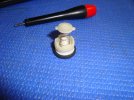
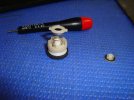
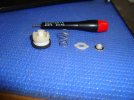
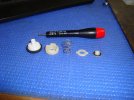
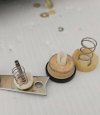
The thumbnails below are an image sequence on how to assemble the clutch.
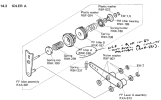
The idler (FF Idler "A", RNK-188) with the tire should have a device that can support the inner-shaft flange and not the tire rim when securing the clutch assembly together.
There is quite a force to press the top clutch retainer parts into the tire idler.
Note that the spring holder (Shaped like a hoop RNK-186) has a groove that captures the spring.
The assembled clutch should have the Spring Holder (RNK-186) nestled between the casalations of the grooved FF Idler "B" (RNK-187).

1774797874213.png
 

Attachments

  • DSC08004.JPG
    DSC08004.JPG
    95.1 KB · Views: 59
  • DSC08001.JPG
    DSC08001.JPG
    134.9 KB · Views: 57
  • DSC08000.JPG
    DSC08000.JPG
    66.5 KB · Views: 50
  • DSC07999.JPG
    DSC07999.JPG
    91.9 KB · Views: 48
  • DSC07998.JPG
    DSC07998.JPG
    133.6 KB · Views: 45
  • DSC07997.JPG
    DSC07997.JPG
    114.2 KB · Views: 47
  • DSC07996.JPG
    DSC07996.JPG
    112.5 KB · Views: 45
  • DSC07995.JPG
    DSC07995.JPG
    120 KB · Views: 50
  • DSC07994.JPG
    DSC07994.JPG
    126.3 KB · Views: 58
Hi@all,
where ca i buy the 3d Parts to repair my ff/rw Problem by my ct-f9090

Regards from germany
Harry
 

Attachments

  • 9090.jpg
    9090.jpg
    72.8 KB · Views: 11
Hi @ all,
so my 9090 runs rew ffw ok.
Problem: The EQ switch hums briefly when pressed, causing the right channel to register a higher deflection than the left. How can I fix this ?


Thanks
Harry
 
Last edited:
Back
Top Bottom