
• The move to the new server is done. There are some software and database maintenance updates in process. This has us passing the hat around to help out. We appreciate any donations. Seriously, even a dollar helps. The payment page may be found here - https://www.audiokarma.org/support.html

JBL 4311's = system complete... for now.

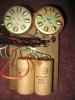
Just wire the new caps in place of the old ones, assuming you're leaving the original wiring and L pads in place: Run the green wires through the two 4uFs (wired parallel to each other). Run the orange wires through the single 3uF cap. Run one .01 bypass cap in parallel with the two 4s and one .01 bypass cap in parallel with the single 3. (The pale green wires in the second picture below are the same wires as the dark green wires in the first one.)

If you do replace the L pads or wiring, just copy the original wiring exactly. You will have it sitting right in front of you. You can do one using the other as a reference, or take some photos as you go.

Does that make sense?
 

Attachments
  • jbl43110141hm6.jpg
    jbl43110141hm6.jpg
    87.9 KB · Views: 262
  • IMG_1000000518.jpg
    IMG_1000000518.jpg
    103 KB · Views: 357
Last edited:
I think it's just a friction fit. Isn't it easier to remove the crossovers first?
 
Last edited:
Hey everyone,

Great read so far. I have some L100s that I would like to recap. Just opened them up and took some pictures. I've never done anything like this before. I'm planning on following the directions in the first post and ordering those parts recommended.

Any caution or words of advice before I start?

Is that glue on the board or something leaking out of the caps?

Should I replace the L Pads?
Should I start with a new board, or just take everything off that board and replace?

Some people have something extra on top of their caps, not sure what that is:

http://www.audiokarma.org/forums/attachment.php?attachmentid=287939&d=1311104882

I'm hoping replacing caps will help me with my lack of low midrange.
I'm open to any suggestion. Thanks!!

picture.php


picture.php
 
Last edited:
Any caution or words of advice before I start?

Nah; just or skim the recapping threads here:

http://www.audiokarma.org/forums/showthread.php?t=369221

And maybe watch a Youtube video on soldering and recapping.

Is that glue on the board or something leaking out of the caps?

Hot glue; you can melt it with a hot knife. I just hold a putty knife over a propane torch or stove burner.

Should I replace the L Pads?

Just pop the backs off and clean them with contact cleaner; replace them only if you see internal damage or scorching.

Should I start with a new board, or just take everything off that board and replace?

I would just recycle the old board.

Some people have something extra on top of their caps, not sure what that is:

http://www.audiokarma.org/forums/attachment.php?attachmentid=287939&d=1311104882

Bypass caps; some say they help the sound. See here:

http://www.audiokarma.org/forums/showthread.php?t=106180

And the reference threads linked in my link above.
 
I ordered these:

2 027-542 SOLEN 3.0UF 400V POLYPROPYLENE CAPACITOR
2 2 027-564 SOLEN 8.2UF 400V POLYPROPYLENE CAPACITOR


Will they have wires attached?

Wondering if I should attach them to the red and green wires that are currently on the old caps, or if I should attach new wires and solder them onto the metal piece?

Does that make any sense?
 
just realized I ordered the caps for the "bright" sound. Did not mean to do that!!

Curious about the "improved original" though, why 4 of the 2nd one? Do you connect them together or something?
2 x DAYTON PMPC-3.0 3.0µF-250V PRECISION AUDIO CAPACITOR Part Number 027-220
4 x DAYTON PMPC-4.0 4.0µF-250V PRECISION AUDIO CAPACITOR Part Number 027-226
 
I ordered these:

2 027-542 SOLEN 3.0UF 400V POLYPROPYLENE CAPACITOR
2 2 027-564 SOLEN 8.2UF 400V POLYPROPYLENE CAPACITOR


Will they have wires attached?

Not wires per se; just long bare metal leads.

Wondering if I should attach them to the red and green wires that are currently on the old caps, or if I should attach new wires and solder them onto the metal piece?

Either way will work fine; lay them in place and see what's simplest. I think I wound up reusing the existing wires and soldering them onto the leads.

Happy to help!
 
OK- thanks for the help so far everyone!

I tried the recap tonight. Just got through and there is increased treble and soundstage, but I seem to have less bass and low-mid.
(I was hoping this would help me have more of a low-mid presence)


I used the bypassed Daytons (0.01 uf AudioCap Theta in prarallel with each) for an improved "stock" sound


It could be the same as before and the increased treble is drowing it out more.


Wondering if I did something wrong in the recap. This was my first time, so anything is possible. Maybe I have some kind of phase cancellation?

Questions:

1) Do the caps have a positive/negative or does it matter which side goes to which component?

2) I sort of just soldered the cap and bypass cap together. And in the case of the 8 that was replaced by dual 4.0 uF I just soldered the 2 caps and bypass cap together. Is there a more specific was the bypass cap needs to be attached?

This is the picture I was using as a model, it seems to have all of them kind of braided together:

http://www.audiokarma.org/forums/attachment.php?attachmentid=287939&d=1311104882

3) Is there a break in period for these caps?

4) The L-pads are functioning, not scratchy and make a difference in the sound when I turn them. I did not replace them. Could they be the culprit?

5) Other thoughts on what I could have screwed up, or how to get better low-mid performance?
 
Last edited:
Thanks Tom!

It's the same problem I had before I started the recap, and nothing sounds strange or off, like the typical out of phase sound. It sounds like I did everything right.

The recap is just not solving the problem I hoped it would solve. Highs are really detailed and beautiful, really low bass is okay. I just don't get any good punch in the low mids that makes me want to dance.

I most certainly do not have a good seal around the woofer and not sure about the mids. The caulking is a good idea, thanks so much for that suggestion.

I'm going to take these speakers to a friends house and see how they sound in his system. That's probably a good next step.
 
Just used rope caulk around the woofer and to seal where the wires enter the mid. A slight improvement. Thanks for the tip!

I need to get these speakers to someone else's house and see how they sound. I'm out of things to try for improved lows. At least I will be able to isolate the problem to the speaker itself if it performs poorly somewhere else.
 
I glued the caps down with gorilla glue, a small spot of super glue. Everyone else seems to have a ton of glue on theirs. Is there any reason I should go back and put more of a dampening glue on the caps?
 
Just added dampening glue. Did anyone add rope caulk or anything around the l-pad knobs or entire crossover board? The sock thing didn't really improve the sound too much, but will keep trying and comparing. Pictures for all those interested in my (very boring) part of this thread. They are not as pretty as some others posted here...

picture.php


picture.php
 
Speakers sound better now!

Dampening glue, rope caulk and burn in time, any or all of these must have helped. I've got better low bass response and more clarity in the highs. I'm still curious about the new crossovers that other people have designed, but I think I'm going to rest on these for a moment and listen.
 
Be sure you have the woofers wired correctly as per the schematic from JBL's site. The woofers are not wired positive to red, they are wired positive to black. If in doubt, use a mono source and check for a solid center image, with good bass. If you reverse the leads on one woofer, you should get either better bass (woofers not wired in phase) or worse bass and center image (wired correctly before change).
 
This will be a long shot if anyone is still following this thread but....

Do the 0.01uF capacitors have to have any particular voltage level? The one's recommended in the guide are unavailable here in the UK so I was wondering if either of these caps would be up to the job?

http://www.ebay.co.uk/itm/PIO-paper...136?pt=LH_DefaultDomain_3&hash=item4d3041e318

http://www.ebay.co.uk/itm/10x-Capac...218?pt=LH_DefaultDomain_3&hash=item2c6d8da842

I know these type caps aren't exactly as per the guide and they may sound different but unfortunately beggars can't be choosers.

Thanks for any advice of where to source caps in the UK
 
This will be a long shot if anyone is still following this thread but....

Do the 0.01uF capacitors have to have any particular voltage level? The one's recommended in the guide are unavailable here in the UK so I was wondering if either of these caps would be up to the job?

http://www.ebay.co.uk/itm/PIO-paper...136?pt=LH_DefaultDomain_3&hash=item4d3041e318

http://www.ebay.co.uk/itm/10x-Capac...218?pt=LH_DefaultDomain_3&hash=item2c6d8da842

I know these type caps aren't exactly as per the guide and they may sound different but unfortunately beggars can't be choosers.

Thanks for any advice of where to source caps in the UK

50 to 250 volts would be fine for any film bypass cap used. Contact Falcon Acoustics who have many types of film caps and are recommended. Wilmslow Audio will also have them.
 
Thanks for the replies that was really helpful, it does seem hard to tell 0.01uf caps from 0.1 uf caps with the way they are listed on half the adverts.

I think I will phone one of your recommendations and see which they suggest
 
I just wanted to put my 2 cents in. I just completed the crossover rebuild for improved original, and the 4311's sound amazing. All the mids and highs I ever wanted, though the bass seems a bit muddy. I will try the test plug in the port trick next. I also subbed the Vitamin Q's for the Theta's (Part's Express was out of them). Thanks to all contributors of this thread! I have benefited greatly from your experience's.
 
Back
Top Bottom