• Please note that Audiokarma will be offline briefly for updates early on Monday morning, September 28th.

JBL 4311's = system complete... for now.

They have 3/8" shaft, and 1" shaft variations of the 50 Watt versions. I'm taking some measurements to see if the 1" version is suitable.

EDIT:Yep 1"

Please update OP to reflect part number for 1" shaft. I used your part number in Op and ordered 3/8" shaft which is too short to stick through the cabinet.

Should be:

Speaker L-Pad Attenuator 15W Mono 1" Shaft 8 Ohm
Parts Express Part Number: 260-250
http://www.parts-express.com/speaker-l-pad-attenuator-15w-mono-1-shaft-8-ohm--260-250
 
Are the attenuator/pots loose from their main mounts, or are the actual internal pieces dirty or loose? You can pull the pots out by pulling the knobs off and use a pair of needle-nose pliers or a deep socket (preferred) to tighten up the shaft retaining nuts, or take those same nuts off to remove them all together to clean or replace them. If that doesn't do the trick, you may have to very carefully heat the thin aluminum foilcal/badge that reads "4311x Control Room Monitor" with a blowdryer, while gently lifting it off the enclosure with a 1" "full elastic" blade putty knife. That will expose the retaining screws that you see coming in through the front and from behind the aforementioned foilcal/badge. Go to www.audioheritage.org for the replacement numbers, or contact member Zilch about the proper replacement attenuator pots. To replace the foilcal/badge, spread a small amount of contact cement as per directions, and reattach them after you R&R the pots. Sometimes you can just re-heat them with the blowdryer and press them back down. Either way it takes a great amount of patience and care to prevent damage to them.

BTW, you have what I consider to be the best of all the 4311 models. Your 4311's have the wonderful LE5-2 Alnico mid. Nice find, I hope you get them up to spec.

I know this is an old quote, but I'm about being able to get the control knobs off the very similar 412's that i have. Would love to do that and shoot some deox into the pots in hopes of cleaning them up WITHOUT having to get that foil off and taking out the crossovers. Mine work, they just sound scratchy. I'm wondering how hard you have to pull to get those knob off....mine seem on there pretty good.
 
Normally, the 4312 control knobs are just a straight pull off the splined shaft of the control pot. Unless someone glued them on. Usually a hand pull would do it.

You might have to consider a cloth wrap along with a pair of pliers to pull them off. Not sure if you could get a pry bar something under the back of the knob. If not successful, you'll have to take the controls out.
 
I know this is an old quote, but I'm about being able to get the control knobs off the very similar 412's that i have. Would love to do that and shoot some deox into the pots in hopes of cleaning them up WITHOUT having to get that foil off and taking out the crossovers. Mine work, they just sound scratchy. I'm wondering how hard you have to pull to get those knob off....mine seem on there pretty good.

You won't be able to deoxit without pulling the whole XO board. The good news is you don't have to remove the knobs. Bad news is you need to remove the foilcal (metal plate). Mine both came off within 1-2 minutes each with a thin paint scraper and a heat gun on low. no damage to the paint or metal.

I was able to clean my L-Pads with d5 and I'll wait and see if that lasts. They were all AWFUL before, generating a very bad crackling sound when adjusted, Now the adjustment is silent and they are effective throughout their full range- all four of them.
 
It does look pretty simple. What are the values of the caps and have you pictured a 4312 crossover here? Or is it for a 4311? Same thing perhaps?

This is a 4311 which uses the 3112 network (labeled as in first post on the front of the XO board. The 4312 might use the 3112 network also, not sure.

For the 3112, you need 8uf for the mid L-pad (pot). I used 2x4uf in my config. And you need 3uf for the high L-pad.

Non polarized audio caps (direction doesn't matter), mine are Dayton. You don't need the tiny 0.01uf bypass cap (red one in my pic) but some people recommend adding a high quality audio cap here if going with a middle-tier cap like my Daytons.
 
in order to retain collectors value I need the white recone kit?
Mine already have some walnut trim missing, the covers need rebuilt, the tweeter and woofer are dead on one and one is good shape (the left speaker is fine) the right was damaged.

So all in all I actually have a recording studio in my home, so white VS black cone might be a non issue but who knows I might hate them and sell them.

keep them white?

What about the cheaper black drivers? those are from a different vintage?
 
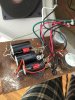
First time post here, but I have referenced the forum many times. Thanks to all of you who contributed to this thread and my friend Jason who stopped by to help me sort out the first one. My speakers are now amazing. The sweet spot has expanded from one spot on the sofa to nearly the whole room. The imaging is clear, and stereo separation seems stronger. I have only run them about an hour and they seem to keep getting better. I got the scratchiness out of the Lpads with deoxit, too. I guess I got lucky. I didn't see many "after" pics of the crossover assembly so I thought I would add mine. We shrink tubed the smaller set just to minimize the chance of a short, and I reused the blob of glue on the board by warming it with a heat gun, then pressing the components in it.
 

Attachments

  • IMG_3943.jpeg
    IMG_3943.jpeg
    75.4 KB · Views: 140
That looks fantastic! I love it.

index.php
 
First time post here, but I have referenced the forum many times. Thanks to all of you who contributed to this thread and my friend Jason who stopped by to help me sort out the first one. My speakers are now amazing. The sweet spot has expanded from one spot on the sofa to nearly the whole room. The imaging is clear, and stereo separation seems stronger. I have only run them about an hour and they seem to keep getting better. I got the scratchiness out of the Lpads with deoxit, too. I guess I got lucky. I didn't see many "after" pics of the crossover assembly so I thought I would add mine. We shrink tubed the smaller set just to minimize the chance of a short, and I reused the blob of glue on the board by warming it with a heat gun, then pressing the components in it.

Glad I could help out. If you did the second one like we did the first one, you shouldn't have to mess with them for another 30 or 40 years!
 
Back
Top Bottom