• The move to the new server is done. There are some software and database maintenance updates in process. This has us passing the hat around to help out. We appreciate any donations. Seriously, even a dollar helps. The payment page may be found here - https://www.audiokarma.org/support.html

JBL L200 Studio Masters-Pics

Well I finally got a chance to do a test listen to these beasts. I used a spare JVC A-X77 integrated rated @ 90wpc, and my ipod.
HOLY SHEEEiTTT! I let them play at low volume for a bit to warm up, let the kuice go through the crossovers. I have no idea when these were last in use. After 10-15 minutes I increased the volume and just WOW!
Now they are sitting next to each other as shown in the earlier pics. So the environment is not ideal, but none the less, these are spectacular in their all original state. I'm not doing anything to the crossovers. The highs are crisp, and very detailed. The bass is tight but deep. Those 15 inch woofers were barely moving! Damn!
So the only thing I plan to do is pull the tweeters to replace those foam dampening disks behind the domes, restore the cabs, and get the repro grills. Also does anyone have closeup pics, and a source for the correct grill badges or spares they could sell to me? The promo pics on the web are not very clear and I couldn't see what they should look like.
I did a video, and will post it in the video thread in a bit.
Cheers, Glenn
Great news! Glad you like em..
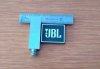
Here are what I replaced my badges with I got them from someone in Hong Kong through Ebay and I chose a bronze look that went with the brown grills I bought from Sonofagun.. They are 1" wide and about 7/8" tall and look very close to the original. SorryI don't have a link..
As much as you like these now there are many upgrades that can be done that bring these even better sound. When I built new crossovers for mine I found I didn't gain much in SQ, and in hindsight I probably would save the money. Redoing the foam in the LE85's is worthwhile, just remember to be careful with those diaphragms!
Currently running mine biamped with the 077's and the new M2 woofers.. Sonic bliss I gotta say!
Badge..
IMG_20181014_104705.jpg
 
Fun, eh?
When I ordered new grills from Sonofagun, he also supplied new badges, w/Velcro backing.
Look to be a bit wider than Alobar's?
Not sure about original placement on the grills, other than lower right, about two ribs in.
Are you going to try to restore the veneer, or re-do it?
IMG_20181014_141315214_cr.jpg
 
I didn't contribute earlier; I had to say goodbye to mine when I changed homes. The cabs were just too big, and so damaged they needed new veneers, not just refinishing. Sad. I kept the drivers of course.

There's been talk of new screens; it may have been resolved, I haven't followed closely. But if not, they aren't "like" window screens. They are window screens. A neighbor made some for me to same dimensions. Identical in every respect. It's how JBL seems to have made them. So unless total authenticity is desired, for a part that's unseen, a hardware store, or a handy neighbor, can make them, if you don't have the tools.

I'm so glad you added the tweeters. I used the LE85s alone a couple months ago, and they were immensely satisfying... for a few days. As you know, the original L200s had no tweeters per se. I missed highs I knew were there, but it only bothered me on tracks where those highs added pure magic.

My current bass is entirely different, 6.5" upper-bass/low-mids, and two 8" subs. They're more "articulate", fingers scraping on the low strings of stand-up bass and all that, and they go deeper down the scale, but I do miss the authority of that big woofer. Your new woofer probably gives the best of both worlds.

Then I added 077s. I wasn't prepared for such a difference, the 85s alone were so good. They added new dimensions. Not just the missing magic highs, they seem to reach well below their "limit" and enhance the mids too.

You now have it all. No wonder words like "WOW" and "bliss" are used...
 
Those big damn speaker, I have a set of rough cabs in my moms garage, just can’t ditch them. A solid hit or a snare drum on those will stop your heart. Haha Enjoy!
 
Great news! Glad you like em..
Here are what I replaced my badges with I got them from someone in Hong Kong through Ebay and I chose a bronze look that went with the brown grills I bought from Sonofagun.. They are 1" wide and about 7/8" tall and look very close to the original. SorryI don't have a link..
As much as you like these now there are many upgrades that can be done that bring these even better sound. When I built new crossovers for mine I found I didn't gain much in SQ, and in hindsight I probably would save the money. Redoing the foam in the LE85's is worthwhile, just remember to be careful with those diaphragms!
Currently running mine biamped with the 077's and the new M2 woofers.. Sonic bliss I gotta say!
Badge..
View attachment 1305222
Hey Alobar,
Thanks for the info.
I need to sand the tops of these before I bring them into the cave for doing any work.
I'm really surprised these sound so good in this untouched condition.
Cheers, Glenn
 
One thing to think about is how generous JBL was on the thickness of their veneer. Take a LOT of sanding without going through!
Think about glass tops too, I had some brown tinted ones made up for mine.. wish I had done that decades ago..Really protects the tops..

Capture.JPG
 
One thing to think about is how generous JBL was on the thickness of their veneer. Take a LOT of sanding without going through!
Think about glass tops too, I had some brown tinted ones made up for mine.. wish I had done that decades ago..Really protects the tops..

View attachment 1305630
Good to know about the veneer. I’ll take it slow though with the sanding. If these become a permanent member in my cave, there will be another set of speakers sitting on these, so even though the glass looks very nice, probably won’t need it. My wife pretty much established we don’t have any rooms big enough for those she said as Joe and I unloaded them from his van!
Yours look fabulous!
Cheers,Glenn
 
Last edited:
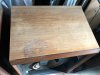
I had some time today and sanded the tops. They look 100% better, but the water staining on the one cab is a shame. I need to get some barkeepers friend and put a little on the remaining ring lines. The veneer is a bit darker. Once I start oiling them, I may need to mix in a little stain with the Watcos to try to blend in the lighter area.
I'm really excited to get these into the cave some time this week so I can continue to work on them. Its starting to get cold out there!
Glenn
IMG_6488.jpg IMG_6489.jpg
 
Its good to see that your making some more progress Glenn. I just did some water ring removal using Denatured Alcohol and Oxalic Acid that @4-2-7 recommended, it worked out great. I had previously mixed water with the acid, but the alcohol is much better in my opinion. I apply the mixture to the entire top and not just the ring itself. I suggest that you tape off the sides to protect them from the acid dripping down them and causing another problem. Looking forward to seeing more progress.
 
50/50 bleach and water, mask off the stain with tape and apply. Would have been better to do it before sanding but it can still work.
 
Now how, I say, howinthehell have I missed this thread??

images


Great score, Glenn. Those are definitely in good hands.
 
Its good to see that your making some more progress Glenn. I just did some water ring removal using Denatured Alcohol and Oxalic Acid that @4-2-7 recommended, it worked out great. I had previously mixed water with the acid, but the alcohol is much better in my opinion. I apply the mixture to the entire top and not just the ring itself. I suggest that you tape off the sides to protect them from the acid dripping down them and causing another problem. Looking forward to seeing more progress.
Thanks Doc!
Did you happen to take before and after pics?
I read 4-2-7's comments but I'll have to look for the thread and what he specifically said.
What were the mixture ratios you did?
Thanks, Glenn
 
Sorry Glenn, no pics right now, but maybe I can find some later. As for the Oxalic Acid mixture I used a regular kitchen tablespoon heaping full mixed with Denatured Alcohol in a 1 pint canning jar. I left about an inch or so of air at the top so I could shake it up good. After mixing I let it sit a while to dissolve some more and shook it good prior to using it. For application I used a paint brush to apply a very wet coat as quickly as possible to the entire top. It evaporates really fast so I actually went over most of it 2 or 3 times during a single application to keep an even wet coat. I hope that made sense. After applying the first coat and allowing it to dry you may have to apply another one or two to completely remove the stain. For best results try to remove most of the previous finish and give it a good steaming with a wet t-shirt before applying the solution to open up the grain. Here's the link:

http://audiokarma.org/forums/index....r-rings-off-the-tops-of-your-speakers.826816/
 
Sorry Glenn, no pics right now, but maybe I can find some later. As for the Oxalic Acid mixture I used a regular kitchen tablespoon heaping full mixed with Denatured Alcohol in a 1 pint canning jar. I left about an inch or so of air at the top so I could shake it up good. After mixing I let it sit a while to dissolve some more and shook it good prior to using it. For application I used a paint brush to apply a very wet coat as quickly as possible to the entire top. It evaporates really fast so I actually went over most of it 2 or 3 times during a single application to keep an even wet coat. I hope that made sense. After applying the first coat and allowing it to dry you may have to apply another one or two to completely remove the stain. For best results try to remove most of the previous finish and give it a good steaming with a wet t-shirt before applying the solution to open up the grain. Here's the link:

http://audiokarma.org/forums/index....r-rings-off-the-tops-of-your-speakers.826816/
Thanks for the info and posting the link!
I’m thinking when I do this, I’ll do both tips so they are even when I start oiling them.
 
I used some Barkeepers Friend for the first time last week and it worked very well.

The above photos illustrate how deep inset the baffle is on those. Interesting.
 
Thanks for the info and posting the link!
I’m thinking when I do this, I’ll do both tips so they are even when I start oiling them.

You're welcome. I agree with your reasoning for doing the tops of each cabinet so they match more evenly. Don't forget to neutralize the acid after the last application.

I mentioned taping off the sides to prevent the solution from dripping down, but I realized that won't work because the alcohol with soften any adhesive quickly and create a mess. I would keep a few rags and the alcohol by my side to quickly wipe off any dribbling that may occur.
 
I used some Barkeepers Friend for the first time last week and it worked very well.

The above photos illustrate how deep inset the baffle is on those. Interesting.
That may be why there's those cutouts on the sides for sound vents.
 
50/50 bleach and water, mask off the stain with tape and apply. Would have been better to do it before sanding but it can still work.
Don't use bleach! Use oxalic acid, also known as deck bleach will get the black out but not lighten the surrounding wood. If you want the absolute best possible finish use real shellac (made from dead bugs). It's hard to describe how beautiful L200s with a shellac look. They won't look newly refinished like they will with poly, and the depth and sheen is second to none.
 
Don't use bleach! Use oxalic acid, also known as deck bleach will get the black out but not lighten the surrounding wood. If you want the absolute best possible finish use real shellac (made from dead bugs). It's hard to describe how beautiful L200s with a shellac look. They won't look newly refinished like they will with poly, and the depth and sheen is second to none.
Thanks for the tips!
I'll have to check out Home Depot for deck bleach.
Cheers, Glenn
 
Back
Top Bottom