• Please note that Audiokarma will be offline briefly for updates early on Monday morning, September 28th.

JVC QL-?? owners thread

A lot of Victor stuff even laboratory line was made for replacement, but it was supposed to be made in-house. As for the tonearms and turntables, they went full technology ahead, while Micro Seiki went for lifetime. However, I don't think any companies ever thought more than 10 to 20 years span max.

I feel your trouble, but I recall reading people using wood for instance now that I think about it to make it lasting longer.
 
6988FFB0-7CC2-4DDE-8579-06979AF9A9BF.jpeg After about a week of using my repaired counter weight on the QL-A7 w new rubber bushing.

I must say that I am very pleased. Easily accomplished and wonderful working with out any sagging. I am able to remove counter weight and readjust without any problems.

Abbey Road via the A7, an AT - F7 , beyerdynamic 1:15 SUT, Fisher 500c and a pair of Klipsh. All is well.
 
^ For those who may not know, that counterweight was sagging all the way down and touching the height adjustment ring when I purchased it. The tonearm was unable to freely move, basically stuck in position. I think it was why they sold it to me.
 
Last edited:
Congratulations on fixing it !

Enjoy listening! The tonearm looks good so I would say you are all set. That's the main reason the weight of headshells were limited : to avoid rubber faster wearing.

Normally, those tonearms were made to go with heavy loads at the front.
 
D73591CE-005B-4453-9BDE-25C0561AD545.jpeg

After a week of use. Counter weight hasn’t changed. Holding up better than I expected and I still could improve upon it but not needed. Going to recommend this repair as it avoids the problem of removing the arm completely from the table. Actually going to purchase a few more of those rubber bushings as spares.
 
Did you have them built specifically or are they ready made? Where are they bought?

No it’s just an off the shelf rubber grommet (bushing) that I bought from a big box hardware store like Home Depot or Lowes. I think you can find one just like it at any hardware store small or large. I posted pics of it and the actual part number on previous page. I picked it up at Lowes but I have been obtaining similar ones that I thought would work from various hardware stores.

I had to cut off one end to make it fit. See my original post on this. It worked out well.
 
I’m listening to it right now and all is well. Very pleased with the results and the fact that I can finally adjust vtf when switching carts without having to worry if it will start drooping again. It’s a durable/robust solution to the drooping tailpiece.
 
@desertrat748

I used a rubber gasket for the taps a few years ago, the counterweight is well supported but the rubber is not as flexible and soft as the original rubber (I assume that the original rubber has a lot of silicone in the composition)
The rubber I used is decidedly less soft and it is probable that if the rubber is not similar to the original, the decoupling of the counterweight with the arm tube deviates from the project desired by the engineers who developed the arm.

DSCN5962.jpg
 
@desertrat748

I used a rubber gasket for the taps a few years ago, the counterweight is well supported but the rubber is not as flexible and soft as the original rubber (I assume that the original rubber has a lot of silicone in the composition)
The rubber I used is decidedly less soft and it is probable that if the rubber is not similar to the original, the decoupling of the counterweight with the arm tube deviates from the project desired by the engineers who developed the arm.

DSCN5962.jpg

How did you get underneath that bearing housing to unthread the tailpiece? I couldn’t see clearly underneath mine but it looked like a C clip or something similar was holding it together underneath the bearing housing.

It didn’t look like there was anything like a nut/washer for the shaft to screw into.


At that point I decided that I didn’t want to have to disassemble the whole arm, and deal with the delicate wires along with unsoldering them. The rubber will still deteriorate over time and I didn’t think it was worth all of that effort to avoid cutting a slit in the new bushing. How I aligned it with the slit vertically above the compressed bottom, it will not affect it and hasn’t changed since the installation.

I don’t think it’s going to matter much about the differences in the original rubber and the replacement rubber. The original rubber deteriorated so quickly that it lost its effectiveness within a year and probably is much worse than the new replacement rubber.

In the end, the original rubber drooped so badly that it had the counterweight touching the height adjustment ring. It rendered the arm useless when it happened. I’m sure this rubber will provide some level of dampening and if not, it is like any other solid metal tailpiece.

JVC should have made it easier to remove and replace the rubber. I have had German cars that are easier to work on (at least less complicated).
 
I posted elsewhere about issues with my recently acquired QL-Y5F but want to post an update in this thread for focus and visibility.

I've had the bottom panel off for a visual inspection and to clean/lubricate the potentiometers and switches w/ DeOxit.

After going through the setup procedures IAW the owners manual, here's what's happening:

Tt powers up via READY push button.
Manually cuing tonearm brings the platter up to the selected speed. The tonearm moves freely and plays an LP.
Pressing START/STOP also brings the platter up to the selected speed. Tonearm raises but the red "up" indicator does not light and the tonearm does NOT cue.
Pressing UP/DOWN lights the up indicator with no further tonearm movement. Pressing it again lowers the tonearm, all in the parked position.
The left/right tonearm push buttons do not function.
Attempting to cue the tonearm with the up indicator lit presents significant force in the tonearm, pushing it back to toward the right/parked position.

Feedback from anyone with similar experiences appreciated.
 
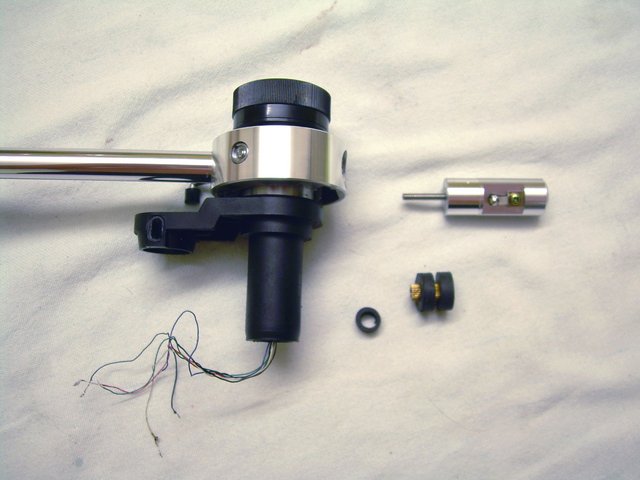
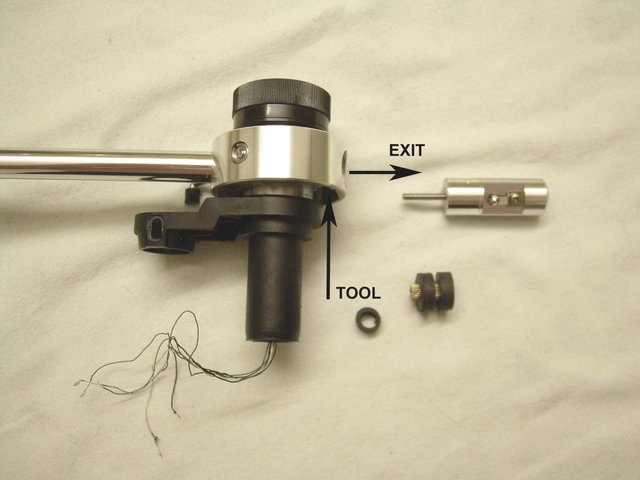
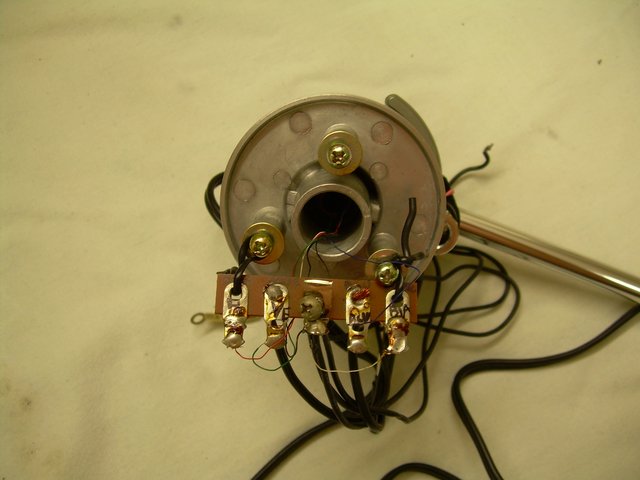
disassembly is much easier in the 7045 arm, in this 5045 it is unfortunately very complicated to unscrew the pin as the nut is located inside the cover that covers the joint.
I had to use a very small hex key of minimum thickness to go inside and unscrew the nut.

1.jpg

Was that with the arm removed from the table? Because I couldn’t see how it was attached underneath the pivot/bearing housing. I could barely see what looked like a free floating C clip or ring. Can you show us the part that you removed from the end? The size of the Allen wrench? Something small like 1.5 mm?

I think you have posted before but I was unclear about the method you used. I don’t think it would be possible with the arm attached. Well for me, I could see the “nut” underneath the housing rotate around but not a hex key opening anywhere on it.
 
Last edited:
@desertrat748
Obviously I had to remove the arm from the plinth, completely disassembled otherwise it would have been impossible to operate.

DSCN5936.jpg


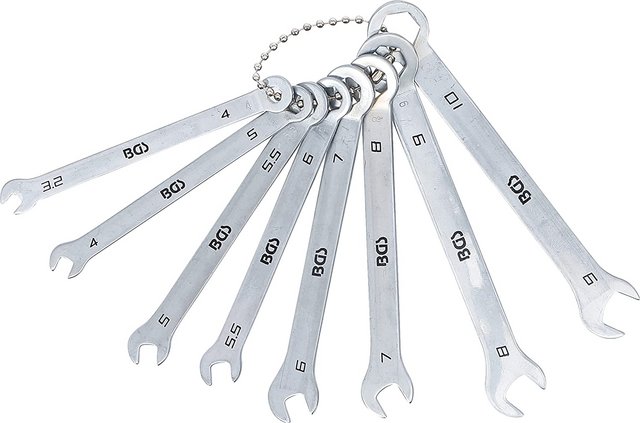
The mini key "C" if I remember correctly is 4 or 4.5 mm.
It is part of a set of very small and slim mini C-wrenches in different sizes similar to those in the photo.


71y5-Y4-V7-ZL-AC-SL1500.jpg
 
Last edited:
Thanks @best-groove! I have had some replying that the arm didn’t have to be removed to unscrew the floating tailpiece. It’s difficult to tell since it’s buried under the bearing housing.

Hence why I chose the way I did it now. The rubber bushing has 28.5 mm ends connected by ~ 14mm shaft. Cutting off one end leaves the other end to support the counter weight with a large bearing surface. After a few years of use, I can easily replace it in 5 minutes without any dissembling of the arm from table. The hardest part for me in the future will be removing the dust cover and the counter weight.
 
I sure hope it will last at least 3 years before I notice any degradation. We will find out. I can look for some urethane rubber and cut it to fit but it is very stiff. Natural rubber seems like it will still work like the original.

So far I am obtaining some excellent performance.
 
Allow me to join the club. Just finished restoring a QL-A5
DSC_0009.JPG
DSC_0008.JPG

DSC_0011.JPG

Together with her sister, a Technics SL-Q3

DSC_0013.JPG

Sister
DSC_0014.JPG

Things left are a dust cover, which I am getting made, and new feet because it is not sitting level without help. And she deserves an ML just like her sister.

The tonearm was slightly sagging which I fixed with three very tight o-rings overtop of the rubber grommet that was in there already. Seems to work well for now and does not look too odd.
 
Last edited:
Back
Top Bottom