• The move to the new server is done. There are some software and database maintenance updates in process. This has us passing the hat around to help out. We appreciate any donations. Seriously, even a dollar helps. The payment page may be found here - https://www.audiokarma.org/support.html

Nelson Pass F5 build, Part Trois...

I have used the "Light bulb variac" when I built my P-P 6550 tube amp.
It worked very well. When first switched on, the lightbulb glowed brightly, then if all is well, dims down.....if not, it glows brighter. Worked like a charm, I had unintentionally reversed the leads from the outputs, which made the amp highly unstable. That, and the bias meters swinging wildly let me know
before anything went up in flames!

russellc
 
Whoops, I see you have already been there and that advice may be in question, sounds like maybe they have it backwards? I have the daniels boards, so I need to find out....

Russellc
Russell,
I put a meter on the trimmers before installing them, like I do for most of the components. I didn't want any surprises about values and have the mission of sorting out a mislocation, etc.. I measured that they were at the highest resistance. After placing them in circuit and prior to start-up, I metered them again and second guessed myself into believing I had them set wrong. A lot of this confusion was reading stuff that is passed along in the original DIY thread.

Here is a copy of the Datasheet of the 3296 Bourns trimmer which was supplied by Tech-DIY. NP commented that there is no difference in the method of mounting but I followed SpecialI's and Tal's orientation.

I am posting this up here so others don't get confused and have that heart-stopping moment when the amp is fed full current.
 
Russell,
I put a meter on the trimmers before installing them, like I do for most of the components. I didn't want any surprises about values and have the mission of sorting out a mislocation, etc..

I triple measured every resistor before soldering them in place. Although I was an electronic tech doing board level troubleshooting in a previous life, I have learned that I no longer have the patience, or the knack for it.

You'll find that the pots are three-legged, with the resistance between the opposite legs the total value of the pot. Turning the screw varies the resistance between the center leg and the outside ones (duh). You'll find that two adjoining pads that the legs solder to are shorted at the pcb level. So you just have to figure that the value that matters is between the other two pads.

Yeah, clear as mud right?

Lance if you decide to go with an engraver to do an F5 logo, please let me know. I'd do mine as well.

It sure sounds nice tonight, how about yours?
 
I triple measured every resistor before soldering them in place. Although I was an electronic tech doing board level troubleshooting in a previous life, I have learned that I no longer have the patience, or the knack for it.

You'll find that the pots are three-legged, with the resistance between the opposite legs the total value of the pot. Turning the screw varies the resistance between the center leg and the outside ones (duh). You'll find that two adjoining pads that the legs solder to are shorted at the pcb level. So you just have to figure that the value that matters is between the other two pads.

Yeah, clear as mud right?

Lance if you decide to go with an engraver to do an F5 logo, please let me know. I'd do mine as well.

It sure sounds nice tonight, how about yours?
Jeff, I'm definitely thinking about the etching, machining, laser of an "F5" into the faceplate. It my hunt bears fruit, I'll let you know and we can double up. I haven't had time to hook it up, lol, been too busy metal working:scratch2:.

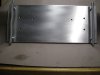
Old Fragger kinda' reminded me I should get busy on the faceplate so I'll show how far I got tonight. I could probably have had it to a mirror finish except for lack of sandpaper. I bossed the mounting bolt holes, chamfered all the holes on the drill press, and cut the edge chamfer on the router table. The handles will be cut down to match the faceplate height. I had to include a pic of the router table (I'm just really pleased how that turned out). It has saved a lot of time around here.:yes:

I promise I'll set up the F5, tomorrow, and report back what my impressions are *practices glowing adjectives in sleep*:thmbsp:.
 

Attachments

  • IMG_0001.JPG
    IMG_0001.JPG
    86.9 KB · Views: 72
  • IMG_0002.JPG
    IMG_0002.JPG
    90.4 KB · Views: 40
  • IMG_0003.JPG
    IMG_0003.JPG
    73.6 KB · Views: 43
  • IMG_0004.JPG
    IMG_0004.JPG
    66.2 KB · Views: 41
  • IMG_0005.JPG
    IMG_0005.JPG
    113.4 KB · Views: 71
Very nice looking! I tend to paint all my stuff, it's just easier :D

Almost there!

If the faceplate is aluminum, maybe you could find a local (read: small) cabinetmaker or sign manufacturer with a CNC getup to mill out what you want?
 
Very nice looking! I tend to paint all my stuff, it's just easier :D

Almost there!

If the faceplate is aluminum, maybe you could find a local (read: small) cabinetmaker or sign manufacturer with a CNC getup to mill out what you want?

I was thinking about painting almost all of the chassis pieces but after you get done sanding and cleaning, you still need to use an acid etching primer and then sand, paint, sand, paint, and probably a third coat, sand, paint, and finish wet sand. I added it all up and it seemed easier to just sand and polish. I guess if I want the aluminum tarnish-free, I'll have to anodize it or cover it with laquer. I could skip all that and take it to Jeff's powder-coating people but where's the fun in that?:D

The etching or machining is kind of a sticking point. None of the places that use a CNC setup want to break their rhythm to take on a little deal like this. They want to punch out as many parts as possible to make the machine earn it's keep. I do have "one card to play" and I'm weighing the choice of playing it.
 
Yea... it can be tough to find a small shop with the gear and the ability to do a one-off. A neighbour of mine runs a custom cabinetry business (his garage is a thing of beauty) and he's usually busy, but has no problems doing one-off deals when he gets slow.

I'd say ask around and try to figure out when slow-season is (there always is one), then approach them in that window to see if they'll do it for yah. You may be waiting a while, though.
 
I triple measured every resistor before soldering them in place. Although I was an electronic tech doing board level troubleshooting in a previous life, I have learned that I no longer have the patience, or the knack for it.

You'll find that the pots are three-legged, with the resistance between the opposite legs the total value of the pot. Turning the screw varies the resistance between the center leg and the outside ones (duh). You'll find that two adjoining pads that the legs solder to are shorted at the pcb level. So you just have to figure that the value that matters is between the other two pads.

Yeah, clear as mud right?

Lance if you decide to go with an engraver to do an F5 logo, please let me know. I'd do mine as well.

It sure sounds nice tonight, how about yours?

Making it even muddier, I have the daniels boards, and apparently some believe there is a difference in that hookup between the daniels board and cviller boards. I guess I should ask Peter for clarification on this. I'm going to (eventually) fire up with my variac, so I should have slightly more warning if something is a miss.

Russellc
 
Got a response over on DIY from Peter. He said as far as he remembered,
clockwise reduced the bias. He said he fires them up with the pot in its half way position, and has no trouble.

Russellc
 
Guys
Good info about the pot orientation, I have got my boards and and I am starting to plan out my build.
The biggest hassle is getting heatsinks and a chassis together, Im thinking to save money the best bet is to build my own chassis. Im still reeling over the cost and shipping for a pair of Conrad heatsinks.
I have a bunch of Nichicon 10000uf@50v I was thinking about using 10k uf and going with a 600va transformer for the ps. anyone using CVillers rectifier boards ?
The small parts and silicon, are pretty reasonable from TechDiy

bob
 
The biggest hassle is getting heatsinks and a chassis together, Im thinking to save money the best bet is to build my own chassis. Im still reeling over the cost and shipping for a pair of Conrad heatsinks.

I like squidward's idea of repurposing an old amp chassis and heatsinks. It would have to be a pretty big one - for the heatsinks anyway.


anyone using CVillers rectifier boards ?

In an earlier discussion which might even be in this thread, some of us agreed that buying a block rectifier for a few bucks is well worth it compared to having to assemble multiple parts. You may save a buck or two, but the opportunity for failure is greater and its far less work to use the block.
 
Specialidiot
I was thinking the same thing, the boards make for quite a few failure areas. I loke the block rectifiers reliable and easy to mount. Can use push on terminals too.
Cheeper after you figure in the diodes and heatsinks.
bob
 
I can verify the Pdaniels boards clockwise lowers bias, CC raises bias.

Either way, when I fired mine up the first time I had voltmeters on both .47 ohm resistors and used a 100 watt bulb in series. They should start out as 0 volts with no bias and increase to .590ish as you turn the pots counter clockwise. I removed the bulb once I saw the bias come up to about .100 on both sides successfully
 
Ebay seller johnango is the guy who runs Antek, the torroid transformer place. Looks like he's also selling heatsinks for cheap now, too. Might be worth checking it out.
 
Lance, I remember reading in a thread somewhere about finding a gunsmith that does custom etching. That or a possibly a place that does trophies.
 
Ebay seller johnango is the guy who runs Antek, the torroid transformer place. Looks like he's also selling heatsinks for cheap now, too. Might be worth checking it out.
Looks like a great deal, the trannys are nice.

Lance, I remember reading in a thread somewhere about finding a gunsmith that does custom etching. That or a possibly a place that does trophies.
Thanks, Denny, I will check on that.

ebay item 250515881584 looks like it will do the trick.
That is a great deal if the sinks will handle the heat. A guy could always fabricate or buy a badder faceplate to pull it up a level.

Finally got some listening time and what others have said is absolutely right on, the F5 is outstanding. I am running some new-to-me gear on the front end so am trying to sort it all out but the Class A goodness is there!:thmbsp:

For starters: Preamp-Yamaha C-2a ( thank you, thank you, thank you, you special guy :banana:) Tuner-Yamaha T-1, Tape deck-Nakamichi CR-3A, CD Player-Panasonic DVD recorder DMR ES-20, Speakers-DIY "Plant Hangers", a Fostex single driver back loaded horn.

I started out with the Tuner hooked up since I had never heard it and wanted to see what it could do. Tuned in the local Jazz station that was playing some acoustical guitar, mandolin, and lute, sat mesmerized for an hour or so. First impression was the clarity and realism, almost similar to a chip-amp but so much more musical.
Hooked up the Tape deck for the same reasons above, never heard it. Meh, tape. Probably a so-so mixdown but thank goodness I don't own many, this is mainly a carrot for the Polish Princess so she can enjoy, also.
I then went to the CD, started with Norah Jones. Man, the gal can sing and "Not Too Late" is well engineered.The vocals were always a treat through these speaks but the F5 turns up the quality and at the same time uncovers a small hump in the high-end that I had never noticed. The term, "in the room" is appropriate.
Next, spun up the Eagles-"Hell Freezes Over", a disc I am quite familiar with, using it to test out dynamics and range on every system I've had. There is absolutely nothing missing with the F5, absolutely nothing. Attack, transients, more bass, better treble, incredible, really. Without a doubt, this is the finest amp I've ever owned and the fact that I built it is only a small bit of icing on a very tasty cake.
Listening now to Miles davis-"Scetches of Spain", a Japanese MFSL disc and winding down a great night. There are those things that I might have heard but I haven't heard them like this.
A word about the test gear: The Panasonic DVD recoder is a 24 bit player but I'm sure it is holding a little back compared to a quality Redbook or SACD player. I didn't hook up a TT, although I have a couple, that is about the extent of my vinyl collection, a couple. The Fostex speakers are marvels in their own right but I can't wait to see what the F5 does on the Altec horns.

I will be finishing up the rest of the amp build and will post a BOM that will enable others to get in on this superb amp. Really, guys, you owe it to yourself to build one of these.

 
Without a doubt, this is the finest amp I've ever owned and the fact that I built it is only a small bit of icing on a very tasty cake.

Well guys, I think he gets it. Well done Lance, we'll see you on the forums in a month or so when you are done with your first listening session. ;)

btw, I have a T1 through my C-2x, and it is a very nice tuna. It does KBEM justice.
 
Another option?

The etching or machining is kind of a sticking point. None of the places that use a CNC setup want to break their rhythm to take on a little deal like this. They want to punch out as many parts as possible to make the machine earn it's keep. I do have "one card to play" and I'm weighing the choice of playing it.

I know a guy who has a one man machine shop in his garage. He does small volume jobs for local commercial clients in the Twin Cities. You'll have to contact him to find out if he could help you out with your faceplate.

Here's a link to his website:

http://www.tedmachine.com/index.html
 
Back
Top Bottom