• The move to the new server is done. There are some software and database maintenance updates in process. This has us passing the hat around to help out. We appreciate any donations. Seriously, even a dollar helps. The payment page may be found here - https://www.audiokarma.org/support.html

Record Bin From single 4 x 8 Sheet of Plywood - Plans

There is no assembly instruction how to. Just the prints showing the cut sheets and final assembly. If you read through the early section of the tread, you will find a bunch of tips and methods people use.

Using wood screws, gluing each joint and capping the screws with wood covers to hide them seems to be the common method.
 
Just finished up my record bins.

This was my first wood project and I'd like to say thanks to the originators and commenters on this post thread for giving me a nice project to learn with. I took my time and enjoyed this project.

I started off by building a box out of cheap plywood, basically a small record crate. Recommended if you've never done much woodwork. You can get smaller sheets of 3/4" birch at Lowe's for $17 that are pretty nice. Assemble it, Stain it, finish it.

For the final project I ended up getting some nicer birch plywood from the "fine lumber" store so this changed my measurements a bit. The nicer plywood has more layers and was more consistent than the Lowe's stuff. Total bill for wood was $110 with tax for two 5'x5' sheets.

The lumber store made some rough cuts on a vertical cable saw that were not square to break the wood down to fit in my car.


I started off doing cuts with a circular saw and homemade jigs and practice plywood from home depot. The standard circular saw blade will shatter veneer on plywood - you will need to buy a finer blade meant for cutting plywood. I found that laying down painter's tape helped stop some of the splintering. Practice a lot if this will be your only method of cutting. Google "Straight cuts plywood circular saw" and look at some jigs.

Eventually borrowed a table saw from a neighbor and this was so much easier to work with on the cuts. Even with the table saw - getting wood straight and square on a large scale is really difficult to do. In some cases I used a straight-edge and a router with a 'flush cut' blade to finally get square, straight edges.

Looking back - the fine lumber store offered to do the majority of the cuts for $40. Might have been a good idea to take them up on that - though in the end I worked through it and that's sort of the point of this. If you have a friend or relative who knows this stuff some hands-on instruction would be very valuable.

I ended up buying a Kreg jig to do pocket joinery - this was $35-ish + a box of screws. It's great for hiding screws but if there is an area where you need to plug it can be ugly.
https://www.kregtool.com/store/c13/kreg-jigsreg/

A ton of sanding once assembled to get the panels lined up perfectly - though nowhere was I out more than 1/16".

I sanded up to 320 with a random orbital. Multiple times. First round of stain was Minwax "Special Walnut" mixed 50/50 with red mahogany. Second round of stain was straight red mahogany. Applied with a rag. Do a ton of testing on scrap wood to arrive at what color you want. MinWax should sell a sample set at the home depot.

Sealed it with semi-gloss polyurethane applied with foam brushes- 3 coats. Hand-sanded between coats with 220 grit. Use a razor blade to knock down bubbles and runs if they come up. Patience and once you have sealer all over a given surface make sure to use the tip of the foam brush to smooth it out in long light strokes- big difference. Super happy with the final outcome.

LED underlight was $20 at Lowe's.

More pics here http://pics.1800philes.com/record_cabinet/

 

Attachments

  • 480x640-IMG_7426.JPG
    480x640-IMG_7426.JPG
    43.7 KB · Views: 705
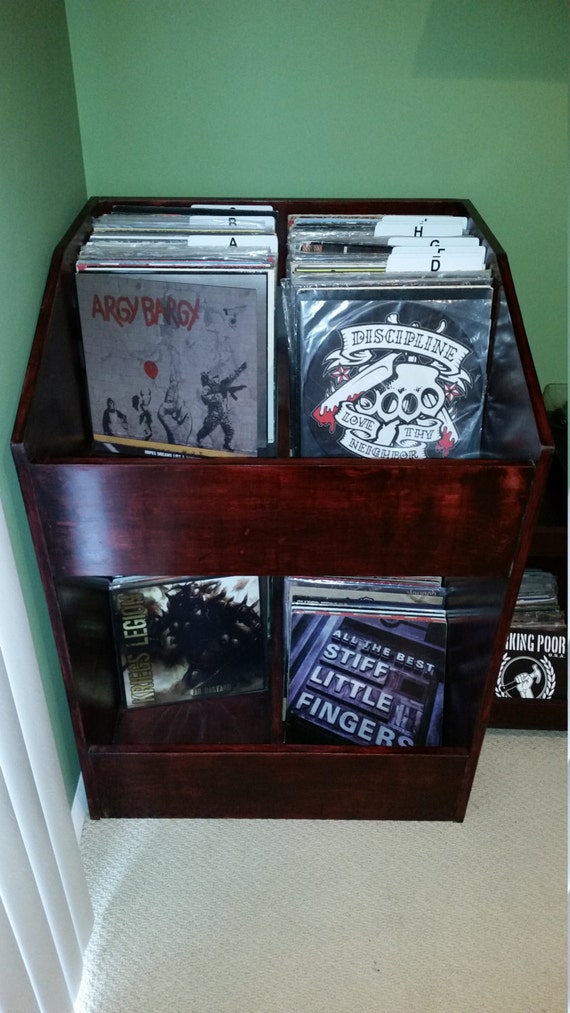
Built allot of these so far, sold about 20 of them

il_570xN.879416784_ejhg.jpg
il_fullxfull.863893919_e2kc.jpg
 
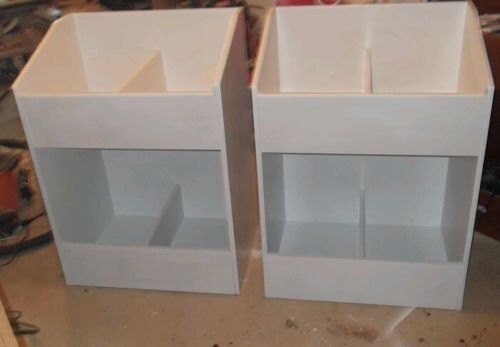
Thank you for the plans. My first piece of "furniture". Made this one cheap to get a feel for it. Rough cut plywood, wood glue, screws, and brads. Maybe giving away a few of these for Xmas.
image.jpeg
 
When mine was finished, I installed 2 stick on LED lights for the lower shelves, and a clip on gooseneck LED lamp for the upper shelves.
 
Here's mine....nothing fancy...just stained and clear coated. Didn't hide the screws, its just upstairs in my cave, but I like it

Very cool smart design. Stupidly I sold or gave away a large part of my collection, :whip: otherwise I'd be building one of these right now.
Oddly enough all 5 of the LP's you have pictured (and including some Van Halen) are or were in my possession. You have very good taste in R&R!
 
Thanks....this is my second time around for vinyl....most was sold at a yard sale and given away when cd's hit the market..stupid. Then a couple years ago my son found Van Halen 1984 on vinyl at a flea market and wanted to by it just to display in his room. Well later on I thought I should set up an inexpensive tt setup to show him what its like to spin vinyl and the obsession began again from there. I really enjoy holding the "media" and setting up the system and maintaining it....its much more satisfying than just plugging in earbuds and hitting a button.
 
My intention was to replace my LP's with CD's and just keep the ones I don't listen to often.
Funny thing is I'm missing a lot of records I would never give away without replacements, some like my Led Zep III or Stones 'Through the Past Darkly' I wouldn't give away, period.
I was hoping to run into a misplaced crate of LP's in my basement but no such luck so far:(
 
All Done

Walnut plywood
Maple ply base
Maple edge banding
Bottom shelf is drawer for easier access. 110 lb rated.

finished in 2 coats of watco and 1 coat briwax


I was looking at this thread for ideas, and THIS IS IT! Great work Lear2000. Now I just have to decide between 2 or 3 tiers:)
Unfortunately,I'll have to wait for my buddy Nigel to return from his family Christmas holiday in England,as he has the cabinet-making skills and the woodshop.
I've found it best to stick with electronics and metalwork/machining,as all of my wood projects have ended up looking like a 10 year-olds first attempt at a birdhouse:(
 
I was looking at this thread for ideas, and THIS IS IT! Great work Lear2000. Now I just have to decide between 2 or 3 tiers:)
Unfortunately,I'll have to wait for my buddy Nigel to return from his family Christmas holiday in England,as he has the cabinet-making skills and the woodshop.
I've found it best to stick with electronics and metalwork/machining,as all of my wood projects have ended up looking like a 10 year-olds first attempt at a birdhouse:(

Just a quick suggestion, go with undermount drawer guides. I would suggest, Blum Tandem Heavy Duty slides. They cost a bit more, but they are well worth it.
 
Was wondering how these are holding up over the years.. An earlier post mentioned the lack of a cross support under the shelf and bowing of the shelf over time due to the weight. This is on my to-do list this spring.
 
Back
Top Bottom