• The move to the new server is done. There are some software and database maintenance updates in process. This has us passing the hat around to help out. We appreciate any donations. Seriously, even a dollar helps. The payment page may be found here - https://www.audiokarma.org/support.html

Need help with Pickering cart

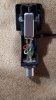
I ended up ordering a 4606-DEX. Before I get it, I'd like to clean up the cart. As you can see in the pics I posted, it does have some pitting and oxidation. Does anyone know what I can use to clean it up?
 
You don't really want to get residue inside the orifice that the stylus slides into, so I would leave the old stylus in place during any cleaning activity. I think that you just want to get the brown, nasty looking crud off of there and it will be good.

Remember, you have a new stylus on the way for that cartridge and if you damage it during cleaning, you will be out the $$$ spent on it. I would just go very, very lightly getting off as much of the obvious detritus on the exterior of the cartridge, particularly that one spot underneath close to the front as well as the bulk of it which from your pictures is located just above where the stylus slides into the cartridge....that's what looks really bad.

That said and as you say, remember the cartridge sounds really good as it is and some might say just leave it alone and replace the old stylus.

If you decide to try to clean it, I would do the following. Take a piece of Magic Eraser and cut a 1/4" by 1/4" piece to form a small cube. Then, take a pair of hemostats and pinch that cube so that you have something that when rubbed against the cartridge will have a slight abrasive quality to it, and importantly initially without any liquid. Take care that the ME covers the tip of the hemostat so you aren't scratching things up. See how much of the crud comes off and repeat as necessary. Only after convincing myself I need liquid would I apply it. My bet is you will remove most, if not all of the crud in this fashion just "dry cleaning."

And, as far as the pitting is concerned, it is doubtful you will be able to do anything about that because it is not dirt, just tiny pits in the metal case that will not be removed with any polishing that I know of without taking a good part of the metal off in the process, which is to be avoided.

Let us know how you do Lennie.

 
You don't really want to get residue inside the orifice that the stylus slides into, so I would leave the old stylus in place during any cleaning activity. I think that you just want to get the brown, nasty looking crud off of there and it will be good.

Remember, you have a new stylus on the way for that cartridge and if you damage it during cleaning, you will be out the $$$ spent on it. I would just go very, very lightly getting off as much of the obvious detritus on the exterior of the cartridge, particularly that one spot underneath close to the front as well as the bulk of it which from your pictures is located just above where the stylus slides into the cartridge....that's what looks really bad.

That said and as you say, remember the cartridge sounds really good as it is and some might say just leave it alone and replace the old stylus.

If you decide to try to clean it, I would do the following. Take a piece of Magic Eraser and cut a 1/4" by 1/4" piece to form a small cube. Then, take a pair of hemostats and pinch that cube so that you have something that when rubbed against the cartridge will have a slight abrasive quality to it, and importantly initially without any liquid. Take care that the ME covers the tip of the hemostat so you aren't scratching things up. See how much of the crud comes off and repeat as necessary. Only after convincing myself I need liquid would I apply it. My bet is you will remove most, if not all of the crud in this fashion just "dry cleaning."

And, as far as the pitting is concerned, it is doubtful you will be able to do anything about that because it is not dirt, just tiny pits in the metal case that will not be removed with any polishing that I know of without taking a good part of the metal off in the process, which is to be avoided.

Let us know how you do Lennie.
Cart cleaned up really nice with the Magic Eraser, and the stylus also cleaned up nicely with some all purpose cleaner, and a very soft paint brush. Now I'm just waiting for that new stylus. It was shipped out today. Hopefully it won't get delayed by USPS.
 
Good job! Be careful cleaning stylus with "all purpose cleaner" though as this should typically be done with a cleaner made for the job. There are good reasons for this and usually depend on how the stylus is attached to the cantilever.....you don't want to clean and then find your stylus is no longer present!!! Pictures of the cleaned cartridge?
 
Good job! Be careful cleaning stylus with "all purpose cleaner" though as this should typically be done with a cleaner made for the job. There are good reasons for this and usually depend on how the stylus is attached to the cantilever.....you don't want to clean and then find your stylus is no longer present!!! Pictures of the cleaned cartridge?
Mean Green was suggested to be used, which is an all purpose cleaner. I used Simple Green, diluted to 10:1.
 
Good job! Be careful cleaning stylus with "all purpose cleaner" though as this should typically be done with a cleaner made for the job. There are good reasons for this and usually depend on how the stylus is attached to the cantilever.....you don't want to clean and then find your stylus is no longer present!!! Pictures of the cleaned cartridge?
Here's a couple pics. The sticker obviously didn't clean up.
 

Attachments

  • 20210403_122006.jpg
    20210403_122006.jpg
    96.7 KB · Views: 19
  • 20210403_122236.jpg
    20210403_122236.jpg
    49 KB · Views: 19
That looks waaaay better! Again, nice job......I love happy endings! Let us know how your new stylus sounds once you receive it!
 
The new stylus came today, and it definitely has a better sound than the one that was on there. It sounds like the bass is better too.
 
Back
Top Bottom