

You are using an out of date browser. It may not display this or other websites correctly.
You should upgrade or use an alternative browser.
You should upgrade or use an alternative browser.
Pioneer PL-L1000A Thread
- Thread starter Bratwurst7s
- Start date

Have you actually tried this? Meaning the shrink wrap. The gluing part is fairly obvious.Hmmmm...
I thought you would simply put some thermo-shrinking tube on the cylinder part of the worm gear, - glueing its' fractures first.
Did it provide enough compression?
 ,
,James
Well... I did not try to fix a part like your's but I can judge by the tightness of cables I cover with thermo-shrincable tubes. The pressure is very significant.
In your case - the main strength would come from the glue, the tube will "help" to tighten the joint, also - the more evenly spread pressure helps to prevent new fractures from appearing. Just select a tube with an initial diameter (before shrinking) closest to the diameter of that cylinder end. Also - there are such tubes with a glue layer inside.
If you insist on that "wire bondage" - I'd took thinner wire and made several windings along the cylinder part before tightening....
In your case - the main strength would come from the glue, the tube will "help" to tighten the joint, also - the more evenly spread pressure helps to prevent new fractures from appearing. Just select a tube with an initial diameter (before shrinking) closest to the diameter of that cylinder end. Also - there are such tubes with a glue layer inside.
If you insist on that "wire bondage" - I'd took thinner wire and made several windings along the cylinder part before tightening....
Last edited:
A tight fitting spring? but tough to get on after gear is glued.Well... I did not try to fix a part like your's but I can judge by the tightness of cables I cover with thermo-shrincable tubes. The pressure is very significant.
In your case - the main strength would come from the glue, the tube will "help" to tighten the joint, also - the more evenly spread pressure helps to prevent new fractures from appearing. Just select a tube with an initial diameter (before shrinking) closest to the diameter of that cylinder end. Also - there are such tubes with a glue layer inside.
If you insist on that "wire bondage" - I'd took thinner wire and made several windings along the cylinder part before tightening....
We shall see. For the moment it isn't going anywhere and can sit.
While I wait for the next motor sleeve I dug into my o-ring stash and played around a bit. Just exploring an alternate way of mounting the motor just for fun.
I found some very suitable samples. They had to be stretched a bit to fit over the motor and are a snug fit, and when sitting in the frame are under compression from the upper and lower frame rails. I just put 2 on the motor to test with, but 6 or 7 would fit in total. I am thinking that this would hold the motor in place quite tightly.
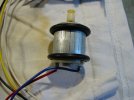

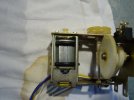
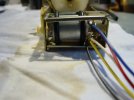
A person could cut some rubber standoff pieces for the front and back and I think that this would be a viable solution. With 6 rings on the motor under compression the motor won't be moving I think.
As my friend Soundscape might say, it would be a bit of a low rent redneck solution, but a viable solution nonetheless.
,
James
While I wait for the next motor sleeve I dug into my o-ring stash and played around a bit. Just exploring an alternate way of mounting the motor just for fun.
I found some very suitable samples. They had to be stretched a bit to fit over the motor and are a snug fit, and when sitting in the frame are under compression from the upper and lower frame rails. I just put 2 on the motor to test with, but 6 or 7 would fit in total. I am thinking that this would hold the motor in place quite tightly.
A person could cut some rubber standoff pieces for the front and back and I think that this would be a viable solution. With 6 rings on the motor under compression the motor won't be moving I think.
As my friend Soundscape might say, it would be a bit of a low rent redneck solution, but a viable solution nonetheless.
,James
You must not have seen an original sleeve or read my earlier post.More than two rings - is an overkill in my opinion. If it is tight in two - let it sit that way. The more rings - the more motor vibrations will reach the TT frame.
The original sleeve has ribs on the inside that are in complete lengthwise contact with the motor and the sleeve is in contact with the complete length of the top and bottom rails.
There is zero concern of vibration from this motor reaching the platter or tone arm during play I believe.
Here is a photo of the inside of the original sleeve.
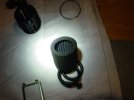
All of those ribs are in full contact with the motor. In fact they were stuck to the motor and I had to gently separate then from the motor to get it out.
,
James
All of those ribs are in full contact with the motor. In fact they were stuck to the motor and I had to gently separate then from the motor to get it out.
,James
I was following this thread as I'm interested in this TT. I saw the original part.
Those ribs there are flexible across the radius so that they absorb stator's reaction to rotor's [ac|de]celerations. So the best way is to have a sleeve identical to the original.
But if you resort to the rings instead, you will loose that absorbtion capability. All stator's reactions will get to the TT frame.
I think - the more rings, - the better the motor's vibrations are conducted (which is The Bad Thing).
Those ribs there are flexible across the radius so that they absorb stator's reaction to rotor's [ac|de]celerations. So the best way is to have a sleeve identical to the original.
But if you resort to the rings instead, you will loose that absorbtion capability. All stator's reactions will get to the TT frame.
I think - the more rings, - the better the motor's vibrations are conducted (which is The Bad Thing).
It is the tonearm lift motor. At what point do you expect that any motor vibration will be heard?

And now back to our regular program.
I have been in contact with Miguel and asked if he can also make a worm gear. He is going to try. He also showed me a photo of the new motor tube on a motor, it looks very good.
,
James
I have been in contact with Miguel and asked if he can also make a worm gear. He is going to try. He also showed me a photo of the new motor tube on a motor, it looks very good.
,James
OK. So I thought that your idea of using the shrink wrap might be worth trying.Hmmmm...
I thought you would simply put some thermo-shrinking tube on the cylinder part of the worm gear, - glueing its' fractures first.
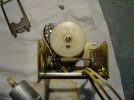
1) As I feared, I was not able to get all of the old grease out of the crack and the glue did not hold. IPA and acetone didn't do the job and there is no way that I will risk using anything stronger like MEK.
2) Applying enough heat to shrink the tube is extremely risky for these 41 year old nylon parts. Even being extremely careful I did slightly melt the thrust washer.
3) The shrink wrap does not compress enough to tighten the barrel enough to hold it from slipping.
4) I ditched the SS wire and used 0.8mm tinned copper wire. It is much softer and easier to form but still strong enough to be able to get it tight. And I was able to get the tail farther away from the gear this way.
5) Using multiple wraps of wire does not work, it is too hard to pull it tight enough to hold the worm gear from slipping.
So my thoughts are, do not attempt to use shrink wrap.
 ,
,James

I have been watching this thread with interest. I no longer have my PL-L1000. The aging parts finally frustrated me beyond keeping it, but parts from it have kept several others operating and I’m happy for that.
With regard to the the white nylon worm gear (and all the other white nylon parts) they don’t age well. They become brittle and crack, split or break. I know of nothing that can be done for that situation. Internal vice. I believe they can stand being washed in acetone to remove the oil and/or grease. After that you may be successful using one of they cyanoacrylate adhesives formulated for plastics. If you are committed to keeping this turntable operating long term, I suggest you buy a decent 3-D printer and learn to “print” replacement parts.
With regard to the the white nylon worm gear (and all the other white nylon parts) they don’t age well. They become brittle and crack, split or break. I know of nothing that can be done for that situation. Internal vice. I believe they can stand being washed in acetone to remove the oil and/or grease. After that you may be successful using one of they cyanoacrylate adhesives formulated for plastics. If you are committed to keeping this turntable operating long term, I suggest you buy a decent 3-D printer and learn to “print” replacement parts.

Pio1980
AK Member
I think the white plastic bits are acytal delrin, which shrinks as it ages and basically unglueable.I have been watching this thread with interest. I no longer have my PL-L1000. The aging parts finally frustrated me beyond keeping it, but parts from it have kept several others operating and I’m happy for that.
With regard to the the white nylon worm gear (and all the other white nylon parts) they don’t age well. They become brittle and crack, split or break. I know of nothing that can be done for that situation. Internal vice. I believe they can stand being washed in acetone to remove the oil and/or grease. After that you may be successful using one of they cyanoacrylate adhesives formulated for plastics. If you are committed to keeping this turntable operating long term, I suggest you buy a decent 3-D printer and learn to “print” replacement parts.
I actually have considered buying a 3D printer. Perhaps this will be a good reason to move ahead with that.
And all of the white plastic parts are clearly aging. Getting yellow and hard. I have recognized that they are a danger area.
It will be interesting to see if Miguel comes up with something. He is already printing foot columns with adjustable top nuts.
The replacement connection cable from rothwellaudio arrived on Thursday. It looks very nice and size wise I see no problem with it fitting in the existing strain relief. The PTFE mantle is fairly hard so I contacted Andrew Rothwell and asked if he thought there will be any danger of damage by bending it in the strain relief.
He replied "The cable isn't the easiest to work with but its PTFE outer insulation isn't easily damaged. I don't know what the turntable's strain relief is like but I doubt it will cause damage."
I think that I will still source a screw and compression sleeve type strain relief just in case.
So right now the only thing slowing me down is waiting for the rubber motor sleeve. But I am not in a rush.
,
James
And all of the white plastic parts are clearly aging. Getting yellow and hard. I have recognized that they are a danger area.
It will be interesting to see if Miguel comes up with something. He is already printing foot columns with adjustable top nuts.
The replacement connection cable from rothwellaudio arrived on Thursday. It looks very nice and size wise I see no problem with it fitting in the existing strain relief. The PTFE mantle is fairly hard so I contacted Andrew Rothwell and asked if he thought there will be any danger of damage by bending it in the strain relief.
He replied "The cable isn't the easiest to work with but its PTFE outer insulation isn't easily damaged. I don't know what the turntable's strain relief is like but I doubt it will cause damage."
I think that I will still source a screw and compression sleeve type strain relief just in case.
So right now the only thing slowing me down is waiting for the rubber motor sleeve. But I am not in a rush.
,James
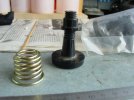
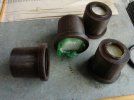
Normally I am fairly linear with these kind of projects and plod along doing only one thing after the other.
But in this case since I have some waiting time I thought it would be nice to wash my dirty feet and get out some clean socks.
,
James
But in this case since I have some waiting time I thought it would be nice to wash my dirty feet and get out some clean socks.
,James
As I mentioned earlier my suspension springs are badly stretched.
What with the old socks having fallen apart and with sagging springs what I did in the past was add shims to the top of the pedestal and sit an o-ring on the bottom turn of the spring.
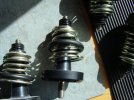
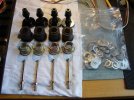
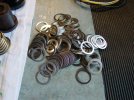
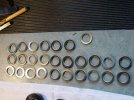
Back in Tacoma Washingtoon I worked doing precision metal etching and my boss gave me permission to etch some 0.010" 302 stainless shims.
,
James
What with the old socks having fallen apart and with sagging springs what I did in the past was add shims to the top of the pedestal and sit an o-ring on the bottom turn of the spring.
Back in Tacoma Washingtoon I worked doing precision metal etching and my boss gave me permission to etch some 0.010" 302 stainless shims.
,James
To address the sagging springs I was able to find a set of 6 used ones on ebay. They all measure about 23mm in free height. Between Celadon and gary7 we came to the estimate that the original springs are about 21.5mm. My old springs are in excess of 25mm.
We also came to the conclusion that for those with adjustable top nuts on the pedestal there should be about 4 turns of thread showing above the top nut. My nuts are glued and there is about 7.5mm of threaded area above the nuts.
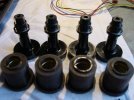
Clean and ready.
Socks on!
,
James
We also came to the conclusion that for those with adjustable top nuts on the pedestal there should be about 4 turns of thread showing above the top nut. My nuts are glued and there is about 7.5mm of threaded area above the nuts.
Clean and ready.
Socks on!
,James
I am going to install these things with 2 shims on each top nut, effectively shortening the spring by about 0.5mm.
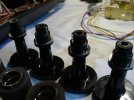
The shims are actually etched to close tolerance and fit snugly over the top hat with very little free play. Like +/-0.002".
I just counted them and I have 267 of them. Just a bit more than I need.
I am willing to share some of them with members in need. Just PM me.
,
James
The shims are actually etched to close tolerance and fit snugly over the top hat with very little free play. Like +/-0.002".
I just counted them and I have 267 of them. Just a bit more than I need.
I am willing to share some of them with members in need. Just PM me.
,James
Last edited: