

You are using an out of date browser. It may not display this or other websites correctly.
You should upgrade or use an alternative browser.
You should upgrade or use an alternative browser.
Record Bin From single 4 x 8 Sheet of Plywood - Plans
- Thread starter sxty8goats
- Start date


JohnVantine
vinyl n00b3r
I finally got around to building one of these, and I'm really happy with the way that it came out.
I documented the process and put together a blog post, if you'd like to check it out: http://www.johnvantine.com/i-built-a-vinyl-record-shelf/
Thanks for sharing the plans, and all of the various advice in this thread!
I documented the process and put together a blog post, if you'd like to check it out: http://www.johnvantine.com/i-built-a-vinyl-record-shelf/
Thanks for sharing the plans, and all of the various advice in this thread!
Attachments


Last edited:

Very nice simple design. I looks like a nice weekend project.
the plywood edges could be covered with iron on veneer tape that can be purchased at most Hardware or Home Improvement Stores.:thmbsp:
JohnVantine
vinyl n00b3r
the plywood edges could be covered with iron on veneer tape that can be purchased at most Hardware or Home Improvement Stores.:thmbsp:
I've never used veneer tape before. Would this be for aesthetic value? I'm definitely interested in making this look nicer, just curious what the motivation for doing it would be


sxty8goats
Super Member
I've never used veneer tape before. Would this be for aesthetic value? I'm definitely interested in making this look nicer, just curious what the motivation for doing it would be
Yep, that is exactly what it is there for. Cleaning up the appearance of the edges. There are a couple examples in this thread if you wander back through some of the pictures.
Thank you for sharing your plans. Searching for storage solutions led me to this forum, and this past weekend I began building my first bin (might need to build a second one, but will wait and see). I'm going to add some heavy duty castors so that I can move the bin around without having to empty it. Will post pics when I'm finished.
sxty8goats
Super Member
Thank you for sharing your plans. Searching for storage solutions led me to this forum, and this past weekend I began building my first bin (might need to build a second one, but will wait and see). I'm going to add some heavy duty castors so that I can move the bin around without having to empty it. Will post pics when I'm finished.
Awesome. Welcome to AK. There are a couple sets of plans, one with castors installed.
Here's my finished cabinet - used the vertical grain plans, and added heavy duty casters to the base - casters are rated for 250lbs each. The plywood edges are covered with 1/4" strips of oak - so the edges can take a little abuse if moving the cabinet around.
Have 110 lps in each section, so 440 albums - wouldn't want to put any more in, as that would impede flipping through them - so I'm going to need to build another one!

Have 110 lps in each section, so 440 albums - wouldn't want to put any more in, as that would impede flipping through them - so I'm going to need to build another one!
Last edited:
sxty8goats
Super Member
Beautiful job toonr.

scottstevens
Well-Known Member
I still haven't stained mine lol.
scottstevens
Well-Known Member
^ can't wait to see pictures of that!

ra7c7er
Hoarding records since 1990
I just finished mine a week ago or so, I'll have to take some pics when the light is better. I used oak veneer plywood and the iron on oak veneer strips for the edges, turned out real nice!
Takes pictures soon or now... or something.... inquiring eyes need to see.

OldSch00l
Seeking a Happy Medium
Okay so here is my attempt at this. As I said in the last post I used oak veneer plywood and veneer strips to cover the edges. I also used a Kreg jig for pocket hole screws so that nothing is visible, and their oak plugs to seal up the holes, which you should be able to make out in the 2nd picture. I stained it with 2 coats of red mahogany stain, then applied 3 coats of semi-gloss polyurethane top coat with an HVLP gun. I need to get a real digital camera, these cell phone pics don't quite do it justice...


Last edited:


Hofy
Voids Warranties
Okay so here is my attempt at this. As I said in the last post I used oak veneer plywood and veneer strips to cover the edges. I also used a Kreg jig for pocket hole screws so that nothing is visible, and their oak plugs to seal up the holes, which you should be able to make out in the 2nd picture. I stained it with 2 coats of red mahogany stain, then applied 3 coats of semi-gloss polyurethane top coat with an HVLP gun. I need to get a real digital camera, these cell phone pics don't quite do it justice...
Good job! Dont you just love the Kreg system?!

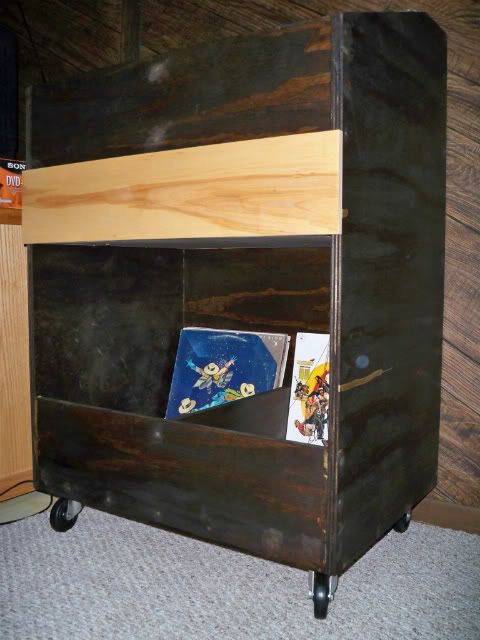
Finally got the casters installed, besides being able to wheel it around it got it about 4 inches off the floor and made it a little easier to access the bottom LP's. Not happy with the dark stain and plan on getting it outside in the spring and trying to lighten it up somehow. I think I'll trim the edges then.
I'm still looking for an idea to lighten up/remove this dark stain, what about brushing it with paint thinner, or would that just make a mess?

DonQuixote99
just give me some truth
Test bleaches and solvents on an inconspicuous area.
I think you have to cover the stain. Paint, veneer, contact paper....
I think you have to cover the stain. Paint, veneer, contact paper....
ra7c7er
Hoarding records since 1990
Okay so here is my attempt at this. As I said in the last post I used oak veneer plywood and veneer strips to cover the edges. I also used a Kreg jig for pocket hole screws so that nothing is visible, and their oak plugs to seal up the holes, which you should be able to make out in the 2nd picture. I stained it with 2 coats of red mahogany stain, then applied 3 coats of semi-gloss polyurethane top coat with an HVLP gun. I need to get a real digital camera, these cell phone pics don't quite do it justice...
They do it more than enough. Wow that looks incredible.