• The move to the new server is done. There are some software and database maintenance updates in process. This has us passing the hat around to help out. We appreciate any donations. Seriously, even a dollar helps. The payment page may be found here - https://www.audiokarma.org/support.html

Show Us Your Sonys!!!

Hey Glenn, there's something amiss with those relays- show me a closeup, I think they have been replaced. It looks like one is glued on sideways. It's quite possible some clown has had a go at it previously...
 
John - Had not gotten that far, but now see what you are talking about. The stereo-mono function (does that also bride this amp?......I'll have to check that out) does not work. Stereo, only, at the moment. After checking it against the service manual I see that the "clown" (excellent name for whomever it was) actually used RTV to mount a replacement relay upside down (pins out) adjacent to the other two. Am guessing he was going to bring the correct connections around to the front. But, wisely choose not to. Hopefully, it is the correct replacement part and I can use it :yes: if the original is bad. But, would rather see if the original can be resurrected by cleaning. Is it fairly simple to 'pop the top' on these relays or must they be taken out to take apart?

EDIT - Stereo/mono function works just fine. It was my brain that was having the problem. Forgot to use the two (+) terminals when in bridged (mono) mode. Getting only the positive half of the signal makes the speaker sound quite odd. :D
 
OK, first, take the relays out, all the speaker relays. Then dismantle them, burnish the contacts and put them back in. Get rid of those blue relays and find some originals. Then tackle the mono issue as that is a separate tiny relay down behind the front panel if I remember correctly (gotta look at the manual). The bridge switch relay shorts out one channels non-inverting input and takes the signal from the other amp and feeds it into the inverting return in the feedback loop to give a nice out of phase amplifier. check all that before trying it out in mono as the N77 is a .6kW mono amp and nearly 1kW if pushed into low impedances- it will fry anything.
 
it's also possible he made a mess of the pcb behind when removing the original or cut a hole in the end of the original and wanted to cover it up or thought he'd use two in parallel and gave up. God knows, just get rid of it and clean her up. *s*
 
Am, again, pleasantly surprised at how easy it is to work on this amp. Drop out a dozen more screws, disconnect a couple of connectors and, bingo, holding the output board in your hand. No holes or anything wrong on the backside of the PCB and the spare relay popped right off. Is the same one as the blue one that is installed. Now I have to spend a bit with the schematic/SM to see if that is the stereo/mono relay. Sure would be nice if it is. Be a bit tight to work in there with solder-wick and iron, but I've had worse. The big magnifying glass/fluorescent light sure helps with such work.

Get rid of those blue relays and find some originals.
OK.......anyone have a couple of new Omron G5R-2232P-KW relays sitting around that I could purchase? .....I'm off to google to begin my search for a pair of new ones.

John - as always, thanks for your help.

And, what do you know. The Omron relay is a current part so no big deal (famous last words) to get. Digikey or Mouser.
 
drei.jpg
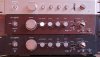
No ... that is not an early Sony 5.1 preamp :no:
It's the TA-E900 A/B test. :yes:

The TA-E88 was out quite fast. It hums more and sounded somehow "hollow" compared to the TA-E900s. Probably this TA-E88 is affected by the oscillating-disease.

TA-E900 NR1 is a US-model. I have cleaned the switches and potis, and replaced all electrolytic capacitors. Moreover I replaced the 1uF Tantalums by 1uF MKS, as some had been defective. It is operated on an oversized 220V-100V transformer equipped with two EMC filters.

TA-E900 NR2 is an AEP-modell without any modifications (from me).

There are, not huge, but clearly audible differences between NR1 and NR2.

First of all you have to open the anutattor of NR2 for about 5dB more to obtain the same volume.

NR1 reproduces "impulses" such as the touches of a piano or ringing of a bell more precise.

NR1 exposes more subtle details e.g. in the sound of a guitar string or human voices. Even applause is somehow less "noise" and more sound.

On the other hand with some recordings this analyticness is a bit annoying. Here NR2 produces a more "analog" sound. Something a little bit like sitting in the audience versus being next to the instrument. Yes a little bit like the analog-digital catch.

But with the right recordings I clearly prefer NR1, and with the others I'm not sure, I would like to have both.
 
Nice read Yves ! Should give the TA-E88 some more credit after an overhaul ;)

Next step is to add in Mirko's TA-E900 and do it again :D

Also, purely cosmecitically, the finish on both TA-E900's seems different, more like a purple glaze over the middle one as compared to the very black looking unit at the bottom.
 
Yes, the US-model is black-black (front panel), while the AEP-model is somehow dark aubergine. Difficult do describe and changing with the lighting.
 
The one with the purplish tinge is the result of anodized aluminum being exposed to sunlight/air over a long period of time. Doesn't have to be direct, but does supply enough energy to move the bonds about a bit to change the color. I'm guessing that is simply a bit more oxidizing of the aluminum over time due to somewhat porous nature of an anodized surface. The bottom unit appears to have a different surface treatment (paint?).
 
Most of Sony's pre-Esprit and ESPRIT units have fairly varying color hues depending on markets... depending on how much ambient light&UV they've received... And probably depending on who was at the anodizing deck that month ;-)


(...and it is all so clear the TA-E900 was first meant as the TA-E89, as the protos shown in TVK's Invisibilia section show).
 
The one with the purplish tinge is the result of anodized aluminum being exposed to sunlight/air over a long period of time. Doesn't have to be direct, but does supply enough energy to move the bonds about a bit to change the color. I'm guessing that is simply a bit more oxidizing of the aluminum over time due to somewhat porous nature of an anodized surface. The bottom unit appears to have a different surface treatment (paint?).

I‘m not that sure about that. The bottom unit is the US-model. The panel is not painted but anodized and really deep black. Mirko's US-model is also very black, I think.
The color is uniform over the panel, no lighter side near the sun or so.
The cover and side panels also have this "purplish tinge". There surely was less light than on the front panel.

By the way, speaking of color, the top unit is a TA-E88B :D
 
i think there were two colours on the esprit line .i got two tan-902 and one was black the other aubergine colour like the preamps in your photo i don´t think it s from uv light
 
Different anodizers give different results. We made replacement nozzles for a line of AMat etchers. Reversed engineered. With our anodizing process (which we did not do in-house, but was a local shop) the nozzle would last twice as long as the stock unit. All due to the anodizing. Let me also add heat to the mix that drives the process of color change with anodized aluminum. And, what's in your air over there?
 
B2, I am fascinated by anodizing- don't really get how it works, what it is, or why it is so tough, and why some deteriorates and some doesnt.
 
http://en.wikipedia.org/wiki/Anodized. They do at least as good a job as I could explaining this. Is a messy, dirty operation and the chemicals are always a problem to handle and dispose of. We had a custom machine shop and many of our parts where either anodized or electropolished. Same safety and environmental problems with both.
 
B2, I am fascinated by anodizing- don't really get how it works, what it is, or why it is so tough, and why some deteriorates and some doesnt.

Funny this whole anodizing topic has come up. My first job after graduating engineering school was in a large anodizing, electro-polishing, and chrome plating plant. I was responsible for the whole production line and all the tank chemistry. There are several factors that affect the quality of an anodized product and how long it lasts without bloom, fading, etc.

So, here is a little off topic discussion.

In general, the quality of an anodized coating is mostly dependent on the thickness of the anodized coating, and the quality of the seal. If the product is dyed, then the concentration of the dye and dye time is also a factor. Pore size can also come into play, but not as much.

Think of the anodize coating as a clear porous aluminum oxide. The pores need to be sealed to prevent the aluminum substrate from oxidizing (bloom). Kinda like a wax job seals paint.

Most of the factors can be controlled by tank chemistry, electrical current, and time. Shortcuts on any of these can lead to an inferior coating.

Too short of time in the anodize bath usually means too thin a coating, but this can also can happen if not enough DC current flows through the bath.

The seal bath is highly dependent on pH, temperature, and time. In our operation, this was usually compromised by production pushes and too much drag in from the preceding acid baths (again because not enough time was given to rinsing).

Colored anodizing is much harder to do than clear. We had a huge headache the first time we tried to do color. The idea is to get the color dye into the pores of the coating, then seal the coating, which keeps the dye in. Turns out, simple things like the amount of time in the air between the anodizing bath and the color bath turned out to be crucial. The pores would start to seal themselves with the dried up acid and dissolved aluminum from the bath. So we had to lower the aluminum content and fast track the bar to a rinse and into the color bath. When it was done right, it looked great, but we had a high rework on that job.

Also, some dyes are UV resistant, and others are not. I imagine the black anodize jobs that look purple now were not UV resistant dyes. That probably wasn't spec'd because they are for indoor use. Gotta also figure that the bean counters and engineers were probably only expecting these electronic components to be in use for 10 years or so, indoors. So why put an anodized part that will withstand harsh environments for 20 years on it? Lots of other factors can come into play too. Repeated cleaning with harsh cleaners could reduce the seal, oxidizing effects from ground level ozone and/or cigarette smoke, etc.

Mostly, I would suspect inferior anodizing from shortcuts. Chemicals (especially dye) are expensive and production time is always minimized because the profits are often very low per piece.
 
Indeed. Some good 'first hand' info. Good shops keep their chemical concentrations uniform and their process tanks clean. Poor shops don't and give horrible results. As in black turns to purple over time when exposed to sunlight and air (with all its constituents). The effects are exacerbated when some heat is applied, as in a working preamp or a 4-500 degree nozzle in an etcher. We worked with our anodizer to get him piggy-backed onto our ISO-9000 certification. They did a good job for us and we shared in the good results (getting more business).
 
That explains why heatsinks often get that purplish tinge on the black anodising. So what do you think is the best thing to clean an anodised surface without opening up the pores too much, but at the same time not removing screen printing. I have always just used a very mild creme cleanser like jif watered down. That seems to get off all the filth but doesn't seem to attack the anodising. That being said, I have taken champagne gold and turned it silver without damaging the lettering...marantz gold turns silver with a decent clean...
 
Back
Top Bottom