• The move to the new server is done. There are some software and database maintenance updates in process. This has us passing the hat around to help out. We appreciate any donations. Seriously, even a dollar helps. The payment page may be found here - https://www.audiokarma.org/support.html

Spray paint is a lot better than it used to be!

I use the satin black lacquer as my primary amp chassis finish, on metal. On an aluminum chassis- etching primer (like Eastwood or something similar), and then the Mohawk satin black instant-dry lacquer. Gives a very consistent, hard, good-looking finish.

It also is an excellent chemical match, to the lacquer finish found on many older electronics pieces, from the 1930s through 1960s. It will "bite" and blend with them, quite well. Great for refinishing old transformer bells and such.

https://www.mohawk-finishing.com/products/wood-touch-up-repair/aerosols/colored-lacquer-enamels/

Regards,
Gordon.
:idea: I always wanted some gloss black components.
 
Mohwak / Behlen makes a great finish. Many of their products are nitro lacquer, which is great but also tricky. If you want true "lacquer", Mohawk is about the only product out there. They sell it for touch-up and refinishing purposes only. For blending and repairing damaged finishes. The old lacquers have so much VOC content (40% ???) that their commercial use is largely bannd in the US. Rattle cans of it cannot shipped air freight. The solvents are so pervasive, that subsequent coats melt into the base. Too much at a time, and you risk melting the entire finish like an ice flow breaking up. Lacquer dries very thin. It dries very quickly, but cannot be cut and polished for quite a while.

That said, nitro colors, toners, and clears have a look all their own. For vintage pieces, they look "original" just painted. Nothing at all like it was rattle-canned. The finish has depth, not like a solid coating of plastic. I use it on antique fans with great success. On guitars, it is a premium finish that you will pay dearly for. Fender, for example, shoots their top dollar USA guitars in Mexico, since doing so is not allowed in the US. You can wet sand and blend the finish as much as you want. Down side, it is a tricky process. Not a shoot-and-scoot deal. That, and the fumes are extreme.

You can buy many of the Mohawk products off the shelf if you live near Hickory, Winston-Salem, or Greensboro. Klingspor Woodworking Shop has tons in stock; all of the woodtones for sure. If you need something else they will order it for you and you can pick it up in a week. Great thing is the price is $6.95 a can. I believe Mohawk will let you order direct. Otherwise, it can be a bit expensive to order from a custom finishing shop.

If I were doing modeling, I would absolutely use the Mohawk and experiment with full colors, toners, and clears. The result is night and day superior. I highly recommend trying it. A couple coats of toner and clear on, perhaps an airplane model, would probably look awesome and quite realistic.

I believe some of the Duplicolor touch up cans are old time lacquer as well. A throwback to the old car finishes. Some folks use them on guitars, I have read. The little Testors cans may be lacquer as well. I recall how much they stunk up a room many years ago.

For basic spray paint, I am using the Rust-Oleum 2X stuff from Wally World. It is so easy to use that even a WalMart customer can do it. Going back to the OP; yes spray cans have improved. It is almost impossible to screw that stuff up.

 
This is a pre-war Hunter Century pedestal fan refinished with Mohawk lacquer. The finish is more translucent than modern opaque paint and has a quality of depth. More subtle. The finish looks old and original. In person, it is stunning and you have no idea it was refinished from a rattle can less than a year ago.

Fan.jpg

This thing was rough when I got it.

Fan 2.jpg

She is currently standing six-foot-eight.
 
Last edited:
upload_2021-3-18_13-32-6.jpeg

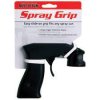
I highly recommend one of these for Rustoleum and other paint with similar nozzles.
You don't get a cramped, indented, painted index finger and it makes starting and stopping easier, like a spray gun.
And here's one for Krylon nozzles:

images
 
This is a pre-war Hunter Century pedestal fan refinished with Mohawk lacquer. The finish is more translucent than modern opaque paint and has a quality of depth. More subtle. The finish looks old and original. In person, it is stunning and you have no idea it was refinished from a rattle can less than a year ago.

that color/finish looks a LOT like an old Dazor desk lamp that I have. Cool stuff!

Hey, if you want an old Hunter table fan that I can't figure out how to fix, send me a message.
 
I just found out how bad the Rustoleom spray paint is. 4 days curing and STILL would not sand good, with 800 grit paper. I’m working on something and I need to make it smooth. Guess I’m going to end up doing a hammered spray finish instead. At least that will hide some of the imperfections.
 
I just found out how bad the Rustoleom spray paint is. 4 days curing and STILL would not sand good, with 800 grit paper. I’m working on something and I need to make it smooth. Guess I’m going to end up doing a hammered spray finish instead. At least that will hide some of the imperfections.

You are wet sanding I presume. Mineral spirits works much easier than water, at least on lacquer, and does not chemically affect the finish. At least not what I have tested. If your project is wood, then it will not swell like like with water.
 
Last edited:
that color/finish looks a LOT like an old Dazor desk lamp that I have. Cool stuff!

Hey, if you want an old Hunter table fan that I can't figure out how to fix, send me a message.

Which model do you have? Mechanically, they are simple and robust. Electrically, they can be a mystery. There is a starter capacitor or inductor since this is single phase AC. Add two or three speed single phase AC into the mix, and it gets downright crazy. If I cannot mark the connections, I measure the windings and try to sketch them out. Sometimes there is information on the Web, but usually not. Trace the "ground" side and try to figure out how the switch selects the windngs. Back in those days, there was no third prong ground. The plugs don't seem to have been polarized. ?????????. I always use a modern three prong cable and a chassis ground, just in case. No matter what the purists say.

If you show any of the windings shorted or broken, then she is probably a goner. Unless an EARLY model with open frame motor and brass blades. Those are valuable. I think GE must have had a patent ot two. The really old ones seem to be GE.
 
Which model do you have? Mechanically, they are simple and robust. Electrically, they can be a mystery. There is a starter capacitor or inductor since this is single phase AC. Add two or three speed single phase AC into the mix, and it gets downright crazy. If I cannot mark the connections, I measure the windings and try to sketch them out. Sometimes there is information on the Web, but usually not. Trace the "ground" side and try to figure out how the switch selects the windngs. Back in those days, there was no third prong ground. The plugs don't seem to have been polarized. ?????????. I always use a modern three prong cable and a chassis ground, just in case. No matter what the purists say.

If you show any of the windings shorted or broken, then she is probably a goner. Unless an EARLY model with open frame motor and brass blades. Those are valuable. I think GE must have had a patent ot two. The really old ones seem to be GE.

I dunno... it's in my storage locker, and it's a mechanical problem that I can't figure out. All I can tell you is it oscillates, has probably 10 or 12 inch blades (not brass) and is painted a cream/tan color all over. If I had to guess it gives off a 50s or early 60s vibe. Basically my ex had a cheap plastic fan in her kitchen and I took it apart to clean it because the switch was getting flaky. I destroyed it, sprayed some QD on it to clean it up and watched the plastic literally disappear. So I got on the Bay of Ee and found this old Hunter table fan as a replacement, I was trying to be nice and replace it with something cooler, it was supposedly working well when shipped but it never actually did. I found that it would work fine if I loosened the bolts holding the halves of the motor together but it would bind up when I tightened them back up. I could not see anything misaligned or tight. go figure? when we split up she literally made me take it because she didn't want any of "my old crap" laying around (she badgered me out of a nice old receiver, some speakers and a Dual turntable though, along with a neat Craftsman badged Kennedy machinist's box and a whole pile of cookware... nother story for another time though. What she doesn't know is I'd already bought a used Oppo 103D that I was going to let her keep once I took my 105 back, but she was so awful about the whole mess that now I have two Oppos and she has the Sony that she had when we met LOL If I'd known how horrible she'd be I wouldn't have let her have near the stuff that I did. And she is the one who claims she's not materialistic...)

I really don't have a use for it but it *is* so cool looking that I can't bear to set it out for the trash.
 
Shipping is the main problem with these... Maybe put it back on The 'Bay and wait for a local buyer. It should fly off the shelf for $60 as soon as someone local sees it.
 
I just found out how bad the Rustoleum spray paint is. 4 days curing and STILL would not sand good, with 800 grit paper. I’m working on something and I need to make it smooth. Guess I’m going to end up doing a hammered spray finish instead. At least that will hide some of the imperfections.
How many coats have you applied and how long between them? Have you sanded between coats? If so how long have you waited to sand after spraying? I painted a turntable base with Rustoleum and it was two light coats, wait two days, sand, two more light coats & wait two days, wet sand then two light coats-wait two more days. Then wet sand and a final light coat. Took about a week and the satin finish paint ended up looking like semi-gloss. Went all the way up to 2000 grit. Never mind the dust :)
i-f5mJHGJ-S.jpg
i-PSzf5QL-M.jpg
 
Last edited:
2000 grit is not nearly gloss and is the starting point for polishing. Semi-gloss is about right for 2000 grit. A couple of steps of polishing compound is next, along with a polisher and a deft touch. A turntable is flat, but be careful around the corners.
 
How many coats have you applied and how long between them? Have you sanded between coats? If so how long have you waited to sand after spraying? I painted a turntable base with Rustoleum and it was two light coats, wait two days, sand, two more light coats & wait two days, wet sand then two light coats-wait two more days. Then wet sand and a final light coat. Took about a week and the satin finish paint ended up looking like semi-gloss. Went all the way up to 2000 grit. Never mind the dust :)
i-f5mJHGJ-S.jpg
i-PSzf5QL-M.jpg
Two coats. Waited 4 days. Sanded with 800 grit paper. All it did was roll up like little threads. Brushed off and sanded very lightly to get it a little better. Decided after that to do a hammer finish, since this stuff was so bad. Hammer finish looks ok, but I’ve got at least 3-4 days to go and a couple more coats before I will know for sure.
 
If you're going to be sanding you've got to start with light coats, very light. The first two sets of coatings are merely to lay down a base. Time temp and humidity are factors in drying paint. With experience you can feel when the last coat is hard/dry enough to sand. Don't be afraid to start with coarser grits. On my TT I went with 320 to 400 first step then 400 to 600 then 800 to 1200 and so on. You can stop anywhere the surface seems fine to you. Having OCD is a plus :rflmao:
 
Back
Top Bottom