• The move to the new server is done. There are some software and database maintenance updates in process. This has us passing the hat around to help out. We appreciate any donations. Seriously, even a dollar helps. The payment page may be found here - https://www.audiokarma.org/support.html

SX 1250 FROM SCRATCH

Been reworking plug in boards. Replaced all electrolytic caps and transistors on the stabilizer. Rock solid 65 volts. All other voltages in spec. I will post the numbers in the morning. Recapped and replaced relay on Protection board. I used a NOS relay I found a while back. I recapped the amp boards but that's it. I'm having issues with taming DC Offset. Both amps fluctuate as much as +/- 35mv. Idle current is relatively stable. It's late now. Will post pics in the AM
 
I would not be too concerned about DC offset drifting a bit, if it is +/- 35mv, that is fine IMO
Thanks. That's reassuring, but I think I'll go ahead and replace the transistors and diodes while I'm in here and just see if there is an improvement.
 
You really need only change the differential input pair (Q1,2) and the overload detector (Q11).
I tried that first. I even had matching 992s from an AK member but the results were about the same. So I went ahead with the shotgun approach and Voila!! Now the fluctuation is about -2mv/+6mv at worst but mostly hangs around 2-4 mv. IMG_20210112_133944510.jpg IMG_20210112_133835924.jpg IMG_20210112_133922445.jpg
 
Last edited:
I even replaced the stv3 diode with one of the new German units.IMG_20210112_125839244_HDR.jpg IMG_20210112_131746883_HDR.jpg IMG_20210112_131735633.jpg IMG_20210112_131729095.jpg
 
Last edited:
Don't throw away your old STV-3 if it is still functional. Those have been obsolete for a long time.
I got it. and a few others too. One of the horns is broke off but I think its still good. One if these days I'm gonna build a test jig.....
 
Finished up the left amp with pretty much the same results...DC offset in the single digit range, 2-4mv mostly. That's a wrap for the power supply/amplifier section. Now on to the hard part....the front end boards....now the shits gonna get deep....
 

Attachments

  • IMG_20210112_175847371.jpg
    IMG_20210112_175847371.jpg
    138.5 KB · Views: 12
  • IMG_20210112_175831562.jpg
    IMG_20210112_175831562.jpg
    136.1 KB · Views: 13
  • IMG_20210112_174850136_HDR.jpg
    IMG_20210112_174850136_HDR.jpg
    142.6 KB · Views: 13
  • IMG_20210112_175857621.jpg
    IMG_20210112_175857621.jpg
    135.8 KB · Views: 13
  • IMG_20210112_180828136_HDR.jpg
    IMG_20210112_180828136_HDR.jpg
    175.3 KB · Views: 14
Last edited:
I got it. and a few others too. One of the horns is broke off but I think its still good. One if these days I'm gonna build a test jig.....
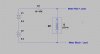
Suggestion for test jig for STV diodes, works for Zeners also:

STV_test.jpg

You can use just one battery for STVs and low voltage zeners, add a third for higher voltage zeners.
 
Suggestion for test jig for STV diodes, works for Zeners also:

View attachment 2095442

You can use just one battery for STVs and low voltage zeners, add a third for higher voltage zeners.
Lets say I'm testing an stv4 as in your diagram...One 9v battery...what value R1? And what would the meter read for a good stv4? What would it read for a bad stv4?
 
Back
Top Bottom