

-
Please note that there are a few updates and clarifications made in the Audiokarma Rules, mostly relating to advertising and the addition of the new "Paying it Forward" & "Giving back" forums in the AudioKarma Audio Marketplace section.
You are using an out of date browser. It may not display this or other websites correctly.
You should upgrade or use an alternative browser.
You should upgrade or use an alternative browser.
Show us the neatest point-to-point wiring
- Thread starter davidro
- Start date
Westy56
A symphony of paradox
Some oldschool PTP master did this one (Frannie's got this amp, now):
That's the one. :thmbsp:


fredcohiba
Super Member
Very nice work drembo.
Pio1980
AK Member
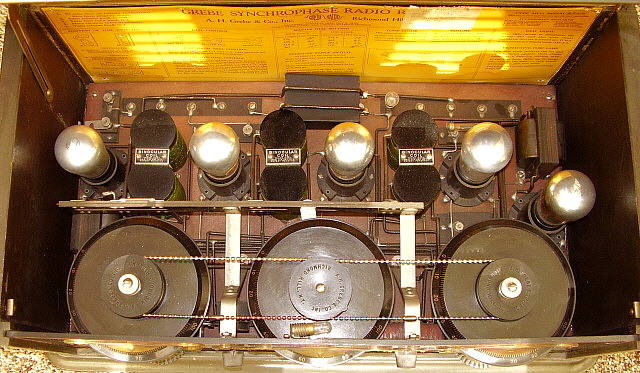
Old-old school, right-angle point-to-point buss bar wiring was pretty much normal back when. I had one of these fine examples as a teen and never forgot it.
Grebe Synscrophase with article;
http://www.radioblvd.com/Grebe Synchrophase.htm
Grebe Synscrophase with article;
http://www.radioblvd.com/Grebe Synchrophase.htm

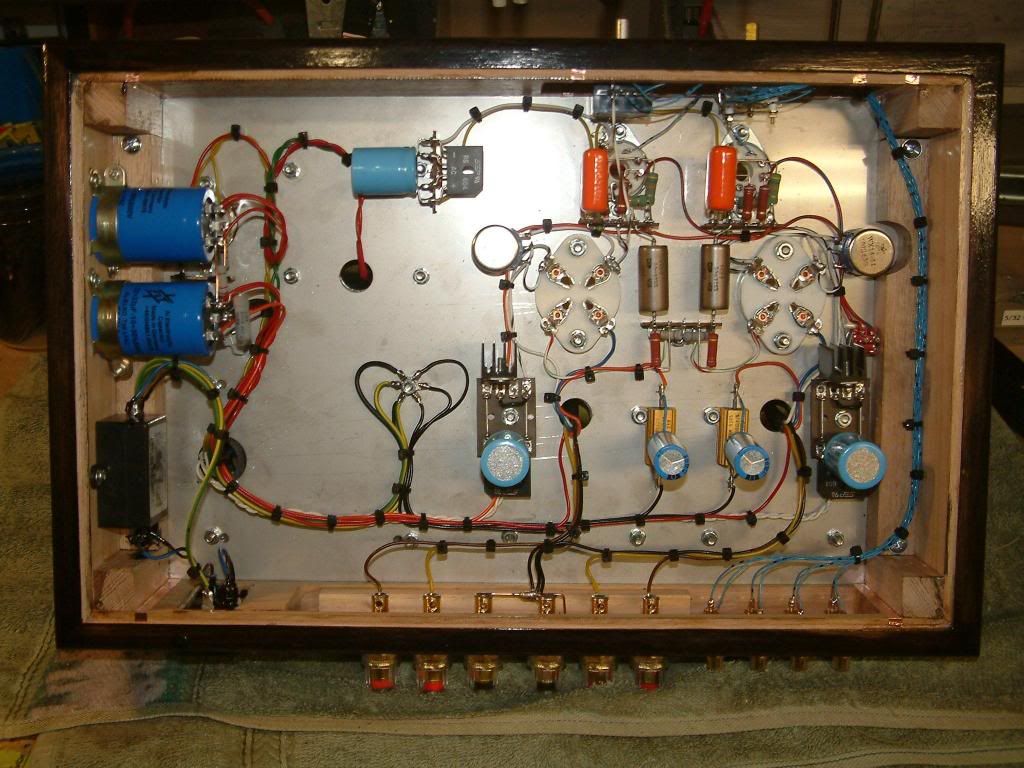
Maybe, not so Neat... But, it's a Great Sounding Phono Stage with (3) 6DJ8s and a 6X5G on 6V DC Heaters...Plus Vol. for each Channel...
A face only a mother could love. :thmbsp:
sled108
Super Member
A face only a mother could love. :thmbsp:
Well, Dad says...A Point to Point (4) Tube Phono Stage is Easier Said than Done...
Last edited:
Well, Dad says...A Point to Point (4) Tube Phono Stage is Easier Said than Done...
I know, and that's why I haven't built one yet.
")
sled108
Super Member
I know, and that's why I haven't built one yet.
Yeah, and it only took 3 years to get it that 'Neat'...
elliott66
Member of the Industry
Wow, some great examples of some fine work~
You guys are awesome! :thmbsp:
Here's a little something I build, maybe not quite as neat but I've got to do these within a time constraint so I don't sell the farm on every one.
The first one is a prototype for a balanced preamp that got stolen from the store that was demo-ing it for me. (long story..)
The second one is a 180 watt 6550 based monoblock that was commissioned by a speaker manufacturer to show at RMAF last October. This is a work in progress picture showing the top plate and 'floating' circuit board not yet wired into the base which has the big caps, choke, cooling fan and I/O jacks.
I try to engineer some sort of wire routing into my casework and make sure everything is attached (no glue!) by rivets or screws. In point to point I believe that a the shortest path between two points is a straight line. BUT- I would love to learn how to do the old-school wire harness with waxed string like some of the examples above. Lovely stuff!
Here a link to my blog about building my products: http://adventuresinmodioland.blogspot.com/2010_12_01_archive.html
Attachments


Last edited:
I don't have any audio stuff that's point-to-point with no PCBs, but FWIW I've built some very pretty stuff with all the wires neatly bundled that oscillated and had hum issues. The same circuits with completely different layout, though much less appealing, worked great. I'm not saying there's anything wrong with beautiful layout and construction, just that it's no guarantee of maximizing the circuit performance.
This is EXACTLY what Kevin Hayes of Valve Amplification Company (makers of the tube amplifiers that won Best of Show from multiple audiophile magazines at the 2014 CES show) has said to me, on many occasions. In fact, he has, as a standard practice at his factory, a procedure called "fluffing the wiring"... if an amp comes off the line that DOESN'T sound as good as the reference amp- one of the first thing that is done, is for the wiring to be moved around so that it more looks like the reference amp of its type- which, incidentally, looks relatively neat, but usually does NOT have tightly bundled runs of wires. Usually, it's a matter of the wiring having been done in TOO regimented a fashion- and "randomizing" them a bit, usually brings the amp to its maximum performance level.
In short- keeping wires from unduly coupling with each other, can be important...
Regards,
Gordon.
OTOH- here's a Heathkit AA141A that I rebuilt. It wasn't terrible before, but it was confused enough in layout/wiring that it was hard to follow- which made problem-solving and diagnosis difficult. It's much easier to work with now...

Regards,
Gordon.
Regards,
Gordon.
Attachments


MickeySmile
Well-Known Member


davidro
Lunatic Member
Is your amp good ol' point-to-point wired? Is the job neatly done?
Let's see some photos!
Here's the nudie of my Earl Weston Time Machine 300B SET:
Earle's done some modification internally:

Outside there's this nice new set of Jarrah waxed woodburns...
Poultrygeist
Lunatic Member
Bottlehead Seduction III preamp

Similar threads
- Replies
- 19
- Views
- 8K