• The move to the new server is done. There are some software and database maintenance updates in process. This has us passing the hat around to help out. We appreciate any donations. Seriously, even a dollar helps. The payment page may be found here - https://www.audiokarma.org/support.html

Who here on AK is using 3D printed parts?

I have the same vice, but so far the original pads have held up. I print a lot of TPU parts. It's super tough, and the layers are never going to separate, no matter what you do with the vice (except maybe squeeze sharp blades). I'd print those jaw pads standing up vertically and eliminate the support material. Supports are difficult to remove -especially TPU- and the process is always risky for your hands. It would be very interesting to print some specialty jaw pads, to hold round objects, or hold rectangular objects by diagonal corners. You could even make a fractal jaw vice out of it.
 
I got a printed gear for my Technics auto-reverse cassette deck. Real common failure of a plasic/rubber gear on the transport. Came from Europe, looks, fits and works perfect.
 
I like it too, looks great. Have much issues with the tpu?

Other than it being a bit of a PITA because you can't use the autofeeder, not really. I had to hang the spool on the back of the printer and hand load it, but once that was done it went smoothly. I used a generic TPU preset, and printed the covers with 100% fill, so they're solid. The main issue with it is it's considerably slower to print than the more 'normal' filaments I typically use - ABS & PETG most often.

I just finished an adapter to permit my vacuum to connect to a Milwaukee Hackzall for dust collection. It took multiple iterations to get it to match the face of the saw (it tapers and has rounded corners, and also is slightly pyramidal) - I printed short sections to match the face shape, and ultimately did the whole thing in TPU. In ABS, the prototype took ~3 hours to print; the TPU final spin took nearly 15 hours. (In the TPU's defense, I printed the ABS with infill and the TPU part is solid, but it still took an age to finish!)

The multiple angles can be seen in the part that goes against the saw's face:
Hackzall%20vacuum%20shroud%2002-X2.jpg


Yellow prints in the background are the evolving iterations I originally printed in ABS, refining the face shape then finally doing a dry run of the full part:
Hackzall%20vacuum%20shroud%2004-X2.jpg

It's not a perfect fit, and in hindsight I should have extended the collar and printed the retaining ridge I'd initially planned to to hold it to the saw face, but I think it will serve its purpose well enough to reduce the dust when we cut out the plaster ceiling at my friend's mother's house.

-Pat

 
Good day!
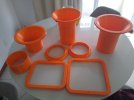
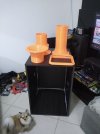
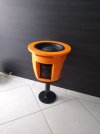
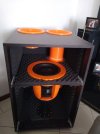
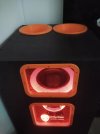
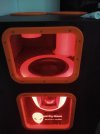
I use it all the time. I actually 3D printed my own subwoofer basket and vents.
I did this for my 6th order parallel tunned band pass box.
 

Attachments

  • Foto 11.jpeg
    Foto 11.jpeg
    77 KB · Views: 10
  • Foto 14.jpg
    Foto 14.jpg
    70 KB · Views: 9
  • Foto 18.jpg
    Foto 18.jpg
    98.3 KB · Views: 9
  • IMG_20221023_164102133.jpg
    IMG_20221023_164102133.jpg
    59.3 KB · Views: 10
  • IMG_20230429_175038855.jpg
    IMG_20230429_175038855.jpg
    66.9 KB · Views: 10
  • IMG_20230506_115936952.jpg
    IMG_20230506_115936952.jpg
    65 KB · Views: 10
  • IMG_20230508_120602747.jpg
    IMG_20230508_120602747.jpg
    69.9 KB · Views: 10
  • IMG_20230520_210752494.jpg
    IMG_20230520_210752494.jpg
    45.4 KB · Views: 9
  • IMG_20230520_210736717.jpg
    IMG_20230520_210736717.jpg
    44.6 KB · Views: 9
  • IMG_20230520_210721240.jpg
    IMG_20230520_210721240.jpg
    50 KB · Views: 10
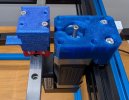
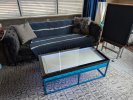
I'm about 90% finished with my latest non-audio project- a coffee table that draws patterns in sand. I use the 3D printer to make pulleys and spacers for them, motor mounts, endstop mounts, belt clamps, and a few other parts. Electronics will be mounted on the metal plate in the next couple days, and then it will get wired and be ready for testing, hopefully next week.

arrakis 3.0 frame.jpg

x sensor.jpg

motor mount.jpg
 
Last edited:
I use the 3D printer to make pulleys and spacers for them, motor mounts, endstop mounts, belt clamps, and a few other parts

Where do you buy your extruded aluminum?

Have you watched the "Aluminum Carpenter" on YouTube?
 
Where do you buy your extruded aluminum?

Have you watched the "Aluminum Carpenter" on YouTube?
I ordered some via amazon and some via ebay. In previous projects I have bought stuff at a local scrap yard for scrap aluminum price. For this project I wanted to use all new material. I cut, mill, drill, and tap the material at the Milwaukee Makerspace on a Bridgeport mill.

Never saw the aluminum carpenter. I'll take a look.
 
I had a very productive day. I updated the controller firmware and configured it for the servomotors, got the endstops working and now the mechanism is functional. I have to neaten up the wiring, wire the LEDs, and write some software to scale patterns generated for the previous table to fit this one. I also need to decide what to use for the side panels and then cut and install them. I'm thinking blue polycarbonate, but maybe something else.

 
I've had my printer for an entire five days, so still on the steep part of the learning curve. Few audio parts contemplated yet, other than some trim rings for rubber feet. You may have seen rubber feet with a central post that you pull through a hole. They're intended for thicker panels. I'm going to make a piece that gives them a better appearance around the outside and takes up enough thickness so they can be used with thin panels. Lots of ideas for other stuff, but only a few complete. Angled block to mount the outside thermometer so I can read it- you have to be square to the face, so the alcohol gets magnified. Small weathervane for the back deck. Unobtanium top hat knobs for some General Radio Corp. equipment. Chair stoppers to nail to the floor so my wife's recliner doesn't slowly move backwards. New float for the rain gauge- the old one sinks. Ring to center my spectrophotometer head on color targets. New idea- microphone adapters to calibrate different size microphones on my calibrator. No doubt other things will come to mind faster than I can make them.

Big time drag is learning FreeCAD. I've used Solidworks and hated it, so this should be no worse. Learning new software packages is tough for me, thus I tend to use the same ones for decades. I tend to be OCD and no print is perfect. There's a tendency to go back and fix very minor details and print it again. And again. The other thing I need to understand better is supports and overhangs. It doesn't seem possible to get a decent finish on the underside of an overhang. At least not for me.

I built a Prusa Core One kit from the Black Friday promotion. Seems decent. Their latest video is entertaining, regardless of what printer you've got-
 
Big time drag is learning FreeCAD. I've used Solidworks and hated it, so this should be no worse. Learning new software packages is tough for me, thus I tend to use the same ones for decades. I tend to be OCD and no print is perfect. There's a tendency to go back and fix very minor details and print it again. And again. The other thing I need to understand better is supports and overhangs. It doesn't seem possible to get a decent finish on the underside of an overhang. At least not for me.
Why freecad? There are so many other options that have a more consistent UI and are easier to learn. Try DesignSpark Mechanical or Fusion360, or OnShape.
Whatever you do, don't use Sketchup!
 
Why FreeCAD? Well, the clue is in the name. I don't do subscription or cloud-based stuff. We use Solidworks at work and I've tried the maker version but just can't warm up to it. The latest version of FreeCAD does a lot and I'm starting to get the hang of it.
 
Would any one here be interested in printing some parts for My heathkit w7? I need 4 pieces, they look like top hat grommets but they were made from plsstic or bakelite. I can send one for a sample. Please let me know if you can help me out. Thanks!
 
Back
Top Bottom